|
|
| useful? |
| yes |
|
67% |
[ 40 ] |
| maybe |
|
11% |
[ 7 ] |
| no |
|
1% |
[ 1 ] |
| mew? |
|
18% |
[ 11 ] |
|
| Total Votes : 59 |
|
|
|
|
|
|
|
|
 Posted: Thu Jan 18, 2007 2:54 am Posted: Thu Jan 18, 2007 2:54 am
|
|
|
|
|
|
|
|
|
|
|
Posted: Thu Jan 18, 2007 3:01 am
 |
|
|
|
From the start
Starting words: In this post, I'll show you how I edit the eyes when I have to start from the very beginnning.
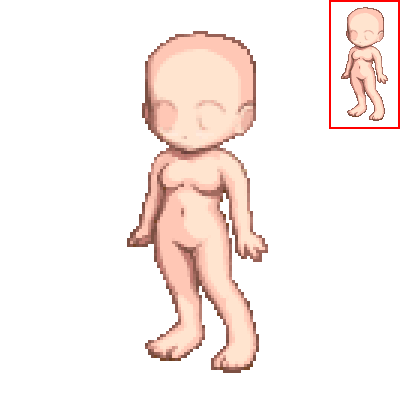
Step 1:
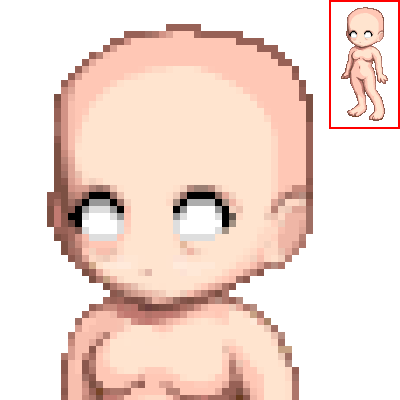
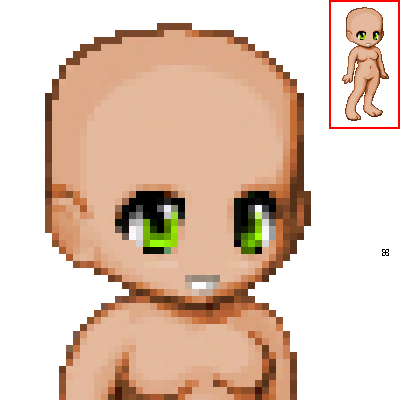
Now, open up an avatar base you want to give eyes to..
Here is the one I'm using today.
Tip: When you want to edit new eyes, but your base doesnt have the "eye area" shown (the darker areas), then you might want to go to tektek.org and get a new base (or head) from the dream avatar creator.

Step 2:
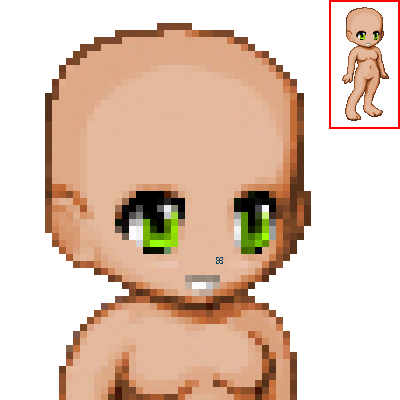
Make a new layer, then take the normal pencil tool (1 px) and draw the upper eyelashes. If you cant use layers, then you'll just have to be very careful by editing. ^^;
They don't have to look perfect right now, since we just started. ^^
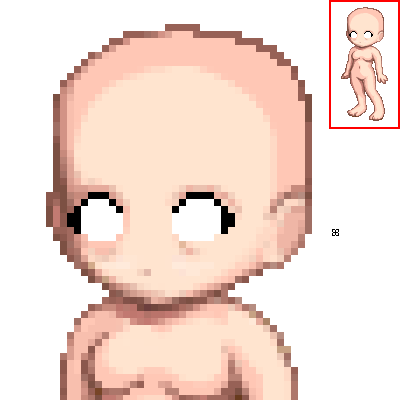
Step 3:
This step is quite easy.
Just make a new layer again, place it between the base layer and the eyelashes layer.
Use the pencil tool to fill it in with white.
Remember, that the eyes arent too big. when the white area ends 1 or 2 pixels below the lowest pixel of the upper eyelid, it should look normal. Also, most eyes are round-ish. 3nodding
For paint users: You'll need a LOT of patience with the following steps since you can not use layers or choose the pencil tools opacity. You'll just have to pick the right colors for each pixel.
Step 4:
As you all know, even eyes have a shadow.
So, we take the pencil tool again, and set the opacity to 20 - 30 %. We will use black for this step.
Select the eyelash layer and start adding darker pixels to the upper part of the white area. Only add a light shade on the bottom.
Also, now we'll soften the eyelashes a bit. Add a few pixels here and there, making the eyelid look like you want it to be. I wanted it to be a bit more round, so I added a new line of pixels to the top. I reccomend you add pixels with different opacity.
Step 5:
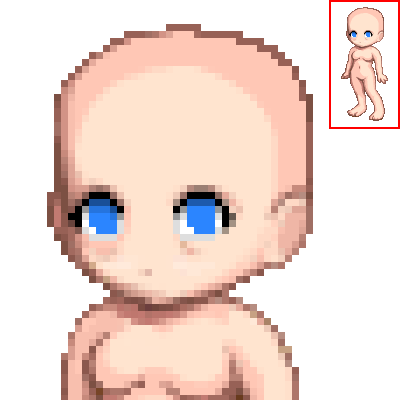
What is an eye without an iris? That's right, nothing much. rofl
So, we now add an iris. Make a new layer and place it between the eyelash and the whiteness layer. Pick a color you wish, I chose a cute blue.
All irises are round-ish, but that doesnt mean they have to be really round, just make a rectangle or square and leave out one pixel from the bottom (on one or both sides).
since the eyelashes are above the iris layer, we allready have a part of the eye shaded. SCORE!

Step 6:
As all eyes need an iris, they also need a pupil.
Take a darker color of the color you chose, which would mean dark blue for me, and make a 2X2 px (or smaller) area to the center of the iris.
Remember, even when the eyes arent open the same amount, the iris should still be at the same height. (unless.... )
Step 7:
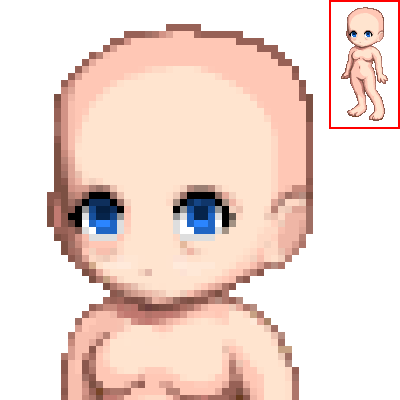
Now we shade the eye a bit more.
We're still using the pencil tool. if you wish, you may use the same dark color you used for the pupil, but set the opacity to 20 -40 %, so that you can make it look smooth. But when you like using the color chooser, go on ahead and add different shades of your original color to the eye.
Leave a small area under the pupil unshaded, since the eye should shine a bit too.

Step 8:
Now, we give the eyes a bit of shine. And we do that by placing a pixel of a lighter shade of the original eye color to the area we left unshaded in the last step.

Step 9:
This is the last step, before you can call the eye editing finished is the cleanup.
We now take the nice color named white again and add the shine to the eyes. A single white pixel in the upper left area of the eye seems enough, but it looks even beter when you add a few pixels of white with a opacity of 25 % or a bit more. ^_^
Now that we have finished making the eye shine, we'll focus on the lower eyelid. The shade of gray I had there was just not right, so I chose a fairly dark shade of the skintone and made a lower eyelid for the edit. I also reccomend you to shade it like I did, making the edges a bit softer.
And then.. the very last (I promise!) thing you should do is replacing the dark shadows under the eys with the normal skin color. if you dont do this, you'll edit will look like it is depressed or has insomnia. biggrin
The eyes might not turn out the way you want at the first try... but don't give up!
You can make smaller or bigger eyes using this method. ^^ Good luck!
|
 |
|
|
|
|
 |
|
|
|
|
|
|
|
|
|
|
|
|
|
|
|
|
Posted: Thu Jan 18, 2007 3:08 am
|
|
|
 |
Be a bit sneaky
Starting words: In this post, I'll show you how I edit the eyes when I can use a allready existing eye.
Step 1:
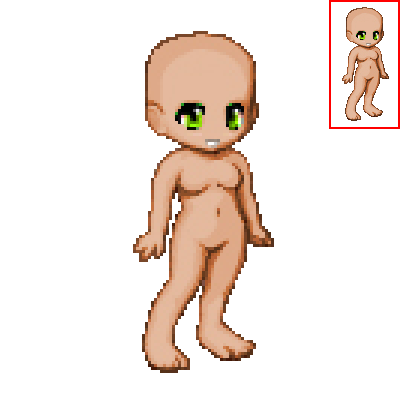
Now, open up the avatar base with the eys you want to edit.
This will be the eyes I'll edit for you today.
Step 2:
The first thing I usually do when I edit these specific eyes, is removing the green pixels from the upper eyelashes.
I also recolor the pink-ish and green-ish shades of the white area, so that they are gray. I also add a few grey pixels to the area of the upper eyelash, This will make the eye lashes a bit thinner and the eye a bit brighter.
Also, adding a few black pixels to the area where the eyelid and the skin meet, will make the eye look better. Use the pencil tool and set it's opacity to 20-40%.
Step 3:
Since I want the edit to look at something else then its nose, I moved the iris of the right eye to the right by 1 px.
I also added a green stripe to the place where the black area used to be. Plus, I added the white area of the eye, shading it with the right shades of gray.

Step 4:
When you look at the previous image, you'll see, that the sparkle on the right eye is weird looking.
We fix it by moving it to the right by 1 px.
Also, shade the iris again, considering the shading style of the original eye.
It now looks good enough to be used, but I will show you one more trick in the next step.

Step 5:
Select the 2 lower pixels of the eyes and also 1 pixel line of the skin. If you are using photshop, press ctrl + J. After doing this, move the duplicated pixels up by 1 px.
If you are using paint, do the same but wthout duplicating, since you can't do that. Fill in the empty are with the right skin color.
When the eyelashes are too long, just edit them to look good.
The eyes might not turn out the way you want at the first try... but don't give up!
|
|
|
|
|
|
|
|
|
|
|
|
|
|
|
|
|
|
|
|
|
|
|
|
|
|
|
|
|
|
|
|
Posted: Thu Jan 18, 2007 8:40 am
|
|
|
|
|
|
|
|
|
|
|
|
|
|
|
|
|
|
|
|
|
|
Posted: Thu Jan 18, 2007 1:10 pm
|
|
|
|
|
|
|
|
|
|
|
Posted: Thu Jan 18, 2007 2:01 pm
|
|
|
|
|
|
|
|
|
|
|
|
|
Posted: Thu Jan 18, 2007 5:34 pm
|
|
|
|
|
|
|
|
|
|
|
Posted: Thu Jan 18, 2007 11:22 pm
|
|
|
|
|
|
|
|
|
|
|
|
|
Posted: Fri Jan 19, 2007 4:00 am
|
|
|
|
|
|
|
|
|
|
|
Posted: Fri Jan 19, 2007 6:50 am
|
|
|
|
|
|
|
|
|
|
|
|
|
|
|
|
|
|
|
|
|
|
Posted: Sat Jan 20, 2007 3:38 am
|
|
|
|
|
|
|
|
|
|
|
|
|
|
|
|
|
|
|
|
|
|
|
|