You will need:
-Adobe Photoshop or a similar program
-A general understanding of how to edit with Photoshop
-A general understanding of layers
-Familiarity ith the Magic Wand tool
To begin:
Block in your flat colors, minus the patterns. Remember to make use of different layers for different parts of the outfit, and all that, and use the pencil... all this was covered in my first tutorial.
Next:
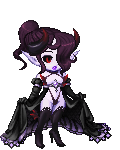
Draw in your patterns and designs. I like doing this on layers above the flats (one for each piece of clothing). This pattern can be anything - embroidery as seen here, plaid, polka dots, a floral print (I used this technique on the apron for my V-cooks-breakfast edit), even lace. I won't give instructions on how to draw your pattern, because this method of shading is so versatile and there are many different ways to draw different kinds of patterns.
After that:
Make a new layer above everything, and turn off the visibility of the avatar base. Using the Magic Wand tool with the 'Use All Layers' box checked, select the white area around the clothes. Hit shift+ctrl+I to invert the selection, and fill the selection with 50% gray, so you now have a gray silhouette of the avatar. Then go to your Layers palette, and set the layer mode to Hard Light (the drop-down menu to choose this is at the top of the palette, just below the word 'Layers'). The gray will disappear. Deselect, and check the box for Lock Transparency. Oh, and turn the base back on.
And now, the shading:
Decrease the opacity of the Hard Light layer to 50%, and paint in shadows and highlights with regular black and white. Smudge them until they're smooth and look good to you.
Shading part two:
Duplicate your shading layer and change it from Hard Light to Soft Light, then decrease the opacity to taste. Here, it's at 41%.
Color Correction:
Since Hard Light with regular black and white tends to decrease the overall saturation of the colors, you'll want to play around with the color settings here. Go to Image->Adjustments->Color Balance, and play with the sliders until it looks good - this step will be different for every avatar edit; on mine I added more yellow to the midtones and highlights and more red to the shadows, but yours will be different if your avatar is different colors. You might try playing with Brightness/Contrast too.
That's the last step! Add your logo and you're done!
Notes:
Don't take this to be the only way to do this sort of thing. By all means, try out different layer settings besides Soft Light and Hard Light. Overlay, Linear Light, and Vivid Light are all viable options, but they need different opacity and/or fill settings, so play with that. Have fun with it, and keep experimenting with different light until you get something that looks just right.
 I hope its okay to post ^^;;