|
|
|
|
|
|
|
|
|
 Posted: Wed Oct 05, 2005 7:12 pm Posted: Wed Oct 05, 2005 7:12 pm
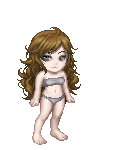
Right. So I decided I'd make a tutorial of how I do my edits, since I'm working on an edit right now... and hey, how hard can writing up a tutorial be? Anyway, here's what I do. First off, I use Adobe Photoshop CS, though Photoshop 7 works just as well for editing purposes (indeed, the only differences in the program are those which do not matter for the purposes of my avatar editing). Ergo, this tutorial is equally effective and understandable for users of Photoshop 7 as it is for users of Photoshop CS. Here's what my workspace generally looks like while I am editing: Have a look.Note the zoom level on the edit, and the prominent position of the reference picture. I edit at 500% zoom, but I often zoom out to 100% to see how things look. You should zoom out after every step to make sure your edit looks good, but zooming in is a great help with precise work - especially if you have to use a mouse instead of a tablet. Instructions in this tutorial assume you know at least a few things about Photoshop. For lesser-known things, I will direct you to them in shorthand. Rather than write "In the Edit menu, under the Transform submenu, select Free Transform," I will write "Select Edit>Transform>Free Transform." Before You StartOur edit subject today is Inuyasha - not because I'm a particular fan, but because someone commissioned him from me, and I thought he'd be a good tutorial subject. Before you start editing, GET A REFERENCE. Nothing is worse than editing something from memory and then having the embarrassment that all your hard work turned out to be inaccurate. This should do nicely - good pose, shows absolutely everything on the edit... Right, so the first thing you'll need is a base. And thanks to a load of Gaia avatar glitches, we have them! These are the actual naked images onto which Gaia superimposes clothes - real, honest-to-goodness avatar bases. Note the lack of arms on the back poses - this in intentional, so they may be re-drawn at will if you so choose. And since arms are very easy to get from your own equip screen (ask a friend if you need a different gender or skin color), well... it's more advantageous for the editor to be provided with an armless base than with an armed one! Step One: The Face.So we have our base now. It badly needs eyes, and maybe a mouth. Thankfully, the user named Saikatsu has created the Gaia Avatar Simulator, which can provide them easily if you're okay with using the original Gaia faces (reccommended for beginners). Don't be afraid to cross gender lines, and slap male eyes and/or mouth on a female avatar, or vice versa! However, our edit subject (the lovely Inuyasha) has eyes whose appearance can't quite be duplicated with existing Gaia ones. This is a problem, because eyes are notoriously tricky to make from scratch (there's a reason most edits have their original eyes)! I'm no expert on eyes, so I'll just share what I know before I set you on the editing: If you make your own eyes, be sure they're about the same width as Gaia eyes. The irises (colored part) are large and prominent, and there are ALWAYS pupils. Leaving your eyes pupil-less will give your avatar edit a blank look. Oh, and make sure you put in at least one highlight in each eye! Right, I'll shut up and tell you how to actually put eyes on him now. First, make a new layer and call it 'eyes' or somesuch. Take the pencil tool in pure white, and draw in the general shape of the eyes. It looks creepy, I know. Then, put in the irises (colored bits). To do that: In the 'Layers' palette, there's a button that looks like a little checkerboard next to the word 'Lock.' Click it - it prevents you from coloring outside the lines. This button will be your best friend when editing. 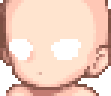 This is what mine looks like. See how I'm zoomed way in? After it's clicked, brush in the irises with a one-pixel Paintbrush tool. Make sure the edges are relatively sharp, since real Gaia eyes are like that. Irises on Gaia are more or less circular, but the one on the 'far' eye should be more ovoid due to perspective. Add eyelashes in black with the same brush. Don't worry if you end up obliterating most of the white. Now, take the original iris color and set the brush mode to 'Multiply.' The menu you want is right between the brush selector and the 'opacity' slider, at the top of the screen. With the brush in this mode, go over the iris at the edges, particularly the top edge, to add shading. Now, set your brush back to 'normal' and add a pupil in black. 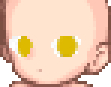 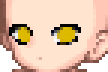 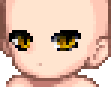 Last step on the eyes: Highlights. Unlike the highlights on Gaia avatar hair and clothing, eye highlights (properly known as 'speculars') more often go closer to the far side of the avatar than toward the 'near.' See the example for what I mean - more on highlights and shading in the 'clothing' section. There are 3 existing Gaia eyestyles with near-side highlights, and 5 with far-side. Don't go overboard with your highlights, unless you're editing Sailor Moon. But hey... these eyes look kinda like they were just pasted on, don't they? To remedy that, duplicate the Eyes layer. Move the copy below the original, and switch to the Smudge tool, with a one-pixel brush. Smudge JUST A LITTLE around the edges of the BOTTOM eye layer to add realistic shadows! Merge these two 'eye' layers and you've finished the hardest part (at least for me!) 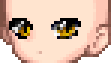 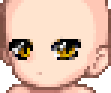 And hey, he needs some eyebrows, doesn't he? Again, make a new layer. Draw in the eyebrow shape in pencil, following th reference picture as best you can. Since Inuyasha's eyebrows are just black, that's the color we will be using - but it looks so plain! Once you have the shape right, lock the transparency on the eyebrow layer and add a careful line of dark gray right down the middle of each eyebrow to make it more 3D. And how about a mouth? Mouths are easy, really. Just use a one-pixel pencil (on a new layer, of course!) to draw in a line. Don't worry about shading on the mouth - once you zoom out, shading only makes mouths look bad, unless there's lipstick involved. Congratulations: You have finished the face! 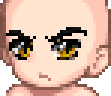 Trick Lucca Uses: Layers can be grouped into sets for easy organization! Select Layer>New>Layer Set, and click OK. In your Layers palette, you can place your layers into a set by clicking and dragging them onto the folder icon of a set. Sets can be opened and closed, which helps a lot with keeping track of things - less to look at all at once!Step Two: The Hair. Trick Lucca Uses: Layers can be grouped into sets for easy organization! Select Layer>New>Layer Set, and click OK. In your Layers palette, you can place your layers into a set by clicking and dragging them onto the folder icon of a set. Sets can be opened and closed, which helps a lot with keeping track of things - less to look at all at once!Step Two: The Hair.Hair is what gets a lot of people worried, because it takes so much practice. But with enough practice, it could become your favorite part - that's how it worked for me! The trick, if there is one, is to use a one-pixel brush. I guess. Sort of. Like always. Start by blocking in the basic shape of the foremost part of the hair - the part that will cover the avatar's face and, in this case, clothing - with pencil. Again, make a new layer. ALWAYS make a new layer. If I tell you to block in a basic shape and neglect to mention this, I forgot, so do it anyway. Trick Lu Uses: For very light hair and clothing, using the light shade of the clothing itself can make thing difficult to see when blocking in the shapes. But who says we have to use the real color? It IS Photoshop, after all! I often use bright (but not blinding) red, since it contrasts well with avatar skin, for my shape-drawing. After I'm sure I have the shape JUST RIGHT, I use the Paint Bucket tool to make the base color what it's supposed to be. Nifty trick, huh?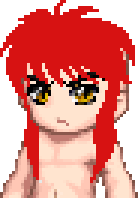 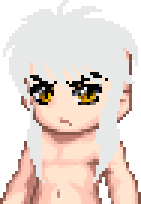 Right, now that you've got the hair base down, it's time to do a bit of shading. Lock the transparency of your 'hair-front' layer, and pick a darker shade. In this case, it's 50% gray. Time again for that one-pixel paintbrush. Go all around the very edge of the hair with this brush. For Inuyasha's hair, there's a poofy bit at the front - at the top-center part of this poofy bit, add a starburst-ish shape in the 'shading' color. Also, add a few flowing lines to suggest hair.  Okay, time for highlights! For Inuyasha, th highlights are pure white - for other characters, they will be a few shades lighter than the base hair color, and also a few shades brighter. Some people cheat by using the Dodge tool, set on Highlights mode, for their hair speculars, and indeed, that tool can be used to great effect - but some people don't like it. Anyway, highlights always go in a ring shape around the head, with the lowest point at the middle of the forehead and the highest points above (and a little behind) the ears. But DO NOT brush this 'halo' in horizontally, across the hair! Follow the direction the hair is going - to progress horizontally, pick your pen up and move a little to the side, then brush down again! Hair highlights are very tricky, so don't get discouraged. 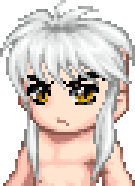 Well, that does it for the FRONT of the hair. Now we need to do the hair that's BEHIND him. For this, create a layer behind the layer that has the edit base, and pencil in the long, flowing hair that's earned this guy so many fangirls. But... there's a piece of his head sticking out. That's no good. Go to your Body layer and erase the piece of his head that shouldn't be visible - and get rid of that human ear sticking out on the other side, too; it shouldn't be there. Now that you've got it unblocked, go back to your 'hair-back' layer and do the same thing you did for the front in terms of highlights and shadows. Keep fiddling with both parts of the hair until they look good to you! 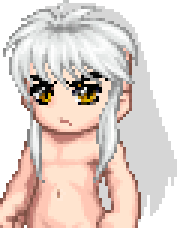 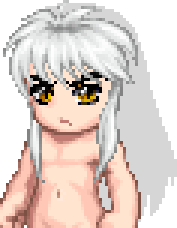 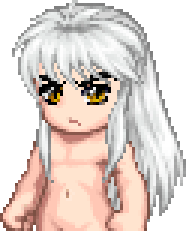 Trick Lu Uses: Don't overuse Smudge! The Smudge tool should be used primarily for smoothing over mistakes - try to keep a generally cel-shaded look to your avatar edit, in keeping with real Gaia avatars!More on hair Trick Lu Uses: Don't overuse Smudge! The Smudge tool should be used primarily for smoothing over mistakes - try to keep a generally cel-shaded look to your avatar edit, in keeping with real Gaia avatars!More on hairOnto part two - Posing!
|
 |
|
|
|
|
|
|
|
|
|
|
|
|
|
Posted: Wed Oct 05, 2005 7:13 pm
Okay, we've just edited a head! Now, before we go for the clothes, we'll have to make our model pose properly. This pose job is a way simple one - all that needs to be changed is one of his arms. Step Three: Posing. (Optional)  Before we begin: Gaia avatars have different proportions from normal human beings (or, for that matter, dog-demons). A Gaia chibi is three heads tall, approximately. The torso and legs are each about a third of the avatar's height. The elbow comes at about the level of the bellybutton, and the hands are level with the hip-to-waist area. For the legs, measure three segments: crotch to knee, knee to ankle, ankle to floor. These segments are all about the same length. Gaia feet are large - slightly shorter than the shin. But we're concentrating on the arm right now.  Gaia skin is shaded in four different colors: Light, Medium, Dark, and Darker. Light and Medium make up most of the skin, Dark is used for shadows, and Darker is used for outlines. Remember this, and don't deviate from it. Also, Gaia avatar skin is drawn with a distinct cel-shaded style, so Smudge and Blur should be used VERY sparingly here, if at all. As previously stated, the light source is located near the front shoulder, so that's where most of your highlights should be. On to the actual editing! First, we take off everything below the elbow on the arm we want to change the position of. We won't need it - we'll be drawing in a whole new arm, so our subject won't remain an amputee for long. Now, like before, create a new layer (Are you using sets? See what I mean about them making organization easier?) and draw in the basic shape of the forearm of the avatar. As with the hair, this is drawn in pencil. Oh, I almost forgot - make this shape in the 'Medium' color.   Time for shading! Start by going over the outline of the shape in the 'Dark' color (after locking transparency, of course!) and adding in a shadow. Remember, shadows are on the far side of the avatar. Then, pick the 'Darker' color and carefully go around the very edge of the arm. DO NOT use 'Darker' to add more intense shadows - it'll wind up not being true to original Gaia avatar design. 'Darker' is ONLY for outlines. Next step: Highlights! Select the 'Light' color and brush in an area of lighter skin where the light would hit it. Repeat what you just did for the arm to add the hand. Look at the hand in your reference for the general shape of the hand, but make the fingers chubbier. Also, on Gaia hands, sometimes only three of the fingers show - don't fret if you can only fit in three chubby fingers without making the hand too big! Better to have three fat fingers on a Gaia avatar than four thin ones.   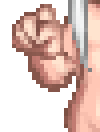 Tip from Lu: The highlights are not more intense on the near side of an avatar than on the far side, but they ARE larger and more numerous, and the shadows are smaller! Examine an avatar base - the 'near' arm is almost halfway taken up by highlights, and shadows are nearly nonexistant, while the 'far' arm is almost completely devoid of highlights, and has visible shadows. Also, don't forget to add shadows where light would be blocked by another body part, like between the legs! Tip from Lu: The highlights are not more intense on the near side of an avatar than on the far side, but they ARE larger and more numerous, and the shadows are smaller! Examine an avatar base - the 'near' arm is almost halfway taken up by highlights, and shadows are nearly nonexistant, while the 'far' arm is almost completely devoid of highlights, and has visible shadows. Also, don't forget to add shadows where light would be blocked by another body part, like between the legs!Right, at this point, Inuyasha started yelling at me to put some clothes on him. So let's get started on that... Step Four: Clothing.I picked Inuyasha for this tutorial because his clothing is very simple. While there are some interesting folds and such, the majority of what he wears is just that red... thing. So, here we go - the part because of which most editors begin editing: I'm going to sound like a broken record here, but the way to start clothing is... yes, to make a new layer and draw in the shape with Pencil. But since most clothing has multiple layers, you'll want to do this multiple times. The top layer of clothing is generally the one you want to do first, for the sake of convenience and efficiency. This is because once you have the top layer of clothing, you can add new layers behind that layer and only pencil in the parts of the clothing that show through. Note our model: Red part, since it's the top layer, comes first, then after that, the white underrobe thingee. It's barely visible at the neck and shoulders of the red part. Also, note that his hair comes in front of the clothing in places, and goes behind in other places! That, in case you were wondering, is why hair is on two different layers: so the clothing can be created between the two hair layers.  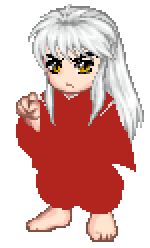 Okay, so we've got our clothing flats now. Time to add outlines and shadows. Take a darker color than your basic red, and brush in the outlines of where the folds and seams are: between the legs, on the sleeves, at the waist, etc. Make sure to check that they're all in the right place - you can do this by disabling the visibility of the 'Clothing' layer. Trick Lu Uses: By lowering the opacity of the Clothing layer so you can see the body beneath it, you can easily trace where the folds should go. Turn down the opacity of the 'clothing' layer to about 75%, and trace in your folds where the elbows, waist, and crotch should be. Now turn it back up to 100% - presto! Accurate seams and folds! Much surer than eyeballing it.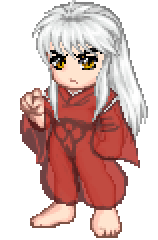 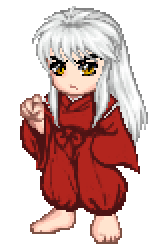 Okay, now for shadows! Like skin, clothing has four shades: Light, Medium, Dark, and Darker. The shade you just now used to outline the folds will become your Dark shade - use it to brush in the large areas of shadow. Don't worry about obliterating the lines you have now, they were just guidelines. After you have the shadows there, you may opt to use Smudge to soften the edges just a bit, but don't overdo it, and be sure to leave some sharp edges! It winds up looking better. 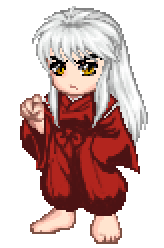  Now, the outlines. You may want to turn the opacity down again, but I find that my shadows are a good enough guide as to where to put outlines. Take a shade even darker than your shadows, and brush them in, one pixel wide. Be sure to make an outline around the very edge of the avatar, too. Note: Unless the clothing itself is black, the outline SHOULD NOT BE BLACK!  Highlights on clothing are tricky. Too few can make your edit look flat, and too many can make it look shiny when it's not supposed to. For matte fabrics, brush in just a few subtle highlights, then gently smudge them just a little. For shinier things, use a brighter highlight color, and add more highlights with less smudging. Shiny things also might have a very subtle lighter spot right near the far edge, where you'd expect the shadow to be darkest, but this fabric isn't like that - go matte. And once you finish the top layer of clothing, add some shading on the bottom layer for completeness. Don't be afraid to go back and tweak your shadows and highlights even after you've painted and smudged them!  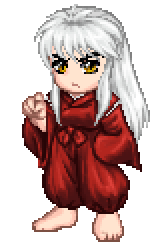  Next up: Details.
|
|
|
|
|
|
|
|
|
|
|
|
|
|
|
|
|
|
Posted: Wed Oct 05, 2005 7:14 pm
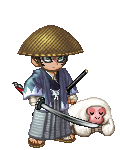
Step five: Accessories, items, and fiddly bits.Almost done! This edit does look strikingly like Inuyasha, but it's missing some key things: The ears, the necklace, the stitching on his sleeves, the scabbard... and speaking of which, that huge-a** sword is also notably absent. Let's remedy that. Since I trust you've at least gotten an idea of how things should work, I'm going to skip lengthy explanations and just give you the short version for everything except the sword. See if you can figure out how to get it right. Ears go on a new layer just behind your 'hair-front' layer. Pencil them in with light gray - not too big! We don't want him to wind up looking like a catboy. Shade them with darker gray and highlight them with white. For the pink inside them, I used the same color as the skin's "medium" and "dark" shades. 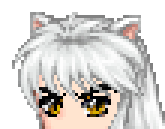 The sleeve stitching may be done in either pencil or paintbrush - your choice. I did mine in paintbrush, but whatever tool you choose, the sticky-out bits at the ends MUST be in pencil, to preserve the sharp, pixilated edge of the Gaia avatar. Don't bother shading these bits - it only makes 'em look weird.  The scabbard is a bit trickier. It goes underneath the sleeve of the red thing - I'll call it a 'robe,' I guess - and continues behind. New layer. There are three ways to deal with this. The first way is to draw in the top of the scabbard and the string it's attached to, then leave a blank space where the sleeve would cover it, then draw the rest. This way is the simplest, but sometimes result in lines not connecting properly. The second way is to draw the whole scabbard in, then erase the parts that would be covered by the sleeve. I used this method. The third way is to draw the scabbard in, then copy the parts of the sleeve that would cover it and paste them onto a new layer above the scabbard. This method is best used if what you're editing involves heavy smudging. Don't forget to shade the scabbard with a bit of gray!  Bead necklaces like this one can be maddening things to edit, since the avatar has so little space on which to do them. I have no real advice to give other than to keep fiddling until you get it right. Oh, but the two fang thingees should be on a separate layer from the blue beads, so you can shade them with locked transparency. That, and zoom WAY in. 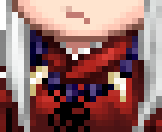 Now, onto the sword. I find weapons extremely difficult to edit, for some reason. And this sword is a doozie! Let's begin by penciling in that fluffy bit (new layer, above everything else). Use a light tan for it, and carefully go around the hand. We can't go behind because then it'd go behind the clothing, which we don't want. Shade the fluffy bit as you would hair, but don't highlight it. 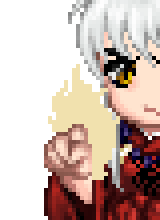 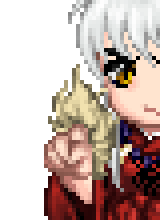 Now, the handle. New layer, above the fluffiness layer. Add the black of the handle where it protudes from Inuyasha's grasp, and add a few bits of gray to suggest the wrappings. New layer - pencil in a brass-colored pommel, and shade it a little with the paintbrush. Further shading on this part can be expedited by using the Burn and Dodge tools, set on Shadows and Highlights, respectively. These things are great for metallic surfaces.  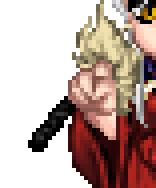   Finally, the blade. Create a new layer BEHIND everything else - that includes hair, clothing, body... everything. Pencil in the blade of the sword. Smooth lines are tricky with pixels, but well worth the effort: practice, practice, practice. I used 50% gray for this sword, but sometimes just a tinge of blue can enhance the effect. Take a shade of gray significantly darker than 50% and outline the blade with the One-Pixel Brush tool, after locking transparency. Draw a smooth line down the middle of the sword, all the way to the tip. This line can and should be a bit messy on the bottom side, because it'll get heavily smudged. In fact, let's do that now. Smudge the bottom part of the messy line until it blends smoothly to 50% gray, but be sure not to disturb the top edge of the line! 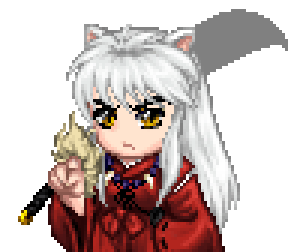 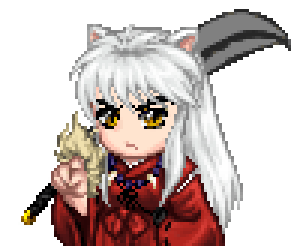 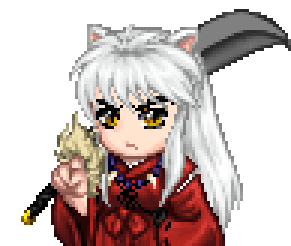 Time for highlights on the shiny metal! I created a new layer above th blade I had so I wouldn't disturb the shadows when I smudged the highlights. Brush in a messy-ish strip of white along the top edge of the blade, then smudge the lower part of that strip of white just like you did the shadows in the last step.  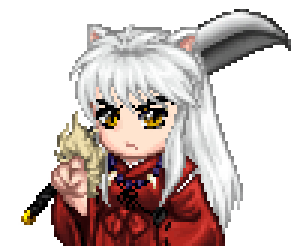 Now create another new layer, and paint in a few diagonal lines on the top part of the blade, and a few more on the bottom part. These lines should form a sort of a chevron shape pointing toward the tip of the sword. Add another line of white just above the line of black going down the sword's middle. Smudge the hell out of them - almost to the level you can't see them anymore. This is what makes sharp, metallic objects look sharp and metallic: diagonal lines of shininess. I felt my sword was just a bit too shiny, so I fiddled with the brightness and contrast one I was done until it looked good to me. 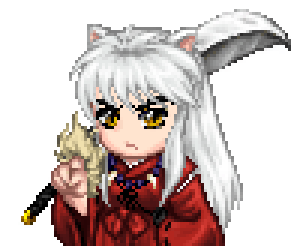 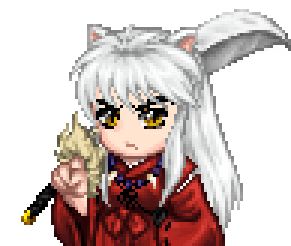 Now, look over the edit to make sure there's nothing you missed... oops! there's something! His hair casts no shadow on his forehead! That's easily remedied. Make a new layer just below the front of the hair, and brush in a thin outline of black where hair meets face. Set the layer opacity to 33% - there! Shadows!  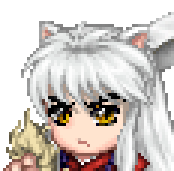 You're done! You're done! Done done done! If you have a logo, now is the time to slap it on - many editors choose to place their logo so it obscures a part of the edit, thus further discouraging art theft, but I prefer to leave all of my hard work visible. The finished product: 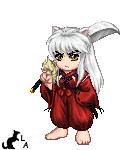
|
|
|
|
|
|
|
|
|
|
|
|
|
|
|
Posted: Wed Oct 05, 2005 8:20 pm
sweet you should make something like this for people that are going to get tablets 3nodding
|
|
|
|
|
|
|
|
|
|
|
|
|
|
|
|
|
|
Posted: Thu Oct 06, 2005 3:42 am
I'm sure it applies wether you've got a tablet or not, sharpie. All of the tools are the same.
Nice little tutorial there, Lucca, very inciteful. 3nodding
|
|
|
|
|
|
|
|
|
|
|
|
|
|
|
Posted: Thu Oct 06, 2005 6:00 pm
Right, so I'm just now posting pictures of what I have so far...
|
|
|
|
|
|
|
|
|
|
|
|
|
|
|
|
|
|
Posted: Thu Oct 06, 2005 6:11 pm
Eep, I forgot to zoom out on those screenshots! *pops back to Photoshop*
|
|
|
|
|
|
|
|
|
|
|
|
|
|
|
Posted: Thu Oct 06, 2005 6:13 pm
Vorty I'm sure it applies wether you've got a tablet or not, sharpie. All of the tools are the same.
Nice little tutorial there, Lucca, very inciteful. 3nodding
|
|
|
|
|
|
|
|
|
|
|
|
|
|
|
|
|
|
Posted: Thu Oct 06, 2005 6:33 pm
cool its inuyasha, hes sorta hard for his pants
|
|
|
|
|
|
|
|
|
|
|
|
|
|
|
Posted: Thu Oct 06, 2005 6:52 pm
Lucca got skills.
As always. ^_^
Seems like a pretty good tutorial. I'm anxious to see the next part.
|
|
|
|
|
|
|
|
|
|
|
|
|
|
|
|
|
|
Posted: Thu Oct 06, 2005 7:27 pm
|
|
|
|
|
|
|
|
|
|
Posted: Thu Oct 06, 2005 7:33 pm
Lucca, I love you. I always over smudge cause I don't understand the highlights. Now I do, at least for hair...
*is eagerly awaiting more*
|
|
|
|
|
|
|
|
|
|
|
|
|
|
|
|
|
|
Posted: Thu Oct 06, 2005 7:43 pm
Clothes might be tomorrow... might be Monday!
Oh, and Vorty - I just noticed you misspelled 'insightful.'
|
|
|
|
|
|
|
|
|
|
|
|
|
|
|
Posted: Sun Oct 09, 2005 5:15 pm
|
|
|
|
|
|
|
|
|
|
|
|
|
Posted: Sun Oct 09, 2005 9:01 pm
lucca your such a spell freak xd
|
|
|
|
|
|
|
|
|
|
|
|
|
|
|
|
|
|