|
|
|
|
|
|
|
|
|
 Posted: Wed May 31, 2006 10:42 am Posted: Wed May 31, 2006 10:42 am
Behold! Tutorials for you, from me, with love. <3
All art here is copyright m a r l o w, steal and die a violent death. O:<
If there is a tutorial you would like to have me do, a question you have, or just a nice compliment, post it! <3
|
 |
|
|
|
|
|
|
|
|
|
|
|
|
|
Posted: Wed May 31, 2006 1:02 pm
HOW TO COLOR / / (with OpenCanvas)STEP 000.5 :: Supplies
Things you will need:
- A tablet (Wacom works for me)
- A scanner (200 dpi minimum, or whatever works for you)
- Some kind of coloring software. The one I'm using in this tutorial is openCanvas4.06E... you can download a trial or snag a copy online for free.
STEP 001 :: Scanning or Sketching your image
There are two ways to go about this step:
1) You can sketch your art in analog (my lingo for RL paper and pencil)
and scan it into your computer.
2) Do it digitally, and sketch your pic right on your comp. After cleaning it up a bit.
- Resize your sketch to 1000 x 1000 px or more. This is the ideal quality for a headshot sized image, but for anything bigger, make it bigger.
STEP 002 :: Setting up Sketch & Outlining
Next, open your sketch in oC. Its should set as Layer 1 / Standard.
Set the Opacity level on this layer down to about 30%. We do this to trace the lines and be able to tell the sketch (grey) from the outlines (black).
Next we create a new mutiple layer, and select the pencil bursh at about 3.0. (make sure your color is set to black!) We now outline the sketch. Take your time! Try to make a smooth, flowing line. Not a choppy and rushed one.
This is what the final outlined piece should look like:
STEP 003 :: Adding Basic Color to Skintones
We now make another multiple layer and select the watercolor brush at about 16. Choose your color, and put in the darker highlights for the pic.
This is where all the shadows are, and where the darkest colors on her skin are going to be used.
Add a little more dark to the shading areas, and now pick out a neutrual color for the area that are not really dark and not really light.
TIP: In skintones, white is your best friend. For all the highlights and such, use white or a color very close to it. As well when coloring, use a wide range of colors that go from dark to light. For skintones, I don't suggest you use any pinks, but more into the oranges.
Add more neutruals and darks, smoothing everything out. Add a slighty pink color for the lip, and color for the eye.
Next, create a Standard layer, and using the pencil tool, add white highlight to the nose, eyes, and lips. Keep in mind the directionality of light.
STEP 004 :: Adding Color to Hair
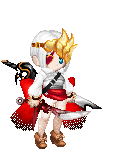
Make another multiple layer. This character has white hair, so I select a color that's almost a light bluish-grey and outline the hair's dark highlights, leaving white where the light highlights should be. To give it more contrast, I add a darker grey at the tips of the hair. Finally, I add the colors for the eyepatch.
Add a signature, and then we're done! c:
|
|
|
|
|
|
|
|
|
|
|
|
|
|
|
|
|
|
Posted: Fri Jun 02, 2006 7:48 pm
nice dude!!!, very cool, i will possibly use this in za future!!! but i was wondering...why is this in the "useless" subforum gonk this is definitely NOT useless, and maybe another subforum should be made for "helpful things" or "Tutorials" or something of the sort...because this is really uber cool.
i was also wondering, could we ask you questions and whatnot if we're having trouble? sweatdrop
b/c i was wondering, on which layer and such (or when) should i be cleaning up the drawing, such as sketchy lines
and again, i think it's AWESOME that you took the time and effort to do a whole tutorial for us!!this is reallly coool. *hoping to see more*
|
|
|
|
|
|
|
|
|
|
|
|
|
|
|
Posted: Sat Jun 03, 2006 5:13 pm
[ killjoy ] nice dude!!!, very cool, i will possibly use this in za future!!! but i was wondering...why is this in the "useless" subforum gonk this is definitely NOT useless, and maybe another subforum should be made for "helpful things" or "Tutorials" or something of the sort...because this is really uber cool. i was also wondering, could we ask you questions and whatnot if we're having trouble? sweatdrop b/c i was wondering, on which layer and such (or when) should i be cleaning up the drawing, such as sketchy lines and again, i think it's AWESOME that you took the time and effort to do a whole tutorial for us!!this is reallly coool. *hoping to see more*
I put this thread here because it didn't fall under either of the other catagories, and all I'd need is a place to put this stuff. I'm glad you like the tutorial though. c:
|
|
|
|
|
|
|
|
|
|
|
|
|
|
|
|
|
|
Posted: Sun Sep 17, 2006 9:45 am
 Nice thread. <3 It really motivated me to try and color in photoshop again. On a more serious level, that is. I believe I'm ging to try and snag a copy of oC from a friend.... Nice thread. <3 It really motivated me to try and color in photoshop again. On a more serious level, that is. I believe I'm ging to try and snag a copy of oC from a friend....
|
|
|
|
|
|
|
|
|
|
|
|
|
|
|
Posted: Sun Sep 17, 2006 2:40 pm
|
|
|
|
|
|
|
|
|
|
|
|
|
Posted: Fri Sep 22, 2006 5:49 pm
I absolutely love you for this.
You are an excellent artist and I am honored and estatic to see how it's done by a pro whom I idolize.
Thanks for the recommended "openCanvas 4.06E". It is lovely. <3
|
|
|
|
|
|
|
|
|
|
|
|
|
|
|
Posted: Fri Sep 22, 2006 6:03 pm
Question lovely artist,
How did you smooth the skin tone? It looks great! You can't even tell where you switched colors in the skin! ;0
|
|
|
|
|
|
|
|
|
|
|
|
|
|
|
|
|
|
|


![[ killjoy ]'s avatar](https://a1cdn.gaiaonline.com/dress-up/avatar/ava/6e/1e/2026b95361e6e_flip.png?t=1249186673_6.00_00)