|
|
|
|
|
|
|
|
|
 Posted: Tue May 02, 2006 9:14 pm Posted: Tue May 02, 2006 9:14 pm
 Announcements 4/30/06
Nothing special, just a few tweaks to things. Thank you Xagarath Ankor for pointing out a critical typo in the Food Chain items, and dramaartwriting for reminding me about a certain error.
I have some specified fishing to be doing, but after that i'll be working on Durem a bit to get the Slates back over 100 for a new set of screenies for the Fish Exchange post. Once I can get what I need from there I can put together an extension for combo items 3nodding Definetly not happening until sometime in May at least, but i'll get it up when I can ^_^4/27/06
Alright, just added the new fish items to my test version of my guide, minutes from posting this announcement I will have the updated version of the Fish Items in the guide. The update to the Fish Exchange post will have to come later, as that is more complicated, but for now, you should have just about all you need here once again 3nodding
As always, please feel free to ask questions or correct an error here. I make typos often when first building or updating a post, so I welcome anything to help make the reading experience easier and better for you all ^_^ Known Issues "Could not keep session alive" ErrorA new one since the new version of fishing was released, the new version seeming to lack a single player version. This simply kills your bucket, barnone, no way to save anything. No explanation as of this time, just that you should beware sad However, you can seem to save and quit by using said button when this happens, just that the "Yes" button is partially covered. You could also try to fish with it anyway, but your vision is greatly reduced by the box. "Undefined" ErrorThis one just stops you in your tracks pretty much, saving score and fish basically all of the time, but sometimes giving you the warning that you already have a game in play. Another unavoidable one, but not as harmful as other errors. (4/30/06) I haven't heard much of this one lately, only about twice in the past week. It may be completely gone at this point. "Invisible Fish" ErrorOne that seems to be happening rarely, but enough to make mention of. Apparently sometimes people catch a fish, but it doesn't show up in the bucket space. It, reportedly, still takes up the space, and you still get your fish. More of an annoyance, just like the "New Version" error. (4/30/06) Haven't heard of this one either in some time, will take it down if I don't hear anything of it for another week or so. "Fish Hat Sellback" ErrorBasically, since the new "Shop" layout was created, fish hats have not been allowed to be sold back to stores. Nothing we can really do but wait and hope. ~~~~~~~~~~~~~~~~~~~~~~~~ There are also reports of bait not being deducted randomly. For the most part it seems to be a single occurence. If you notice it happening though, it's best to report it to a Fishing Forum Moderator, so the appropriate people can be notified.
Post 1: Introduction >>>You are here<<<Post 2: Getting Started
Post 3: The Fish
Post 4: Fishing Hats/Junk Items
Post 5: The Fish Exchange
Post 6: Bait & Rods
Post 7: Bass'ken Lake
Post 8: Port of Gambino
Post 9: Durem Reclamation Facility
Post 10: The Scoreboard Explained
Post 11: TF Explains
Post 12: FAQs
Post 13: Links
Post 14:
Post 15:
|
 |
|
|
|
|
|
|
|
|
|
|
|
|
|
Posted: Tue May 02, 2006 9:15 pm
Post 1: Introduction
Post 2: Getting Started >>>You are here<<<
Post 3: The Fish
Post 4: Fishing Hats/Junk Items
Post 5: The Fish Exchange
Post 6: Bait & Rods
Post 7: Bass'ken Lake
Post 8: Port of Gambino
Post 9: Durem Reclamation Facility
Post 10: The Scoreboard Explained
Post 11: TF Explains
Post 12: FAQs
Post 13: Links
Post 14:
Post 15: So, you are new to Gaia, or maybe just to Gaia Fishing, and you want to know what to do. Normally I would point you to the Fishing Ubersticky, but this is a guide, and I want all of the necessary information to be here, in one place.
The first thing you need to do is head on over to the Ole Fishing Hole and pick up a rod and some bait. If you are on a very small budget, like the one you get upon joining Gaia, I suggest the Basic Fishing Rod. If you have more to throw around, I suggest checking the price(s) of the rod(s) you have your eyes on and then venture over to the Marketplace to see if you can find one cheaper, as likely the case will be. I would recommend a normal Strength Rod if one does not like the Basic, or can afford a bit better if you are starting out.
Next, you need bait. I suggest going with F bait, since it is cheap and you can practice with it without losing much, if any, gold. Just buy 4 or 5 F bait for now, and 3 D bait if possible...
Then, you head to a fishing spot, I would say Bass'ken Lake. It is here that the speed and strength of the fish/junk are at the lowest Gaia has to offer. Here you can just try things out to get a feel for it.
Hover your mouse over the map, and click the fishing icon that will show up in the middle of the water. A window will pop up, load and give you a choice of Single Player, or Multiplayer. Choose Single Player for now, you don't need distractions.
When that loads, you will be asked to choose a bait, choose F. Since this should be your first time fishing, or at least your first time in well over 12 hours, your bait should be acting like A bait.
Click within the scenery of the fishing window to start your cast. Time the little bar moving below and click again to stop it. If done right, you can cast the max length for that rod. Doing this takes little practice, but you won't be a master at it on your first cast(Or at least the odds are low of it).
Then, wait for your hook. If you don't hook anything, cast again, further if you can.
When you get a bite, you will be warned, and the fish/junk will begin to move. You move your mouse in the opposite direction to keep it within the red lines of your rod(This is where upgraded rods help a lot). The further you move your mouse over, the harder you pull, so adjust yourself accordingly.
And that is basically it, once you haul the fish/junk in. From there it is lather, rinse, repeat. All that you need to know from here in this section is that when you get to your third bait, choose D for that bucket and the two following. That would provide you with a higher quality of bait for your first buckets.
Again, the Fishing Ubersticky has this same information, just a bit more detailed, and with pictures as well. I definetly recommend reading it before you start fishing 3nodding
|
|
|
|
|
|
|
|
|
|
|
|
|
|
|
|
|
|
Posted: Tue May 02, 2006 9:16 pm
Post 1: Introduction
Post 2: Getting Started
Post 3: The Fish >>>You are here<<<
Post 4: Fishing Hats/Junk Items
Post 5: The Fish Exchange
Post 6: Bait & Rods
Post 7: Bass'ken Lake
Post 8: Port of Gambino
Post 9: Durem Reclamation Facility
Post 10: The Scoreboard Explained
Post 11: TF Explains
Post 12: FAQs
Post 13: Links
Post 14:
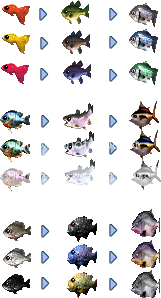
Post 15: There are, as of this moment, 36 different "fish", and 3 kinds of junk. Granted most of these are just different colors of their counterparts, but that makes a lot of different little critters that you can hook.
Below is the complete listing of the fish, where they can be caught, their sellback price to Logan at the Ole Fishing Hole, the item you can make with enough of them, and what times of day you can catch them. The fish with their info in blue text are the "new" fish. This basically means that these colors were added in version 1.5 that was released at the end of April. These fish have just had the hats become available for them in the beginning of June, so they are a bit more rare. At least the med and large Helms/Helmets are.
You may notice that there are 4 classifications of fish: Small, Medium, Large, and Rare.
Small: Guppies, Seedkin, and Pebbo Feeders. These fish are the cannon fodder of the fishing spots. The lakes spew these fish out in hordes, and it can get pretty annoying. Especially if you consider the fact that they can be hooked at 25 ft or further, so everywhere is game. But on the bright side they are easy to haul in, and good to practice with when first starting out. They are the basis for every bucket unless you are very advanced.
Medium: Bass, Trout, and Biters. These fish appear less frequently than the small fish, but are not hard to find if you use any rod that can cast a decent distance. These fish are normally a small step up from the the small fish, taking a little more effort to pull in. The also require a further cast, only being hooked at 45 ft or further. But they also bring a greater gold reward and higher point count as well.
Large: Striper, Tuna, and Boldurs. These fish are pretty much the cream of the crop. Normally the fastest, and always the strongest fish in the lake, you usually need some skill or a Plus Rod to pull one of these suckers in. It doesn't help that they can only be caught at 65 ft or above, but most consider them worth it. They give even more reward gold and point wise, but make much less appearances even with better bait.
Rare: Mutha Guppa, Big Mouth Bass'terd, Candy Striper; The 'Inos; and the Gembacks. The most sought after fish in all of Gaia. It is said that the odds of hooking one is 1 in 5,000. Not only that, but they require that you use D or A level bait to hook them. Then reeling them in is another story. They seem to vary in difficulty and speed, which I will cover at some point in the guide.
Junk: Cans, Boots, and Tires. No, these are not fish, but you can catch them. Unlike the fish, these are available at any fishing spot, though the movements are different at each place. These can sell for varying prices, with cans being the most profitable, but don't do much for your fishing score.Bass'ken Lake Small Fish Fish Name: Fish Name: Orange Guppy Fish Location: Bass'ken Lake Fish Sellback Price: 3 gold Fish Item Available: Orange Guppy Cap Time of Day Available: All times  Fish Name: Fish Name: Yellow Guppy Fish Location: Bass'ken Lake Fish Sellback Price: 3 gold Fish Item Available: Yellow Guppy Cap Time of Day Available: All times  Fish Name: Red Guppy Fish Name: Red Guppy
Fish Location: Bass'ken Lake
Fish Sellback Price: 3 gold
Fish Item Available: Red Guppy Cap
Time of Day Available: All timesMedium Fish Fish Name: Fish Name: Green Bass Fish Location: Bass'ken Lake Fish Sellback Price: 8 gold Fish Item Available: Green Bass Helm Time of Day Available: All Times  Fish Name: Fish Name: Brown Bass Fish Location: Bass'ken Lake Fish Sellback Price: 8 gold Fish Item Available: Brown Bass Helm Time of Day Available: All times  Fish Name: Blue Bass Fish Name: Blue Bass
Fish Location: Bass'ken Lake
Fish Sellback Price: 8 gold
Fish Item Available: Blue Bass Helm
Time of Day Available: All timesLarge Fish Fish Name: Fish Name: Blue Striper Fish Location: Bass'ken Lake Fish Sellback Price: 13 gold Fish Item Available: Blue Striper Helmet Time of Day Available: All times  Fish Name: Fish Name: Gray Striper Fish Location: Bass'ken Lake Fish Sellback Price: 13 gold Fish Item Available: Gray Striper Helmet Time of Day Available: All times  Fish Name: Green Striper Fish Name: Green Striper
Fish Location: Bass'ken Lake
Fish Sellback Price: 13 gold
Fish Item Available: Green Striper Helmet
Time of Day Available: All timesRare Fish Fish Name: Fish Name: Mutha Guppa Fish Location: Bass'ken Lake Fish Sellback Price: 1,000 gold Fish Item Available: Mutha Guppa Mask Time of Day Available: Day  Fish Name: Fish Name: Big Mouth Bass'terd Fish Location: Bass'ken Lake Fish Sellback Price: 1,000 gold Fish Item Available: Big Mouth Bass'terd Mask Time of Day Available: Night  Fish Name: Fish Name: Candy Striper Fish Location: Bass'ken Lake Fish Sellback Price: 1,000 gold Fish Item Available: Candy Striper Mask Time of Day Available: Dawn/Dusk Port of Gambino Small Fish Fish Name: Fish Name: Blue Seedkin Fish Location: Port of Gambino Fish Sellback Price: 7 gold Fish Item Available: Blue Seedkin Cap Time of Day Available: All times  Fish Name: Fish Name: Green Seedkin Fish Location: Port of Gambino Fish Sellback Price: 7 gold Fish Item Available: Green Seedkin Cap Time of Day Available: All times  Fish Name: Pink Seedkin Fish Name: Pink Seedkin
Fish Location: Port of Gambino
Fish Sellback Price: 7 gold
Fish Item Available: Pink Seedkin Cap
Time of Day Available: All timesMedium Fish Fish Name: Fish Name: Cool Rainbow Trout Fish Location: Port of Gambino Fish Sellback Price: 12 gold Fish Item Available: Cool Rainbow Helm Time of Day Available: All times  Fish Name: Fish Name: Warm Rainbow Trout Fish Location: Port of Gambino Fish Sellback Price: 12 gold Fish Item Available: Warm Rainbow Helm Time of Day Available: All times  Fish Name: Frozen Rainbow Trout Fish Name: Frozen Rainbow Trout
Fish Location: Port of Gambino
Fish Sellback Price: 12 gold
Fish Item Available: Frozen Rainbow Helm
Time of Day Available: All timesLarge Fish Fish Name: Fish Name: Icy Tuna Fish Location: Port of Gambino Fish Sellback Price: 17 gold Fish Item Available: Icy Tuna Helmet Time of Day Available: All times  Fish Name: Fish Name: Spicy Tuna Fish Location: Port of Gambino Fish Sellback Price: 17 gold Fish Item Available: Spicy Tuna Helmet Time of Day Available: All times  Fish Name: Dicy Tuna Fish Name: Dicy Tuna
Fish Location: Port of Gambino
Fish Sellback Price: 17 gold
Fish Item Available: Dicy Tuna Helmet
Time of Day Available: All timesRare Fish Fish Name: Fish Name: Buckin' Bino Fish Location: Port of Gambino Fish Sellback Price: 1,250 gold Fish Item Available: Buckin' Bino Mask Time of Day Available: Day  Fish Name: Fish Name: Tootin' Tino Fish Location: Port of Gambino Fish Sellback Price: 1,250 gold Fish Item Available: Tootin' Tino Mask Time of Day Available: Night  Fish Name: Fish Name: Chargin' Chino Fish Location: Port of Gambino Fish Sellback Price: 1,250 gold Fish Item Available: Chargin' Chino Mask Time of Day Available: Dawn/Dusk Durem Reclamation Facility Small Fish Fish Name: Fish Name: White Pebbo Feeder Fish Location: Durem Reclamation Facility Fish Sellback Price: 11 gold Fish Item Available: White Pebbo Cap Time of Day Available: All times  Fish Name: Fish Name: Brown Pebbo Feeder Fish Location: Durem Reclamation Facility Fish Sellback Price: 11 gold Fish Item Available: Brown Pebbo Cap Time of Day Available: All times  Fish Name: Black Pebbo Feeder Fish Name: Black Pebbo Feeder
Fish Location: Durem Reclamation Facility
Fish Sellback Price: 11 gold
Fish Item Available: Black Pebbo Cap
Time of Day Available: All timesMedium Fish Fish Name: Fish Name: Black Roque Biter Fish Location: Durem Reclamation Facility Fish Sellback Price: 16 gold Fish Item Available: Black Rocque Helm Time of Day Available: All times  Fish Name: Fish Name: Bluestone Biter Fish Location: Durem Reclamation Facility Fish Sellback Price: 16 gold Fish Item Available: Blue Stone Helm Time of Day Available: All times  Fish Name: Pyrite Biter Fish Name: Pyrite Biter
Fish Location: Durem Reclamation Facility
Fish Sellback Price: 16 gold
Fish Item Available: Pyrite Helm
Time of Day Available: All timesLarge Fish Fish Name: Fish Name: Stone Boldur Fish Location: Durem Reclamation Facility Fish Sellback Price: 21 gold Fish Item Available: Stone Boldur Helmet Time of Day Available: All times  Fish Name: Fish Name: Sand Boldur Fish Location: Durem Reclamation Facility Fish Sellback Price: 21 gold Fish Item Available: Sand Boldur Helmet Time of Day Available: All times  Fish Name: Slate Boldur Fish Name: Slate Boldur
Fish Location: Durem Reclamation Facility
Fish Sellback Price: 21 gold
Fish Item Available: Slate Boldur Helmet
Time of Day Available: All timesRare Fish Fish Name: Fish Name: Diamondback Lionfish Fish Location: Durem Reclamation Facility Fish Sellback Price: 1,500 gold Fish Item Available: Diamondback Lion Mask Time of Day Available: Day  Fish Name: Fish Name: Emeraldback Lionfish Fish Location: Durem Reclamation Facility Fish Sellback Price: 1,500 gold Fish Item Available: Emeraldback Lion Mask Time of Day Available: Night  Fish Name: Fish Name: Rubyback Lionfish Fish Location: Durem Reclamation Facility Fish Sellback Price: 1,500 gold Fish Item Available: Rubyback Lion Mask Time of Day Available: Dawn/Dusk Junk  Junk Name: Junk Name: Old Can Junk Location(s): All fishing spots Junk Sellback Price: 1 gold Junk Item Available: Tin Hat Time of Day Available: All times  Junk Name: Junk Name: Old Boot Junk Location(s): All fishing spots Junk Sellback Price: 2 gold Junk Item Available: Patchwork Boots Time of Day Available: All times  Junk Name: Junk Name: Big Old Tire Junk Location(s): All fishing spots Junk Sellback Price: 3 gold Junk Item Available: Tire on my Head Time of Day Available: All times
|
|
|
|
|
|
|
|
|
|
|
|
|
|
|
Posted: Tue May 02, 2006 9:17 pm
Post 1: Introduction
Post 2: Getting Started
Post 3: The Fish
Post 4: Fishing Hats/Junk Items >>>You are here<<<
Post 5: The Fish Exchange
Post 6: Bait & Rods
Post 7: Bass'ken Lake
Post 8: Port of Gambino
Post 9: Durem Reclamation Facility
Post 10: The Scoreboard Explained
Post 11: TF Explains
Post 12: FAQs
Post 13: Links
Post 14:
Post 15: Alright, so you want to know what you can do with your fish when you catch them right? Otherwise, what's the point? Well, you can do basically two things. Sell them(In the Marketplace or in the Ole Fishing Hole) or exchange them in for fishing hats or junk items.
If you want to go the way of the hats, this post is what you want to read. I also majorly advise checking out the sticky: The Fishing Exchange: How to get a Nifty Hat. It has models for all of the hats below(Excluding the Mutha Guppa Mask), to show what they actually look like equipped.
To obtain a hat listed below, you enter the Ole Fishing Hole, and click on the sign to the left that says "Exchange Fish". You will then see a list of fish hats that you can create. If the fish you desire to make into a hat is not there, then you do not have the correct amount of fish. The general rule is 100 non rare fish, or 10 rare fish for the older items. The newer items also come in smaller trade in amounts, or even combos. I've highlighted the new items in orange, just as I did for the newest variety of fish in blue, for your ease of search.Bass'ken Items  Hat Name: 3x Orange Guppy Helm Hat Name: 3x Orange Guppy Helm
Hat Sellback: 150 gold
How many fish to trade: 35 Red Guppies + 15 Yellow Guppies Hat Name: 3x Yellow Guppy Helm Hat Name: 3x Yellow Guppy Helm
Hat Sellback: 150 gold
How many fish to trade: 35 Yellow Guppies + 15 Orange Guppies Hat Name: 3x Red Guppy Helm Hat Name: 3x Red Guppy Helm
Hat Sellback: 150 gold
How many fish to trade: 35 Orange Guppies + 15 Red Guppies Hat Name: Hat Name: Orange Guppy Cap Hat Sellback: 300 gold How many fish to trade: 100 Orange Guppies  Hat Name: Hat Name: Yellow Guppy Cap Hat Sellback: 300 gold How many fish to trade: 100 Yellow Guppies  Hat Name: Hat Name: Red Guppy Cap Hat Sellback: 300 gold How many fish to trade: 100 Red Guppies  Item Name: Catfish Whiskers Item Name: Catfish Whiskers
Item Sellback: 200 gold
How many fish to trade: 25 Bass(Any combination of colors will do) Hat Name: Hat Name: Green Bass Helm Hat Sellback: 800 gold How many fish to trade: 100 Green Bass  Hat Name: Hat Name: Brown Bass Helm Hat Sellback: 800 gold How many fish to trade: 100 Brown Bass  Hat Name: Hat Name: Blue Bass Helm Hat Sellback: 800 gold How many fish to trade: 100 Blue Bass  Item Name: Blue Fish Eyes Item Name: Blue Fish Eyes
Item Sellback: 325 gold
How many fish to trade: 25 Blue Striper Item Name: Brown Fish Eyes Item Name: Brown Fish Eyes
Item Sellback: 325 gold
How many fish to trade: 25 Gray Striper Item Name: Green Fish Eyes Item Name: Green Fish Eyes
Item Sellback: 325 gold
How many fish to trade: 25 Green Striper Hat Name: Food Chain Blue Striper-Bass-Guppy Hat Name: Food Chain Blue Striper-Bass-Guppy
Hat Sellback: 285 gold
How many fish to trade: 25 Yellow Guppies + 10 Green Bass + 10 Blue Striper Hat Name: Food Chain Silver Striper-Bass-Guppy Hat Name: Food Chain Silver Striper-Bass-Guppy
Hat Sellback: 285 gold
How many fish to trade: 25 Orange Guppies + 10 Brown Bass + 10 Gray Striper Hat Name: Food Chain Green Striper-Bass-Guppy Hat Name: Food Chain Green Striper-Bass-Guppy
Hat Sellback: 285 gold
How many fish to trade: 25 Red Guppies + 10 Blue Bass + 10 Green Striper Hat Name: Hat Name: Blue Striper Helmet Hat Sellback: 1,300 gold How many fish to trade: 100 Blue Striper  Hat Name: Hat Name: Gray Striper Helmet Hat Sellback: 1,300 gold How many fish to trade: 100 Gray Striper  Hat Name: Hat Name: Green Striper Helmet Hat Sellback: 1,300 gold How many fish to trade: 100 Green Striper  Hat Name: Hat Name: Mutha Guppa Mask Hat Sellback: 10,000 gold How many fish to trade: 10 Mutha Guppas  Hat Name: Hat Name: Big Mouth Bass'terd Mask Hat Sellback: 10,000 gold How many fish to trade: 10 Big Mouth Bass'terds  Hat Name: Hat Name: Candy Striper Helmet Hat Sellback: 10,000 gold How many fish to trade: 10 Candy Stripers Gambino Items  Item Name: Dark Head Fins Item Name: Dark Head Fins
Item Sellback: 350 gold
How many fish to trade: 50 Blue Seedkin Item Name: Green Head Fins Item Name: Green Head Fins
Item Sellback: 350 gold
How many fish to trade: 50 Green Seedkin Item Name: Pale Head Fins Item Name: Pale Head Fins
Item Sellback: 350 gold
How many fish to trade: 50 Pink Seedkin Hat Name: Hat Name: Blue Seedkin Cap Hat Sellback: 700 gold How many fish to trade: 100 Blue Seedkin  Hat Name: Hat Name: Green Seedkin Cap Hat Sellback: 700 gold How many fish to trade: 100 Green Seedkin  Hat Name: Hat Name: Pink Seedkin Cap Hat Sellback: 700 gold How many fish to trade: 100 Pink Seedkin  Hat Name: Hat Name: Cool Rainbow Helm Hat Sellback: 1,200 gold How many fish to trade: 100 Cool Rainbow Trout  Hat Name: Hat Name: Warm Rainbow Helm Hat Sellback: 1,200 gold How many fish to trade: 100 Warm Rainbow Trout  Hat Name: Hat Name: Frozen Rainbow Helm Hat Sellback: 1,200 gold How many fish to trade: 100 Frozen Rainbow Trout  Item Name: Dorsal Fin Item Name: Dorsal Fin
Item Sellback: 425 gold
How many fish to trade: 25 Tuna(Any combination of colors will do) Hat Name: Hat Name: Icy Tuna Helmet Hat Sellback: 1,700 gold How many fish to trade: 100 Icy Tuna  Hat Name: Hat Name: Spicy Tuna Helmet Hat Sellback: 1,700 gold How many fish to trade: 100 Spicy Tuna  Hat Name: Hat Name: Dicy Tuna Helmet Hat Sellback: 1,700 gold How many fish to trade: 100 Dicy Tuna  Hat Name: Hat Name: Buckin' Bino Mask Hat Sellback: 12,500 gold How many fish to trade: 10 Buckin' Binos  Hat Name: Hat Name: Tootin' Tino Mask Hat Sellback: 12,500 gold How many fish to trade: 10 Tootin' Tinos  Hat Name: Hat Name: Chargin' Chino Mask Hat Sellback: 12,500 gold How many fish to trade: 10 Chargin' Chinos Durem Items  Item Name: Gills Item Name: Gills
Item Sellback: 275 gold
How many fish to trade: 25 Pebbo Feeders(Any combination of colors will do) Hat Name: Hat Name: White Pebbo Cap Hat Sellback: 1,100 gold How many fish to trade: 100 White Pebbo Feeders  Hat Name: Hat Name: Brown Pebbo Cap Hat Sellback: 1,100 gold How many fish to trade: 100 Brown Pebbo Feeders  Hat Name: Hat Name: Black Pebbo Cap Hat Sellback: 1,100 gold How many fish to trade: 100 Black Pebbo Feeders  Item Name: Sharp Fish Teeth Item Name: Sharp Fish Teeth
Item Sellback: 400 gold
How many fish to trade: 25 Biters(Any combination of colors will do) Hat Name: Hat Name: Black Rocque Helm Hat Sellback: 1,600 gold How many fish to trade: 100 Black Rocque Biters  Hat Name: Hat Name: Blue Stone Helm Hat Sellback: 1,600 gold How many fish to trade: 100 Bluestone Biters  Hat Name: Hat Name: Pyrite Helm Hat Sellback: 1,600 gold How many fish to trade: 100 Pyrite Biters  Hat Name: Hat Name: Stone Boldur Helmet Hat Sellback: 2,100 gold How many fish to trade: 100 Stone Boldurs  Hat Name: Hat Name: Sand Boldur Helmet Hat Sellback: 2,100 gold How many fish to trade: 100 Sand Boldurs  Hat Name: Hat Name: Slate Boldur Helmet Hat Sellback: 2,100 gold How many fish to trade: 100 Slate Boldurs  Hat Name: 4x Blackrocque Helm Hat Name: 4x Blackrocque Helm
Hat Sellback: 2,060 gold
How many fish to trade: 55 Brown Pebbo Feeders + 45 Black Rocque Biters + 35 Sand Boldurs Hat Name: 4x Bluestone Helm Hat Name: 4x Bluestone Helm
Hat Sellback: 2,060 gold
How many fish to trade: 55 White Pebbo Feeders + 45 Blue Stone Biters + 35 Stone Boldurs Hat Name: 4x Pyrite Helm Hat Name: 4x Pyrite Helm
Hat Sellback: 2,060 gold
How many fish to trade: 55 Black Pebbo Feeders + 45 Pyrite Biters + 35 Slate Boldurs Hat Name: Hat Name: Diamondback Lion Mask Hat Sellback: 15,000 gold How many fish to trade: 10 Diamondback Lionfish  Hat Name: Hat Name: Emeraldback Lion Mask Hat Sellback: 15,000 gold How many fish to trade: 10 Emeraldback Lionfish  Hat Name: Hat Name: Rubyback Lion Mask Hat Sellback: 15,000 gold How many fish to trade: 10 Rubyback Lionfish Junk Items  Item Name: Item Name: Tin Hat Item Sellback: 5,000 gold How many items to trade: 5,000 Old Cans  Item Name: Item Name: Patchwork Boots Item Sellback: 2,000 gold How many items to trade: 1,000 Old Boots  Item Name: Item Name: Tire on my Head Item Sellback: 1,500 gold How many items to trade: 500 Big Old Tire(s)
|
|
|
|
|
|
|
|
|
|
|
|
|
|
|
|
|
|
Posted: Tue May 02, 2006 9:18 pm
Post 1: Introduction
Post 2: Getting Started
Post 3: The Fish
Post 4: Fishing Hats/Junk Items
Post 5: The Fish Exchange >>>You are here<<<
Post 6: Bait & Rods
Post 7: Bass'ken Lake
Post 8: Port of Gambino
Post 9: Durem Reclamation Facility
Post 10: The Scoreboard Explained
Post 11: TF Explains
Post 12: FAQs
Post 13: Links
Post 14:
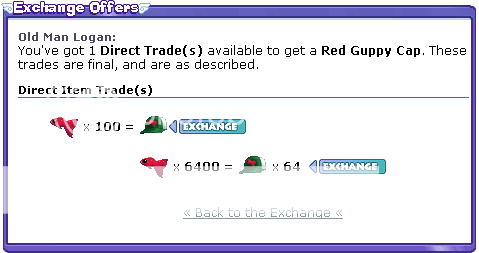
Post 15: Alright, so you've seen the fish, you've seen what you can make from them hat wise. But this was before Exchange 2.0. Now you can exhange fish for certain other fish. This makes a lot of people wonder how exactly you go about such things. Well, first enter the Ole Fishing Hole, and click on Exchange Fish. Assuming you have every kind of fish and junk, and enough to make a cap/helm/helmet/item out of it, and no rares of course, here is what you should see: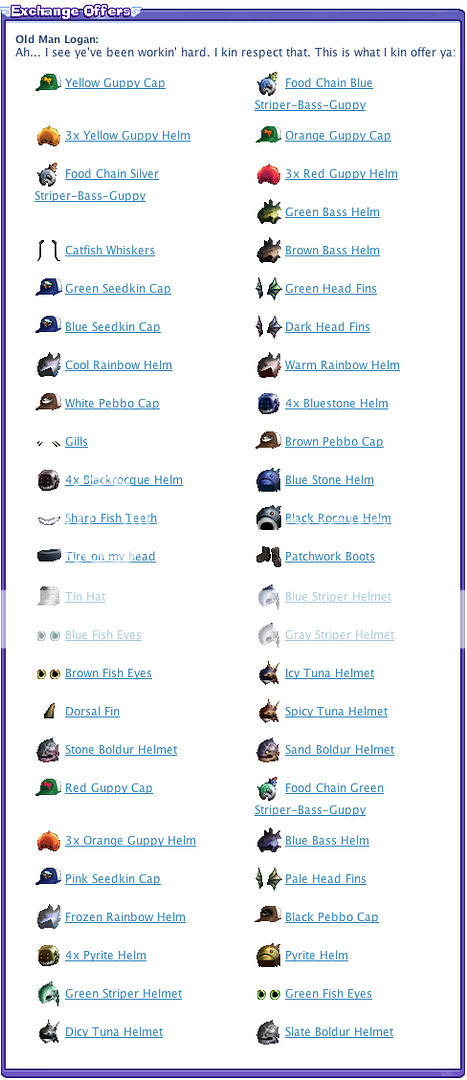
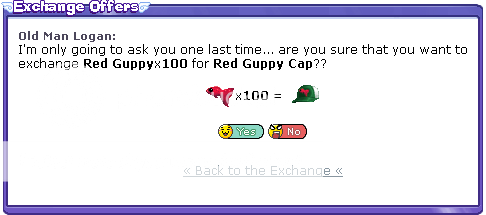
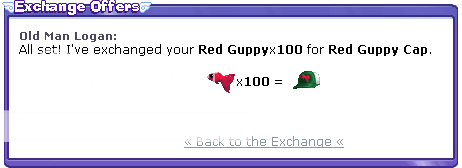
There are two things you can do here, trade for hats, or trade for fish. While the hats are still pretty obvious, there are some basics in it that apply to the fish trading as well, so I will illustrate:Upon clicking the gray text for the Red Guppy Cap, that is what you will see. Note that you can make a single cap, or you can trade in all of your Guppies for however many caps you can make with the available fish in your inventory. Assuming you just want to make one, see below. If you want to make them all, just picture the appropriate numbers instead of what is there:Look at that, Logan's a pretty nice fellow, asking your if you are sure instead of just swindling you. Of course, if you aren't sure you click no, and try over again. But if you are sure, click yes, and you will see the following:This works for any fishing cap, helm, helmet, mask, or junk item, just with the appropriate numbers of fish/items. Yes, the pictures are a little blurry, but this is to keep things under 500px wide, to avoid stretching too many screens 3nodding
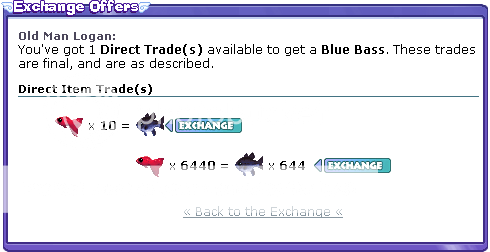
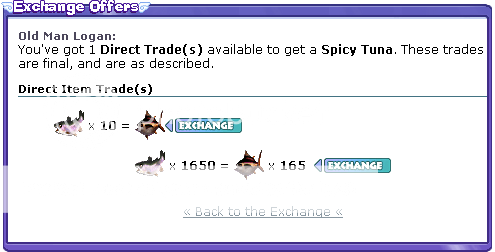
But as was previously stated, you can also trade for fish, in steps to the point where enough small fish can become large. Note:Again, pretty simple. Except it is 10 fish to the next up, instead of 100 for a hat. Granted, you can only make one or the entire batch into the bigger fish, but the option is still there, and there are ways around having to take half an hour to make a few fish. It works the same with medium to large fish, check it out:With a different fish, just so you can see that it works the same. Also note, that at the exchange rate, one large fish is equal to 100 small fish of the corresponding type, listed below. Thus this addition to fishing is more for those fishing for the actual items than trying to make a profit.There you have it, what each fish can be traded up for. But there is no junk, nor are there any rares up there. Why? Because you can't trade up junk, nor can you trade for rares. The current highest try is over 2500 of one kind of Boldur, and the option for a rare still does not appear. Thus we can conclude that there likely isn't a way to exchange for a rare.
And that's it, it's really that simple. Happy Exchanging ^_^
|
|
|
|
|
|
|
|
|
|
|
|
|
|
|
Posted: Tue May 02, 2006 9:19 pm
Post 1: Introduction
Post 2: Getting Started
Post 3: The Fish
Post 4: Fishing Hats/Junk Items
Post 5: The Fish Exchange
Post 6: Bait & Rods >>>You are here<<<
Post 7: Bass'ken Lake
Post 8: Port of Gambino
Post 9: Durem Reclamation Facility
Post 10: The Scoreboard Explained
Post 11: TF Explains
Post 12: FAQs
Post 13: Links
Post 14:
Post 15: Bait and rods, the basis for fishing. Without a rod, one cannot fish. The same goes for bait. While normally it is easier to buy bait from the Ole Fishing Hole, you can purchase them in the Marketplace as well. For rods, I recommend that you use the Marketplace after first checking the particular rod's normal price. You can usually find them at a discount there, leaving you more bait money.
Below is the list of bait and rods. The bait has the name, cost, it's use, and some personal advice from me on how to use it. The rods follow, with name, cost, line description, and some personal input as well. Read on for special bait info and pictures demonstrating the rod lines.Bait
Bait Rank: Grade F Fishing Bait
Bait Cost: 25 gold
What it does: Allows you to hook any fish excluding rares, unless the bait is undegraded (See Bait Degradation). It has a high volume of junk and small fish, and very little else.
Gaidin's personal advice on this bait: If used together with bait degradation and/or heavy filtering, this bait can be very profitable. However, if you like to do high volumes of fishing, this is then more ideal for junking instead of actual fishing, as over half of the hooks tend to be junk when it is at true F level.
Fish in the water with this quality bait: Junk: 51, Small: 42, Medium: 6, Large: 1, Rare: 0

Bait Rank: Grade D Fishing Bait
Bait Cost: 100 gold
What it does: Allows you to hook any fish, even rares. It has a higher volume of junk than A bait, but less than F bait, truly making it the middleman.
Gaidin's personal advice on this bait: With D bait working again, I finally had some time to do the necessary testing. What I found is that D bait hooks 3-6 junk on average in a single bucket if you do not filter. It can be as low as 1 or 2(Zero is a complete fluke and should be disregarded) or it can be as high as 8 or 9. But generally I have found that I get about 4 junk per bucket with it. Thus, with it's better ability to hook better fish, it is more competition worthy. I would say this bait is now worth using, as it is cost effective when used correctly.
Fish in the water with this quality bait: Junk: 32, Small: 54, Medium: 11, Large: 3, Rare: 1 or 0

Bait Rank: Grade A Fishing Bait
Bait Cost: 250 gold
What it does: Allows you to hook any fish, even rares. It is the top of the line quality in bait, having a high volume of fish, a decent amount being med and large fish.
Gaidin's personal advice on this bait: The cream of the crop, and my personal favorite. The only problem is the price. If one does not filter, they could run through 10 bait in an hour fairly easily. This would be a hefty 2.5k gold per hour if you went fast. This bait seems to basically just be useful for getting med and large fish, or competing. If you are one to filter, A bait makes things a heck of a lot easier. A word of advice: Use bait degradation to get 5 A bait everyday for a total price of 350 gold that is worth 1,250 gold wink
Fish in the water with this quality bait: Junk: 18, Small: 54, Medium: 18, Large: 9, Rare: 1 or 0 Bait DegradationIf you hang around the Fishing Forum enough, you are bound to run into this term. Basically it describes what happens to bait when you use a lot of it. If you fish a bunch, your bait eventually degrades, or gets worse. You will hook more junk, though it only becomes obvious after a large number of buckets. But this phenomenon works both ways. If you do not fish for 12+ hours, your bait resets. By this I mean that your bait gets better, if only for a limited time. Your first five (5) baits will be a better quality than it normally would. Your first two baits, no matter the type, will act as A bait. The next 3 will act as D bait if you are using F bait, and act as A bait if you are using D bait. After those first 5 buckets, the baits will all become their normal levels again. Allow me to illustrate:
If you use 5 F bait, normally you would catch a ton of junk and small fish. But if you let your bait reset, you will catch better fish. Below is a comparison of what your F bait would act like if degraded vs. reset.
Degraded
Reset
See the difference? The bait quality is much higher when you let it reset. Notice that after the first two baits however, that your F bait begins to act like D bait. That is what degradation is. The bait loses it's extra quality. If you were to continue to fish with the F bait, any buckets after those initial 5 would be F level.
The same thing happens with D bait, except for one minor difference. Observe:
Degraded
Reset
You see, F bait, being of very poor quality, does not stay at A level as long as D bait does when they are both reset. But, you still do get a couple of A level baits with F bait, assuming it is reset. So, a certain order has been established long before I even started fishing, that will give you the optimum amount of A level bait at the lowest price.
Since your first two F baits act as A bait, you use two of them. Then, since D bait continues to act as A bait for 3 more uses, you use 3 of them. The reason you cannot simply use 5 D bait after the 2 F bait is because the Bait Degradation goes by how many buckets you have fished, not by any particular bait you use.Rods
Rod Name:Basic Fishing Rod
Rod Cost: 100 gold
Cast Distance: 70 ft.
Line width and pattern: Minimal distance apart, Straight parallel
Gaidin's personal advice on this Rod: I would only reccommend this rod for the complete beginner, and one with little gold. It can be good for testing and honing one's skills later on, but I wouldn't use this much if you can help it.

Rod Name: Basic Fishing Rod PLUS
Upgrade Cost: 10,000 gold
Cast Distance: 80 ft.
Line width and shape: Further distance apart, Straight parallel
Gaidin's personal advice on this Rod: Better than the Basic un-upgraded, and actually worth using. A better casting distance means more chances for better fish, and the wider lines make things a bit easier, while still giving you more of a challenge then some of the other rods.

Rod Name: Strength Rod
Rod Cost: 1,850 gold
Cast Distance: 60 ft.
Line width and shape: Miminal distance apart, parallel, but curve out near the bottom
Gaidin's personal advice on this Rod: The perfect rod for a newbie, assuming you can afford it but cannot afford any upgrades. While this is the only rod that cannot hook Large fish, it makes pulling what you can hook(Including rares) in easier. The lines that fan out at the bottom are perfect for those that lose fish at the last second, as many beginners do.

Rod Name: Strength Rod PLUS
Upgrade Cost: 11,075 gold
Cast Distance: 75 ft.
Line width and shape: Further distance apart, parallel, but curve out near the bottom
Gaidin's personal advice on this Rod: The best rod for speed fishing. It has the strengths of a normal Strength rod, but now can hook large fish as well. Being the distance cast isn't that much, you can still get decent hooks and bring them in faster without having to regulate your cast distance. If you are looking for speed, and don't mind not getting that many large fish, this is your dream rod.

Rod Name: Performance Rod
Rod Cost: 2,475 gold
Cast Distance: 75 ft.
Line width and shape: Curve out both at the top and bottom, but thin in the middle ---> )(
Gaidin's personal advice on this Rod: A good rod all around, though not quite reccommended for a newbie. Though the lines are wide at both the top and the bottom, the middle actually has less width than the other normal rods, making it a tad challenging bringing it through the middle. But if you can handle that, this rod is good. It has the cast distance of a Strength Plus, but for less price, and has wider lines at the top.

Rod Name: Performance Rod PLUS
Upgrade Cost: 12,500 gold
Cast Distance: 90 ft.
Line width and shape: Curve out both at the top and bottom, but a bit thin in the middle ---> ) (
Gaidin's personal advice on this Rod: Statistically the overall best rod, at least theoretically. With the casting distance of a normal Distance Rod, you have a pretty good chance for large fish. The lines are wider than the Distance at the top, and the same as the Strength Plus at the bottom, so you have plenty of room to tell what the fish is at the top, and not lose it at the bottom. The only real drawback is that the middle has about as much width as a normal Basic Fishing Rod. But just like the normal Performance, if you can get it past the middle, this rod is great for you.

Rod Name: Distance Rod
Rod Cost: 3,500 gold
Cast Distance: 90 ft.
Line width and shape: Minimal distance apart, parallel, curve out at the top
Gaidin's personal advice on this Rod: If you have the skill to keep fish within the lines, or are fishing at Bass'ken, this rod is great. The cheapest rod for this kind of casting distance gives you a good chance for hooking large fish. While that stands true, I don't reccommend this rod for newbies until they do decent with a Basic Fishing Rod. Why? Because it pulls about the same, but hooks harder fish more often, not to mention the price. Try pulling in a Boldur with this rod and you will see what I mean.

Rod Name: Distance Rod PLUS
Upgrade Cost: 13,050 gold
Cast Distance: 100 ft. (Max Distance)
Line width and shape: Further distance apart, parallel, curve out at the top
Gaidin's personal advice on this Rod: My personal favorite, it has the max casting distance. It also costs the most sweatdrop But if you can afford it, the lines are wide enough to make up for it's lack in strength while fighting with a fish or piece of junk. You hook significantly more large and medium fish with this rod, but buckets do take a tad longer. The best rod for heavy filtering, but not so good for speed.

Rod Name: Angelic Rod
Rod Cost: Has not been released
Cast Distance: 100 ft. (Max Distance)
Line width and shape: Further distance apart, parallel, curve out at the bottom
Gaidin's personal advice on this Rod: It is basically a Strength Plus combined with a Distance Plus, giving you the lines of the Strength Plus, and the casting distance of a Distance Plus. The "Uber Rod" if you will, or at least it's upgraded form is. Yes, it can be upgraded. As of now it is not yet available to anyone other than the admins or kaia9. It is rumored that it will be part of the quest system, but the admins said that they are still unsure of how to release it.

Rod Name: Angelic Rod PLUS
Upgrade Cost: Has not been released
Cast Distance: 100 ft. (Max Distance)
Line width and shape: Max distance apart, parallel, curve out at bottom.
Gaidin's personal advice on this Rod: Best rod available, at least, when it is made available. The lines are even further apart than the Strength Rod Plus, and it still casts 100 ft. Rods just can't get any better than that. The only downside is that no one can obtain it aside from admins and fishing programmers sweatdrop Rod LinesChoosing a rod is something that should be done carefully. After all, it can vastly effect your performance in fishing depending on your skill. Below are some novice-skill edits to show you the lines of each of the rods, excluding the Angelic Rod. The red lines are for the normal version, and the orange lines are for the upgraded version. The orange lines are normally much smoother, but you will have to excuse me, as I am not the best picture editor. Do not forget that each rod upgrade has more casting length than it's un-upgraded form. See above for exact numbers. Also, there is another thread in the Fishing Forum that has the lines, entitled Need help deciding which fishing rod to get?
For those that are wondering, the Angelic Rod has the same lines as a Strength PLUS Rod, and the Angelic PLUS has lines another upgrade size wider than that.   
|
|
|
|
|
|
|
|
|
|
|
|
|
|
|
|
|
|
Posted: Tue May 02, 2006 9:20 pm
Post 1: Introduction
Post 2: Getting Started
Post 3: The Fish
Post 4: Fishing Hats/Junk Items
Post 5: The Fish Exchange
Post 6: Bait & Rods
Post 7: Bass'ken Lake >>>You are here<<<
Post 8: Port of Gambino
Post 9: Durem Reclamation Facility
Post 10: The Scoreboard Explained
Post 11: TF Explains
Post 12: FAQs
Post 13: Links
Post 14:
Post 15: Bass'ken Lake, the perfect spot for beginners. Here the fish are very slow and very weak compared to the other fishing spots. It is here that you can come to test out your skills for the first time, and also the place I would recommend for such activity. Granted, the fish are not worth very much gold-wise, but the training you can get here is invaluable. I have seen numerous threads of "Why can't I catch a fish? crying ", only to find that they have not started at Bass'ken. If you have a Strength Rod here, things will be very easy, though you will miss out on Stripers. If you have a Basic Rod, you can get experience with small and medium fish, and occasionally a large fish as well. I personally advise one to fish here until they feel they can catch fish with their eyes closed before moving on to Gambino.What can be caught here:Small Fish
Fish Name: Orange Guppy
Fish Location: Bass'ken Lake
Fish Sellback Price: 3 gold
Fish Item Available: Orange Guppy Cap
Time of Day Available: All times
Fish Name: Yellow Guppy
Fish Location: Bass'ken Lake
Fish Sellback Price: 3 gold
Fish Item Available: Yellow Guppy Cap
Time of Day Available: All times
Fish Name: Red Guppy
Fish Location: Bass'ken Lake
Fish Sellback Price: 3 gold
Fish Item Available: Red Guppy Cap
Time of Day Available: All timesMedium Fish
Fish Name: Green Bass
Fish Location: Bass'ken Lake
Fish Sellback Price: 8 gold
Fish Item Available: Green Bass Helm
Time of Day Available: All Times
Fish Name: Brown Bass
Fish Location: Bass'ken Lake
Fish Sellback Price: 8 gold
Fish Item Available: Brown Bass Helm
Time of Day Available: All times
Fish Name: Blue Bass
Fish Location: Bass'ken Lake
Fish Sellback Price: 8 gold
Fish Item Available: Blue Bass Helm
Time of Day Available: All timesLarge Fish
Fish Name: Blue Striper
Fish Location: Bass'ken Lake
Fish Sellback Price: 13 gold
Fish Item Available: Blue Striper Helmet
Time of Day Available: All times
Fish Name: Gray Striper
Fish Location: Bass'ken Lake
Fish Sellback Price: 13 gold
Fish Item Available: Gray Striper Helmet
Time of Day Available: All times
Fish Name: Green Striper
Fish Location: Bass'ken Lake
Fish Sellback Price: 13 gold
Fish Item Available: Green Striper Helmet
Time of Day Available: All timesRare Fish
Fish Name: Mutha Guppa
Fish Location: Bass'ken Lake
Fish Sellback Price: 1,000 gold
Fish Item Available: Mutha Guppa Mask
Time of Day Available: Day
Fish Name: Big Mouth Bass'terd
Fish Location: Bass'ken Lake
Fish Sellback Price: 1,000 gold
Fish Item Available: Big Mouth Bass'terd Mask
Time of Day Available: Night
Fish Name: Candy Striper
Fish Location: Bass'ken Lake
Fish Sellback Price: 1,000 gold
Fish Item Available: Candy Striper Mask
Time of Day Available: Dawn/DuskJunk
Junk Name: Old Can
Junk Location(s): All fishing spots
Junk Sellback Price: 1 gold
Junk Item Available: Tin Hat
Time of Day Available: All times
Junk Name: Old Boot
Junk Location(s): All fishing spots
Junk Sellback Price: 2 gold
Junk Item Available: Patchwork Boots
Time of Day Available: All times
Junk Name: Big Old Tire
Junk Location(s): All fishing spots
Junk Sellback Price: 3 gold
Junk Item Available: Tire on my Head
Time of Day Available: All times
|
|
|
|
|
|
|
|
|
|
|
|
|
|
|
Posted: Tue May 02, 2006 9:21 pm
Post 1: Introduction
Post 2: Getting Started
Post 3: The Fish
Post 4: Fishing Hats/Junk Items
Post 5: The Fish Exchange
Post 6: Bait & Rods
Post 7: Bass'ken Lake
Post 8: Port of Gambino >>>You are here<<<
Post 9: Durem Reclamation Facility
Post 10: The Scoreboard Explained
Post 11: TF Explains
Post 12: FAQs
Post 13: Links
Post 14:
Post 15: Port of Gambino, the next step up in difficulty, normally called medium. Here fish move a good deal faster than in Bass'ken, with Seedkin easily rivaling Stripers for speed. The good thing here is that the junk is very easy to tell from most every fish in the Port. The junk here moves just like the junk in Bass'ken, while all of the fish(Excluding Green Seedkin) move much faster. Even the Green Seedkin is distinguishable, as it pulls very hard, which the junk does not. I love this place, because the fish are not only colorful, but they move fairly quickly. This will be a bit of a shock to someone who has only fished at Bass'ken, but if you can handle Stripers you can handle Seedkin and probably Trout as well. Here is where you get your real training in controlling your rod. Once you can pull in anything here with little or no trouble, I think you are okay to move up to Durem 3nodding What can be caught here:Small Fish
Fish Name: Blue Seedkin
Fish Location: Port of Gambino
Fish Sellback Price: 7 gold
Fish Item Available: Blue Seedkin Cap
Time of Day Available: All times
Fish Name: Green Seedkin
Fish Location: Port of Gambino
Fish Sellback Price: 7 gold
Fish Item Available: Green Seedkin Cap
Time of Day Available: All times
Fish Name: Pink Seedkin
Fish Location: Port of Gambino
Fish Sellback Price: 7 gold
Fish Item Available: Pink Seedkin Cap
Time of Day Available: All timesMedium Fish
Fish Name: Cool Rainbow Trout
Fish Location: Port of Gambino
Fish Sellback Price: 12 gold
Fish Item Available: Cool Rainbow Helm
Time of Day Available: All times
Fish Name: Warm Rainbow Trout
Fish Location: Port of Gambino
Fish Sellback Price: 12 gold
Fish Item Available: Warm Rainbow Helm
Time of Day Available: All times
Fish Name: Frozen Rainbow Trout
Fish Location: Port of Gambino
Fish Sellback Price: 12 gold
Fish Item Available: Frozen Rainbow Helm
Time of Day Available: All timesLarge Fish
Fish Name: Icy Tuna
Fish Location: Port of Gambino
Fish Sellback Price: 17 gold
Fish Item Available: Icy Tuna Helmet
Time of Day Available: All times
Fish Name: Spicy Tuna
Fish Location: Port of Gambino
Fish Sellback Price: 17 gold
Fish Item Available: Spicy Tuna Helmet
Time of Day Available: All times
Fish Name: Dicy Tuna
Fish Location: Port of Gambino
Fish Sellback Price: 17 gold
Fish Item Available: Dicy Tuna Helmet
Time of Day Available: All timesRare Fish
Fish Name: Buckin' Bino
Fish Location: Port of Gambino
Fish Sellback Price: 1,250 gold
Fish Item Available: Buckin' Bino Mask
Time of Day Available: Day
Fish Name: Tootin' Tino
Fish Location: Port of Gambino
Fish Sellback Price: 1,250 gold
Fish Item Available: Tootin' Tino Mask
Time of Day Available: Night
Fish Name: Chargin' Chino
Fish Location: Port of Gambino
Fish Sellback Price: 1,250 gold
Fish Item Available: Chargin' Chino Mask
Time of Day Available: Dawn/Dusk
Junk
Junk Name: Old Can
Junk Location(s): All fishing spots
Junk Sellback Price: 1 gold
Junk Item Available: Tin Hat
Time of Day Available: All times
Junk Name: Old Boot
Junk Location(s): All fishing spots
Junk Sellback Price: 2 gold
Junk Item Available: Patchwork Boots
Time of Day Available: All times
Junk Name: Big Old Tire
Junk Location(s): All fishing spots
Junk Sellback Price: 3 gold
Junk Item Available: Tire on my Head
Time of Day Available: All times
|
|
|
|
|
|
|
|
|
|
|
|
|
|
|
|
|
|
Posted: Tue May 02, 2006 9:21 pm
Post 1: Introduction
Post 2: Getting Started
Post 3: The Fish
Post 4: Fishing Hats/Junk Items
Post 5: The Fish Exchange
Post 6: Bait & Rods
Post 7: Bass'ken Lake
Post 8: Port of Gambino
Post 9: Durem Reclamation Facility >>>You are here<<<
Post 10: The Scoreboard Explained
Post 11: TF Explains
Post 12: FAQs
Post 13: Links
Post 14:
Post 15: Durem Reclamation Facility, typically the hardest spot to fish at, for multiple reasons. Here, the junk is not too different from the fish, though it is quite possible to learn the differences. Second, and more importantly, the fish are the fastest here, and pull the hardest. Once you master the fish here, any place is in your grasp, especially if you can fish here with a rod that hasn't been upgraded. Basically everything is a level up from Gambino, whereas Gambino was about 2-3 levels up from Bass'ken. The fish here however are mighty profitable, as it only takes 3 Pebbo Feeders to pay for an F bait with gold left over. Fishing here will quickly get you the funds you need to upgrade your rod or purchase your rod of choice. A word of advice though: A normal Distance Rod here will be a mistake for many fishers. The Distance does not pull very hard, and that makes getting any fish here somewhat difficult. What can be caught here:Small Fish
Fish Name: White Pebbo Feeder
Fish Location: Durem Reclamation Facility
Fish Sellback Price: 11 gold
Fish Item Available: White Pebbo Cap
Time of Day Available: All times
Fish Name: Brown Pebbo Feeder
Fish Location: Durem Reclamation Facility
Fish Sellback Price: 11 gold
Fish Item Available: Brown Pebbo Cap
Time of Day Available: All times
Fish Name: Black Pebbo Feeder
Fish Location: Durem Reclamation Facility
Fish Sellback Price: 11 gold
Fish Item Available: Black Pebbo Cap
Time of Day Available: All timesMedium Fish
Fish Name: Black Roque Biter
Fish Location: Durem Reclamation Facility
Fish Sellback Price: 16 gold
Fish Item Available: Black Rocque Helm
Time of Day Available: All times
Fish Name: Bluestone Biter
Fish Location: Durem Reclamation Facility
Fish Sellback Price: 16 gold
Fish Item Available: Blue Stone Helm
Time of Day Available: All times
Fish Name: Pyrite Biter
Fish Location: Durem Reclamation Facility
Fish Sellback Price: 16 gold
Fish Item Available: Pyrite Helm
Time of Day Available: All timesLarge Fish
Fish Name: Stone Boldur
Fish Location: Durem Reclamation Facility
Fish Sellback Price: 21 gold
Fish Item Available: Stone Boldur Helmet
Time of Day Available: All times
Fish Name: Sand Boldur
Fish Location: Durem Reclamation Facility
Fish Sellback Price: 21 gold
Fish Item Available: Sand Boldur Helmet
Time of Day Available: All times
Fish Name: Slate Boldur
Fish Location: Durem Reclamation Facility
Fish Sellback Price: 21 gold
Fish Item Available: Slate Boldur Helmet
Time of Day Available: All timesRare Fish
Fish Name: Diamondback Lionfish
Fish Location: Durem Reclamation Facility
Fish Sellback Price: 1,500 gold
Fish Item Available: Diamondback Lion Mask
Time of Day Available: Day
Fish Name: Emeraldback Lionfish
Fish Location: Durem Reclamation Facility
Fish Sellback Price: 1,500 gold
Fish Item Available: Emeraldback Lion Mask
Time of Day Available: Night
Fish Name: Rubyback Lionfish
Fish Location: Durem Reclamation Facility
Fish Sellback Price: 1,500 gold
Fish Item Available: Rubyback Lion Mask
Time of Day Available: Dawn/DuskJunk
Junk Name: Old Can
Junk Location(s): All fishing spots
Junk Sellback Price: 1 gold
Junk Item Available: Tin Hat
Time of Day Available: All times
Junk Name: Old Boot
Junk Location(s): All fishing spots
Junk Sellback Price: 2 gold
Junk Item Available: Patchwork Boots
Time of Day Available: All times
Junk Name: Big Old Tire
Junk Location(s): All fishing spots
Junk Sellback Price: 3 gold
Junk Item Available: Tire on my Head
Time of Day Available: All times
|
|
|
|
|
|
|
|
|
|
|
|
|
|
|
Posted: Tue May 02, 2006 9:22 pm
Post 1: Introduction
Post 2: Getting Started
Post 3: The Fish
Post 4: Fishing Hats/Junk Items
Post 5: The Fish Exchange
Post 6: Bait & Rods
Post 7: Bass'ken Lake
Post 8: Port of Gambino
Post 9: Durem Reclamation Facility
Post 10: The Scoreboard Explained >>>You are here<<<
Post 11: TF Explains
Post 12: FAQs
Post 13: Links
Post 14:
Post 15: Alright, the scoreboard, also known as the Fishing Stats Page. For most this doesn't matter, but to some, such as us competition fishers, it is an everyday necessity. But I might as well start with the basics. Some fishers don't even know there is a scoreboard. So first off, what does it look like? See below:That's it, right there. The big question marks will have an avatar picture in normal circumstances, with the names and numbers filled in for the other questions marks and number symbols. What you see above is the core of the board, and shows everyone(Except for the junkers) who will win a trophy. At least, if they can be on there come score reset. That is where everyone who competes strives to be.
For most, the boards are just there off in the distance, something they don't have time or the patience to attempt. But that doesn't mean that the Fishing Stats Page is useless to the rest of you, far from it. Observe:
Score - As I said above, this is simply your total points from any fish and junk you have caught that entire month. This score is adjusted by your PI, so even if you are fishing in a single spot only, it is unlikely to be the same as your score there.
Performance Index - A tricky subject for most. While those competing are the main ones to use it, especially when going for Overall, it can still tell you things otherwise. The Performance Index(PI) is a percentage based on the quality of the fish you catch. Each fish is worth a certain amount of points, and that translates out to a certain percentage. The 100% mark is set at 20 points per fish, so a fish that earns you less than that will get you under 100%, and one that is worth more will get you over. The average score of all of your fish determines your PI, thus it is possible to raise or lower it according to what you catch.
Example: A Guppy is worth 6 points. When stacked against the 20 point 100% average, your PI becomes 30%. A Seedkin, worth 14 points would get you 70%, and a Pebbo Feeder, worth 22 points would get you 110%. If you caught 1 of each, your score would be 42. But that would have to be divided by 3 fish, meaning your average was 14, which comes out to 70% PI.
But why all these numbers? What is the PI for? It is for your Score in the same bar. Whatever your Total Score is for everything added together is multiplied by the PI percentage to get the score you see in that bar. Again, it's not much to non-competitors, unless you want to challenge yourself to get a certain PI by catching better fish.
Fish/Junk - This is merely the counter for how many fish, and how many junk you have caught in the current month. This stat is currently broken however, and adds both fish and junk to your fish counter, leaving your junk side at 0 even if you catch some.
All that explained, you will see this bar below it:
But that is only half of the page right? Below you should have something like this:
On the side you might notice the four sections. I will explain them below:
Number Times Fished - This is, quite simply, the number of buckets you have managed to save at this fishing spot. This does not count buckets started but never saved. So none of your glitched buckets that froze will be in this count.
Total Fish - This should be the number of fish that you have caught from this spot total. But alas, this stat is broken right now, so unless you fished before the date that the board stopped working correctly this will be 0, and will remain so until it is fixed.
Total Score - This would be the points those fish were worth, the ones that would be totaled in the above category. This too is broken however, and does not change at this time.
Total Time Fishing - Wow, a stat that works! This stat logs the time you have spent in fishing games that were saved at this spot. Here you can effectively see how much time of your life you have spent playing pixelated fishing at this particular spot razz
And thus this concludes... Wait, what? Oh, I only went through the bare bones didn't I? Some of you are still wondering about PI, and how it works huh? I suppose I can explain it for you.A Little More In-depthSo I explained a bit about the scoreboard, and what the Fishing Stats Page is useful for. But maybe some are interested in reaching the scoreboards, or finding how to go after a high PI, or maybe you just want to know how many points each fish is. And what about junk huh? I didn't really talk about it much. Well, here goes.
The scoreboard ranks one simply based on points for 4 of the 5 categories. The categories are: Overall, Bass'ken Lake, Port of Gambino, Durem Reclamation Facility, and Junk. The last four simply require you to catch a lot of stuff from that category.
Bass'ken Lake - Considered the easiest place by some, the hardest by others in competition. The fish are easy to pull in, but slow, and for some fishers that is tiring. Not to mention the scores are harder to make here, because of point values. Take a look:
Port of Gambino - The next step up, the fish here are faster, and thus worth more points and gold. If you look on the boards, you will see the scores are almost, if not more than, double that of Bass'ken. Why? Check this out:
Durem Reclamation Facility - But there is a place that gains you even more points per fish: Durem. Durem has the hardest of fish to catch, their speeds higher than anything anywhere else. You are rewarded by higher point values which mean higher sellback to Logan as well:
Junk - Yes, the hidden board, creeping in the shadows. There is no scoreboard, but there are rankings. They too go by simple points. But unlike the fishing spots, Junk from anywhere counts to your junk score, so you can fish wherever you fancy whenever you fancy. The scores per piece are as follows:
Overall - The biggie, and the reason for PI's existence. Here your Total Score(The sum of your Bass'ken, Gambino, Durem, and Junk scores) is multiplied by your PI to get your Overall Score, and that is what appears in your Current Stats bar and on the Overall Scoreboard:
But the tricky part is the requirement of 25% of your fish having to be from Bass'ken, and 25% having to be from Gambino as well. That is also where the point values come in. Look above to the fishing spot's scores. Notice Bass'ken and Gambino give you lower points per fish, meaning a lower PI. Junk is even worse, as the scores not only lower your PI, but also count for you fish total. It takes a bit of strategy and skill to not only keep on the board, but to rise on it, and many fishers use this board as a test for themselves since only the #1 Rank get's a trophy.
All of that said, the Scoreboard is good for many things, and not all for just getting a trophy. Hopefully this has shed some light on what each part of the board means.
|
|
|
|
|
|
|
|
|
|
|
|
|
|
|
|
|
|
Posted: Tue May 02, 2006 9:23 pm
Coming Soon Post 1: Introduction
Post 2: Getting Started
Post 3: The Fish
Post 4: Fishing Hats/Junk Items
Post 5: The Fish Exchange
Post 6: Bait & Rods
Post 7: Bass'ken Lake
Post 8: Port of Gambino
Post 9: Durem Reclamation Facility
Post 10: The Scoreboard Explained
Post 11: TF Explains >>>You are here<<<
Post 12: FAQs
Post 13: Links
Post 14:
Post 15:
|
|
|
|
|
|
|
|
|
|
|
|
|
|
|
Posted: Tue May 02, 2006 9:24 pm
Post 1: Introduction
Post 2: Getting Started
Post 3: The Fish
Post 4: Fishing Hats/Junk Items
Post 5: The Fish Exchange
Post 6: Bait & Rods
Post 7: Bass'ken Lake
Post 8: Port of Gambino
Post 9: Durem Reclamation Facility
Post 10: The Scoreboard Explained
Post 11: TF Explains
Post 12: FAQs >>>You are here<<<
Post 13: Links
Post 14:
Post 15: General
Q: How do I fish?
A: Read Post two: Getting started. Or better yet, check out the Fishing Ubersticky.
Q: Oh no! My bucket didn't save! What do I do?
A: Sorry to say, there really isn't much you can do but either stop fishing or keep going and hope they do save. Gaia is still in in the Alpha testing phase, and things like lost buckets will happen sadly.
Q: What's filtering?
A: Filtering is when you learn the patterns of fish and junk, and when you hook something that you don't want, you drag it out of the lines. This basically gets you what you want instead of just everything, but at a cost of time.
Q: Can I go back to a previously unfinished game?
A: Nope sad
Q: What if I can't find the answer to my question in your gude, or even in this FAQ section?
A: Feel free to post your question. I or another well informed fisher will answer you as soon as we can. Also feel free to PM me a single time in regards to your question, and I will get to it when I am able ^_^
Fish
Q: Where can I catch [Insert name here] fish?
A: Read post three: The Fish. It has the complete list of fish you can catch, and where you can catch them.
Q: What fish can I catch at [Insert Fishing Spot Here]
A: Read corresponding post for that fishing spot. It has a list of the fish and junk caught there, in case you don't want to go through the complete list.
Q: What times do what fish come out?
A: Read post three: The Fish. Only rares are actually affected by the time of day, and you can read either Post Two, or the Lake specific post to find out about the rare you have in mind.
Q: Why can't I sell my fish? I clicked "Exchange Fish" but they didn't show up confused
A: You were going to the place to get hats for your fish, not gold. If you just go to the main window in the Ole Fishing Hole and click on the fish, you can enter the number you would like to sell to Logan.
Bait
Q: What is this Bait Degradation I keep hearing about?
A: Read post five: Bait and Rods. A fairly simple, illustrated example is there for your convenience ^_^
Rods
Q: Which rod is the best?
A: There is no best rod, unless you count the Angelic PLUS, which hasn't been released. That said, there are rods best suited for certain tasks, but there is no supreme rod out as of yet.
Fish Hats/Junk Items
Q: I want to know what [Insert hat here] looks like equipped
A: Check out: The Fishing Exchange: How to Get a Nifty Hat
Q: I sold my fish to Logan and he didn't give me the hat! Why?
A: Because to get a nifty fishing hat, you have to click Exchange Fish. Just clicking on the fish and selling them gets you gold instead.
Personal Statistics/The Scoreboards
Q: How do I find my score?
A: In the Ole Fishing Hole, you can click on the sign that says "Top Fishers" on it, which will take you to the Statistics Page. There you can see both your current month's score, and your accumulated score for previous months.
Misc.
Q: Did you do all of this yourself?
A: As of now, yes. Though the information of what fish are available from what level of bait are taken from a quote of Mardoll's, taken from the code before it was bannable to look at it.
Q: How did you get [Insert Trophy Here]?
A: I worked very hard . Sorry, I am not yet making a guide on competing, I am too busy actually doing so. Maybe when I retire wink
*Note: This section will constantly be updated as new questions roll in.
|
|
|
|
|
|
|
|
|
|
|
|
|
|
|
|
|
|
Posted: Tue May 02, 2006 9:25 pm
|
|
|
|
|
|
|
|
|
|
Posted: Tue May 02, 2006 9:25 pm
Post 1: Introduction
Post 2: Getting Started
Post 3: The Fish
Post 4: Fishing Hats/Junk Items
Post 5: The Fish Exchange
Post 6: Bait & Rods
Post 7: Bass'ken Lake
Post 8: Port of Gambino
Post 9: Durem Reclamation Facility
Post 10: The Scoreboard Explained
Post 11: TF Explains
Post 12: FAQs
Post 13: Links
Post 14: >>>You are here<<<
Post 15:
|
|
|
|
|
|
|
|
|
|
|
|
|
|
|
|
|
|
Posted: Tue May 02, 2006 9:26 pm
Post 1: Introduction
Post 2: Getting Started
Post 3: The Fish
Post 4: Fishing Hats/Junk Items
Post 5: The Fish Exchange
Post 6: Bait & Rods
Post 7: Bass'ken Lake
Post 8: Port of Gambino
Post 9: Durem Reclamation Facility
Post 10: The Scoreboard Explained
Post 11: TF Explains
Post 12: FAQs
Post 13: Links
Post 14:
Post 15: >>>You are here<<<
|
|
|
|
|
|
|
|
|
|
|
|
|
|
|
|
|
|