|
|
|
|
|
|
|
|
|
 Posted: Mon Feb 25, 2013 5:07 pm Posted: Mon Feb 25, 2013 5:07 pm
 so this coloration is inspired by birds, this is why its called the "Feathers" Coloration of Angel's Wistas. It is a layering technique, usually almost always a very dark color like black that is on top of vibrant colors. It is sometimes different colors, however, like I have made yellow and blue ones but most of the time they are dark in color. You can make them whatever color you wish and I will show you here it is tedious a bit but simple to make this technique. so this coloration is inspired by birds, this is why its called the "Feathers" Coloration of Angel's Wistas. It is a layering technique, usually almost always a very dark color like black that is on top of vibrant colors. It is sometimes different colors, however, like I have made yellow and blue ones but most of the time they are dark in color. You can make them whatever color you wish and I will show you here it is tedious a bit but simple to make this technique.
Start with a base color or if you have most of you pet colored already, begin with that and create a new layer. Create a clipping mask if you can of this layer.
|
 |
|
|
|
|
|
|
|
|
|
|
|
|
|
Posted: Mon Feb 25, 2013 5:10 pm
 Pick up a dark color, or whatever color you plan to use for this feathering/layering technique of coloring and create a jagged line. This line will be the furthest away from you on the pet because you are going to "layer" a series of the same line until the come close to you at a small line that is in "front" You will see what I mean the further we get down in this tutorial. If you want to see the end product first and then scroll back up here to see where this line of dark is on the sphere if you do not understand, you should do so. Pick up a dark color, or whatever color you plan to use for this feathering/layering technique of coloring and create a jagged line. This line will be the furthest away from you on the pet because you are going to "layer" a series of the same line until the come close to you at a small line that is in "front" You will see what I mean the further we get down in this tutorial. If you want to see the end product first and then scroll back up here to see where this line of dark is on the sphere if you do not understand, you should do so.
|
|
|
|
|
|
|
|
|
|
|
|
|
|
|
|
|
|
Posted: Mon Feb 25, 2013 5:12 pm
 Next take a small eraser and erase on the inside of the line, this is not the top of it you see, it is the inside, or the "bottom" in this case of this line. Depending on where you put it on the pet, this could be in a different area so you want to erase where you are about to put your next line of dark jagged feathering. The erasing should be jagged like the way you colored to make it look like your color underneath this layer is actually ON TOP of the dark feathers. See.. its layering it. Next take a small eraser and erase on the inside of the line, this is not the top of it you see, it is the inside, or the "bottom" in this case of this line. Depending on where you put it on the pet, this could be in a different area so you want to erase where you are about to put your next line of dark jagged feathering. The erasing should be jagged like the way you colored to make it look like your color underneath this layer is actually ON TOP of the dark feathers. See.. its layering it.
Now to the next step.
|
|
|
|
|
|
|
|
|
|
|
|
|
|
|
Posted: Mon Feb 25, 2013 5:14 pm
 Next make your second jagged line of color. This one should be very close to your first one, but not over lapping it anywhere. It should also be shorter than it in length or near the same size if you want it to stretch very far along a pet's body. Next make your second jagged line of color. This one should be very close to your first one, but not over lapping it anywhere. It should also be shorter than it in length or near the same size if you want it to stretch very far along a pet's body.
|
|
|
|
|
|
|
|
|
|
|
|
|
|
|
|
|
|
Posted: Mon Feb 25, 2013 5:15 pm
 Once again, erase now on the inside of this line. You are going to repeat this process until you can not make any more lines. in this area of the pet. Once again, erase now on the inside of this line. You are going to repeat this process until you can not make any more lines. in this area of the pet.
|
|
|
|
|
|
|
|
|
|
|
|
|
|
|
Posted: Mon Feb 25, 2013 5:18 pm
 Finally, just make a few stray dots here or there to represent a few loose feathers away from the lines and you'll be finished with it. You'll end up getting pets like these. Finally, just make a few stray dots here or there to represent a few loose feathers away from the lines and you'll be finished with it. You'll end up getting pets like these. 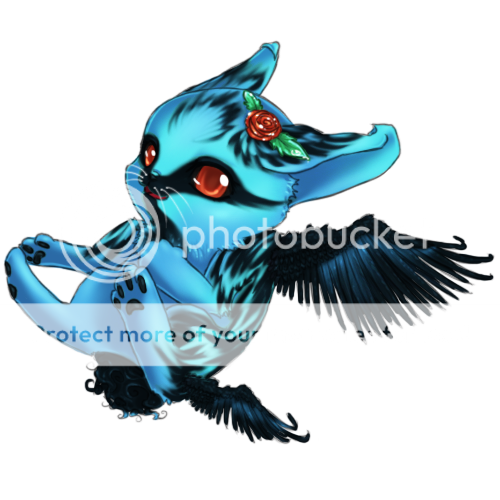 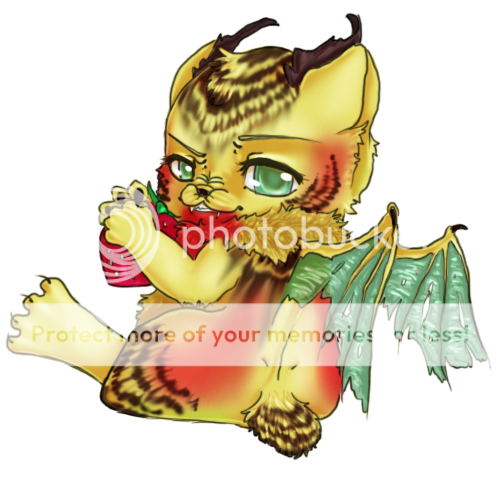
|
|
|
|
|
|
|
|
|
|
|
|
|
|
|
|
|
|
|