|
|
| Do you find online guides helpful? |
| yes |
|
92% |
[ 39 ] |
| no |
|
2% |
[ 1 ] |
| never used one |
|
4% |
[ 2 ] |
|
| Total Votes : 42 |
|
|
|
|
|
|
|
|
 Posted: Thu Feb 05, 2009 11:04 am Posted: Thu Feb 05, 2009 11:04 am
 Your one stop in obtaining information! Your one stop in obtaining information!
On this first page you will find a multitude of information regarding various facts of Animal Crossing. arrow If you cannot find what you are looking for in the posts below, there are also various links presented at the end of this post, where you can search for the information you need. Announcement Still cannot find the answer you are looking for?
PLEASE feel free to post it here! Moderators and threadies will be around to help answer your questions 3nodding  Below you will find links to various AC guides. Below you will find links to various AC guides.
These provide players with walkthroughs, FAQs, item lists, and much more.
Just click and explore!GameFAQsWikiign entertainmentAC: aheadNeoseekerGamespot: WWGamespot: CFCheatsCodesGuidesHave another one not not on the list?
If you have an additional link that you would like to add, please copy, complete, and post the following form:[color=green][size=14]I'VE GOTS A LINK TO ADD![/size][/color]
[b]WEBSITE URL:[/b] (copy and paste from browser)
[b]WEBSITE NAME:[/b] (title of website) (( Below are some quick tips on AC:CF, courtesy of Wiki & GameFAQs )) ContentsI. Introduction & Links <---you are here yay! II. Getting Started: Your Town/Your City III. The Basics: Trees/Grass & Snow/Tools IV. Perfect Town: Step-by-Step V. Flowers: Hybrids & Outcomes VI. Bug Catching: Complete Bug List VII. Fish Catching: Complete Fish List VIII. HRA: Point Bonuses & Rewards VIII2. Feng Shui: Scoring/Benefits/Lucky Items IX. Special Characters: Town/City/Holiday X: confusedbaka's gift listu
|
 |
|
|
|
|
|
|
|
|
|
|
|
|
|
Posted: Thu Feb 05, 2009 9:18 pm
Before You Start…Before you can catch a bus to your new town, you'll first have to setup a few basic things, including the date and time. But more interestingly, if you have Animal Crossing: Wild Word for the Nintendo DS, you can actually import your character and play as him or her in City Folk! And better yet, the items you added to your catalog in Wild World will also be carried over to City Folk, where they can be purchased from Tom Nook at rock-bottom prices! Once you're done setting things up, it's time to catch the bus to town! The Wheels on the Bus go Round and RoundYour Animal Crossing life begins on a bus ride to your new home town. A short ways into the ride, a friendly cat named Rover will sit across from you and begin making small talk. Although he may seem nosy, the questions he asks plant the seeds of your future, so answer wisely! Choosing a HomeOnce the bus drops you off, you're free to explore the town. But one of your first tasks should be choosing a place to stay. Check your map to locate the four vacant houses scattered about. While the choice is yours, we strongly suggest choosing the one that's closest to Tom Nook's store--it'll save you a lot of time running back and forth in the long run. Don't like your town?The town's layout is randomly each time you create a new file, so if you're not happy with how it looks or the way its laid out, simply start over to get a new one! But remember, everything will be lost, including your character, items, etc, so it's best to do this before you become too invested in your village. Be friendly to your neighbors, as they'll often give you goodies in return. After you've checked out some of the homes, a strange raccoon known as Tom Nook will be waiting for you outside. Turns out he's the landlord of this property, as well as the local shop owner, and he wants to know if you're interested in buying it. If you accept, he'll quickly put you to work in order to make your first payment. WorkingDespite you having almost no say in the matter, working for Tom Nook isn't so bad. In fact, it gives you a chance to meet some of the town's residents and come to grips with how life in Animal Crossing works. The tasks are all pretty self-explanatory, and help cover the fundamentals of Animal Crossing. Once you've completed all of Nook's tasks, he'll let you off the hook. You're still going to have to make the payments on your home though! Animal Crossing : Your TownOkay, so you've moved in and completed Nook's job requirements, but there's still much to see and do--you've only scratched the surface! Your HomeWhile your home is where you'll go to sleep and save your game, its primary use is to store all that stuff you find. Unfortunately, it starts quite small, with a living room and small bedroom above. But as you begin to make payments, Nook will eventually upgrade your home to bigger and better offerings, allowing you to store even more stuff! Here's the upgrade schedule, based on your payments: 1st Expansion: 120,000 bells 2nd Expansion: 248,000 bells 3rd Expansion: 368,000 bells 4th Expansion: 598,000 bells Nook's StoreApart from your home, Nook's store will probably be one of your most visited locations. If you need something, odds are Tom Nook can hook you up…for a price. Here you'll find all sorts of goods, from tools such as the axe and fishing rod, to wallpaper, flower seeds, and more. In addition, Nook will upgrade his store periodically, after you've spent a set amount of money: 1st Expansion: 25,000 bells 2nd Expansion: 90,000 bells 3rd Expansion: 250,000 bells Town HallThe Town Hall doubles as both a civic center and post office, depending on which window you speak to Pelly through. On the Post Office side, you're able to send mail to other residents in town or post messages to your friends' Wii message board. As for the Civic Center side, you can check out the environmental state of your town, change the jingle heard whenever you interact with someone, or donate funds to help improve village life. If you donate enough money, special things will be built in town, such as: A Bridge: 200,000 A Fountain: 500,000 A Lighthouse or Windmill: 1,000,000 Able SistersThe Able Sisters are expert tailors who can outfit you in the latest fashions. Although their selection changes day by day, you can also create your very own shirt designs, for a small charge, of course. MuseumWell, that's odd. Your town has a museum, but there's nothing on display! It's a good thing you've moved in, as you'll be able to donate the things you collect to be used as exhibits. These include: Fish, Insects, Fossils, and Paintings. In addition, the museum is also home to an Observatory (where you can draw constellations in the sky) and The Roost, a relaxing coffee shop where you can enjoy a live musical performance every Saturday night, put on by the one and only K.K. Slider. If you dig his tunes, you can replay them on your home stereo with the CD he gives you after every performance. The GateIf you want to get away or just invite some friends to your town, then you'll have to visit the town gate to do so. The gate is always located in the same place of every town, along the northern wall. There you'll find two guards: Booker and Copper. Check in with Booker (the one on the left) if you want to find out what's going on in town, if there are any lost items, or change the town flag. Or talk to Copper if you wish to visit another friend's town or invite them to yours. Animal Crossing : Your CityAs the name suggests, you're no longer confined to the mere greenery of your village. Oh no, now you can catch the bus for a ride into the city! But don't let the fact that it's a city overwhelm you--it's really quite quaint and easy to navigate. Here's what you can find while there: It sure is small for a city, but there's still a lot you can do. Shampoodle (Hours: 8am -- 9pm)If you're feeling drab, stop by Shampoodle's for a makeover! And like most good hair stylists, the employees here are great conversationalists. In fact, the manner in which you answer her questions dictates what kind of hair style you wind up with! Or if you're not feeling up to getting a haircut, you can also put on a mask that looks just like your Mii! Gracie (Hours: 9am -- 9pm)Gracie runs the local clothing store, although the prices can be a bit steep. Because the clothing she sells is seasonal, you may want to hold out on purchasing until the new season for some steep discounts on the outdated goods--but beware, the item you want may be sold out! Her shop also closes the earliest (along with Shampoodle) so make sure to stop by before it gets too late. The Marquee (Hours: 10am -- 11pm)While the tickets may be expensive (hundreds of bells), attending Dr. Shrunk's comedy act is the only way to learn new facial expressions. Katina's Fortunes (Hours: 10am -- midnight)You don't have to be the superstitious type to reap the rewards of Katina's Fortunes! For a small price, she'll give read you your outlook, which you'll find may very well affect the things you find or encounter back in the village. Redd's Secret Shop (Hours: 10am -- 1am)Redd's back and sleazier than ever, only now he's opened a full-time shop in the city itself! Unfortunately, the shop is off-limits until you're offered an invitation. Try buttering up some of your neighbors back in town by giving them gifts and keeping them happy--eventually, one should offer you an invitation to Redd's shop, though you're not in the clear yet! You must still pay Redd 3,000 bells in order to gain access to his store. Once a member, you'll find he carries some high-priced, but rare items that can't be found anywhere else. Auction HouseHave something rare that you want to sell, but aren't happy with the price 'Nook is offering? Then the auction house is for you! Here you can put whatever you want up for grabs, and anyone on your friend list can bid on the item, potentially netting you some major cash! Likewise, you can also bid on what your friends have put up for sale in hopes of acquiring that perfect item. Happy Room Academy HQThe Happy Room Academy is responsible for rating how well rooms fit a particular theme. Try visiting their HQ to see an ideal room, as well as perform a few other activities. Note: Unfortunately, the city is strictly a single-player affair. If you're playing with friends via Wi-Fi, none of you will be able to catch a ride on the bus to visit the city. So make sure you take care of your city needs before departing for a friend's town, or inviting others into yours.
|
|
|
|
|
|
|
|
|
|
|
|
|
|
|
|
|
|
Posted: Thu Feb 05, 2009 9:20 pm
 FruitLocal Fruit FruitLocal FruitEach player's town will start off with one type of fruit tree growing in it - the local fruit. Each tree will have three fruits on it, and will regrow three days after you pick it. Local fruit can be sold to Tom Nook for 100 bells each. Foreign FruitForeign fruit is any fruit other than your local fruit. Tom Nook will buy foreign fruit for 500 bells a piece. Getting Foreign FruitPlayers can trade with each other to get foreign fruits or villagers may send them a foreign fruit as a gift attached to a letter. Some letters your write are more likely to result in foreign fruit being returned than others. If you start your letter "Dear ," then have "How are you?" or any other three word sentence as the message, and end with "From " and attach a present you should get foreign fruit back quite often.
When you first get foreign fruit, it's a good idea to plant some in your town so you have a local supply.
Planting Fruit
Fruit can be planted in the ground using a shovel. If it grows, it will grow into a fruit tree. Plant a foreign fruit orchard next to Nooks and harvest it every three days. This is a great way to earn money since one full load of 15 foreign fruit is 7,500 bells.
Coconuts
Coconuts must be planted in the bottom row of acres in a town or they will not grow. Unlike other fruits, only two coconuts grow on a tree. Coconuts are found on the shore on random days at random times anytime during the year. As coconuts can never be a town's native fruit, Tom Nook buys them in all towns for 500 bells
Trees
Your town starts off with a number of trees already there, but these can be added to at your leisure by growing your own. There are five kinds of trees:
Fruit trees - Grown by planting a piece of fruit in a hole in the ground. Can be grown anywhere.
Normal trees - Bought from Tom Nook as saplings for 60 bells. These can be grown anywhere.
Cherry Blossom Trees - Change the color and shape of some tree's leaves to a pink-ish magenta color. They appear on or after the 1st of April to signify that spring has come!
Coconut trees - Grown by planting a coconut in a hole in the ground. Can only grow in the bottom row of acres. Coconuts can be randomly found on the beach.
Cedar trees - Bought from Tom Nook as saplings for 60 bells. These can only be grown in the top two rows of acres.
Bell trees - Grown by burying Bells with a golden shovel (see below for details)
Unlike flowers, they do not grow instantly, but instead take 3-4 days to develop fully. However, they do not require watering (watering doesn't help them at all) and stepping on/walking over/running over saplings does not affect their growth. A common myth is that some trees only grow on the higher or lower tier but these are actually acre-based.
Trees don't always grow to full size, some of them whither or are stunted, and no fruit will develop (if it's a fruit tree).
Trees play a large role in a town's environmental status.
Each tile in town is set to either "allow trees" or "do not allow trees". The latter are tiles which trees can never grow on, sometimes due to planned town features (such as the fountain) and sometimes just at random. A consequence of this is that if a tile contains a tree, it is an "allow trees" tile, hence cutting the tree down and planting a new one in its place will guarantee its growth.
An exception to the above paragraph is when the town fountain is created; existing trees that are positioned immediately adjacent to the new fountain are not destroyed (as they would be for the appearance of a new villager's house), but if they are cut down and a fresh sapling or fruit is planted in their place, the replacement tree will not grow.
Bell Trees
Grown by burying Bells with a golden shovel. These trees may produce three bags of Bells (a bit like fruit), each bag of Bells on the tree is the same as the amount of Bells buried. Bells will only sprout once, and even if the tree grows there is no guarantee that bells will be produced. The chance of a Bell Tree producing Bells is 1 percentage point per 1,000 Bells buried. So if you bury 10,000 (ten thousand) Bells you have a 10% (ten percent) chance of the tree producing three lots of 10,000 Bells (90% of the time the tree will just be a regular tree).
However the maximum payout from Bell trees is three lots of 30,000 Bells. So if you bury 50,000 Bells you'll have a 50% chance of the tree producing three lots of 30,000 Bells.
Using 100 bell coins to plant coins, while very unlikely to produce bell trees, can be a convenient method to plant many trees during one session.
Chopping Down Trees
Stunted and fully developed trees can be chopped down with an axe. This leaves a stump, which can be removed using a shovel.
New in AC:CF: some bugs only appear on tree stumps, namely the Longhorn Beetle and the Violin Beetle.
Shaking Trees
Trees can be shaken to make them drop their contents. With fruit trees this is pretty obvious: the fruit drops. Normal and Cedar trees will sometimes drop 100 bells or furniture when shaken, or may contain bugs like a Spider or a Bagworm.
WARNING: When shaking trees, there is the risk of getting stung by bees. However, this is the only way to catch those evil insects. Tips for catching bees can be found here. If you do get stung, you can buy medicine from Tom Nook's store for 400 bells once per day or you can save and reload and the sting will be gone.
Grass and Snow
Grass
When you arrive at your town, the ground will be mostly covered with grass (unless, of course, it's wintertime), with a few patches of dirt. If you walk over the same area frequently, it eventually wears away. This wear will become more and more visible each time you play the game. A slower, less visible form of wear does occur even after the initial wear.
A little grass grows back at 6am, but if you walk/run over a certain area enough a trail will begin to form. It takes about a fortnight before a faint path becomes visible, though some players experience it sooner. It goes from barely noticeable footprints, to a clear trail after a while. Running will accelerate wear, as will jogging, although running does the most damage.
Grass needs to be present in order for five bugs to appear - the bell cricket, cricket, grasshopper, long locust and migratory locust. These appear at various times of the year, but they all appear in September so it may be a good idea to designate a "nature reserve" area in town that is almost never walked on - even to dig up fossils or pull weeds, which should probably be done weekly in that area at most.
There are various patterns to grass, such as circles, stars, squares, and triangles. Each individual town will have a randomly-generated and permanent grass shape. This shape changes during winter, when the snow falls, then changes back again as the snow fades.
Snow
In early December, a notice is posted on your town's bulletin board alerting you to a low pressure system's arrival on December 10th. Following a full day of snowy weather, any grass covered areas will be converted to snow.
Snow, like the underlying grass, is worn away as it is walked over. Snow wear is more visible than grass wear because of the stark contrast between snow and dirt. Cracks in the ground will also be more visible. In addition to this, you will find snowballs in your town--your only method of catching dung beetles. These snowballs can also be made into a Snowman to attain Snowman furniture. Snow only falls on previously grassy areas, and natural dirt patches will always be bare. During the final weeks of February, you will slowly start to see some green on the trees in your town start to show. On February 25th, at 6:00am, all of the snow in your town will turn green, the snow on any ledges (buildings) will disappear, the snow on the bus will disappear, and the weeds will turn green.
Solutions to excessive grass loss
Some players find that after several weeks of play, there is very little grass left. In the winter, complete erosion of the snow can prevent players from obtaining Snowman furniture. One drastic solution is to Time Travel forward using the Wii system clock, loading one day at a time. Simply jumping forward a few months has no effect on the grass. Your grass should be fully grown back from a complete desert in 6 months, although if the situation wasn't too bad, it'll take less time than that. Grass grows back faster than snow, so if you were to resort to Time Traveling while snow was still on the ground, you should start at February 25th, and go forward from there, so the grass will grow back quickly, and by the time you go back to the real date with snow on the ground, it should have grown back. (as much as your Time Traveling accomplished)
Another method is to place pattern paths to all the most visited places in town, using them exclusively while the grass is in a state of recovery. Note that the patterns themselves do not have an effect on the grass in any way. They are merely a tool to help players develop paths only where they are desired. Early regrowth is fragile; walking over it even once will cause it to visibly disappear. For this reason, players who use this method may have to refrain from shaking trees or digging up fossils and gyroids until the grass reaches a certain stage of recovery. Grass grows faster under trees and flowers and, for a town that has not yet eroded to the point of desertification, planting trees and flowers in problem areas may be enough to reverse or halt the damage. However, the act of walking to the flowers to water them will erode the grass you walk across to reach the flowers. Placing the flowers along the pattern paths themselves is an option while the town is in the early stages of recovery. Natural dirt spots will not grow back.
Whether you're trying to prevent future desertification or are in the process of regrowing your grass, there are are a few things that should be avoided. Unnecessary reloading of the game makes your grass more vulnerable to new wear. Not reloading is not a complete solution, however, as some additional, slower wear still does occur within a single load after stepping on a tile of grass for the first time and the grass becomes susceptible to the faster wear again after 6am. When there are multiple players of the same game file, it may be difficult to avoid reloading. In those cases, pattern paths may be additionally beneficial, as they encourage different people to take the same routes through the town. You should only run where you want a path to form. Do not use the same area repeatedly for rolling snowballs into snowmen; this can very quickly erode an otherwise untouched area of snow.
Grass wear and regrowth is actually affected by the current season. During winter (especially December), the grass will be at its worst, wearing away quickly and growing back slowly. During spring and summer (especially June), the grass will wear down roughly half as fast, and grow back significantly faster.
Note that the grass in your town is arranged in invisible, pattern-sized blocks. When a block of grass is growing back from total dirt, you'll be able to see a small circle of grass, dead center in that block. More bits of grass will appear within the block as time goes on, or the grass will shrink away if it's walked on.
Tools

Axes
Occasionally available in the tools section of Nook's shop (after upgrade to Nook 'n' Go) for 400 bells.
Silver axe:Occasionally given by Serena, summoned once per day by throwing a basic axe into the town fountain.
Golden axe:Occasionally given by Serena.
Purpose: An axe is used to cut down trees. This is used to clear away undesired trees to make a path or to redevelop and improve a town's environmental status. Axes can also get money out of a money rock, and they can get any bugs out of a rock.
Upgrades: The basic axe breaks and disappears from the inventory after around 50 hits [count needed]. The item and its icon change to two stages of visible cracking before the axe breaks, and the player can use this to know roughly how close their axe is to breaking. Silver and golden axes cannot break.

Nets
Usually available in the tools section of Nook's shop (all incarnations) for 500 bells.
Silver net: Rarely available in the tools section of Nook's shop (after upgrade to Nook 'n' Go) for 500 bells.
Golden net: Given to the character by speaking to Tortimer after catching every bug.
Purpose: A net is used to catch bugs. Upon use the character swings the net in an arc over its head, catching a bug within range of the swing. Bugs are caught to be collected, donated to the museum, or sold for income.
Upgrades: The silver net is a tiny amount larger than the basic net. The golden net is larger than both.

Shovels
Occasionally available in the tools section of Nook's shop (all incarnations) for 500 bells.
Silver shovel: Given by Resetti the first time a character enters the Surveillance Center.
Golden shovel: Buried shovels turn into golden shovels the next 6AM following burial.
Purpose: A shovel is used to dig holes in the ground, bury items in existing holes, retrieve buried items (such as fossils, gyroids or any manually buried item), remove tree stumps or saplings, and hit money rocks.
Upgrades: In addition to the above, a silver shovel provides a 10% chance at doubling the bells that appear from a money rock each time it is hit. A golden shovel does not do this, but allows the player to create saplings using bells, with a possibility of the resulting tree turning out as a money tree, with 3 sets of 30,000 bells. Every 1,000 bells you bury give you a 1% chance at a money tree (i.e. 50,000 bells buried gives you a 50% chance at a money tree)

Fishing Rods
Usually available in the tools section of Nook's shop (all incarnations) for 500 bells.
Silver rod: Rarely available in the tools section of Nook's shop (after upgrade to Nook 'n' Go) for 500 bells.
Golden rod: Given to the character by speaking to Tortimer after catching every fish.
Purpose: A fishing rods is used to catch fish. Fish are caught to be collected, donated to the museum, or sold for income.
Upgrades: A silver rod attracts the attention of fish from further away than a basic rod. A golden rod also does so to a greater extent and also keeps a biting fish on the lure for longer, allowing the player more response time to complete the catch.

Slingshots
Occasionally available in the tools section of Nook's shop (after upgrade to Nook 'n' Go) for 500 bells.
Silver slingshot: Rarely available in the tools section of Nook's shop (after upgrade to Nook 'n' Go) for 500 bells.
Golden slingshot: Appears as a "three-balloon" balloon after shooting down at least eight balloons.
Purpose: A slingshot is used to shoot balloons carrying presents, and the UFO of the special character Gulliver.
Upgrades: The basic slingshot fires a single pellet into the sky directly upards. The silver slingshot fires two pellets angling away from each other, increasing the amount of sky covered. The golden slingshot fires three pellets, one centered with the other two to each side, to further increase coverage.

Watering Cans
Occasionally available in the tools section of Nook's shop (all incarnations) for 500 bells.
Silver can: Mail from "Posy Farm" after buying 50 bags of flower seeds at Nook's shop.
Golden can: Awarded by the Town Hall after maintaining the best environmental status for 15 consecutive days.
Purpose: A watering can is used to restore withering flowers in order to prevent them disappearing the following day. They are also used to water buried red turnips. The effective radius of the watering can is greater than the visual effect, and using it in one space will also water the spaces above, below and to the sides.
Upgrades: The silver can resets a wilted buried red turnip, making it count as "just planted" the following day. The golden does not do this, but instead turns wilting black roses into golden roses (which themselves never wilt). Both the silver and gold cans have a greater effective radius, watering all eight spaces surrounding the spot where it is used.

Timer
Occasionally available in the tools section of Nook's shop (after upgrade to Nook 'n' Go) for 500 bells.
The timer has no Silver or Gold varieties. Upon being started, the timer counts down from a limit the player sets (3, 5, 10 or 15 minutes). During this countdown, all players in the town (via Wi-Fi) are able to view the total number of fish and bugs caught by their character as well as other characters in town. When time runs out, the score (total bugs and fish caught during the time) is displayed over each characters' head.
The timer replaces the normal clock on screen while active, preventing the player from being able to see the current time. The timer can be stopped early, but removing it from the character's inventory does not automatically cancel the timer. If other characters in town own a timer, they can also cancel the timer's countdown.
|
|
|
|
|
|
|
|
|
|
|
|
|
|
|
Posted: Fri Feb 06, 2009 6:22 am
 Steps to Make a Perfect Town Steps to Make a Perfect Town 1. Use patterns to make acres by 16x16 shovel spaces (16 down, 16 across) 2. Have between 12 and 15 trees and 6 to 10 flowers per acre in your town. 3. Try to get rid of all the weeds in your town. 4. Don't leave any items lying around. Seashells and fruit are excluded from this. Each weed or non-natural item (anything from random furniture to rotting garbage) effectively cancels out one flower in the 16x16 area it is in. (Confirmation needed, but that's how it worked in GC and WW). If your town meets these specifications for 15 days in a row, you earn the Golden Watering Can from the Town Hall's environment counter as a reward. Once the Gold Can has been earned by one player in your town, any of the remaining three players can obtain one (regardless of whether or not they helped). In order to have a perfect town, 8 out of 25 acres must be "perfect," and the rest must be "decent." Here is a guide on how to make perfect and decent acres. 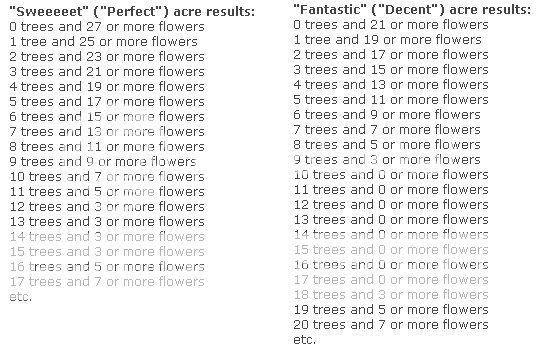 "This place is the pits! Everything that can go wrong has gone wrong! There's not a single thing I like in this town!" "Bad" message:"I'm not sure what good it will do to write this, but... Could you try and be a bit more thoughtful about your town? Because at this rate..." "So-so" message:"Hmm... it's not a passing grade, but it's not a failing grade either. I'd give it a D plus. Maybe a C minus on a good day." "Decent" message:"This town is fantastic! But even so, it still seems to be missing something" "Perfect" message:"Fantastic! [Town Name] is in great shape right now! Yep, it's pretty sweeeeet!" Pelly and Phyllis Comments:Pelly and Phyllis will add their own comment, hinting at what should be done in order to improve your town rating(In brackets is the simple version of what you need to do):  Pelly: Pelly:1) Hmm... You know, I think the problem is there are those gross flowers that keep showing up. You really have to work daily to prevent eyesores like that from sprouting. [Get rid of Rafflesia] 2) Hmm... I guess my hunch was right. All those weeds around town are really stirring everyone up. [Pick weeds] 3) Hmm... It sounds to me like the problem is all the garbage lying around. [Get rid of trash] 4) Hmm... It sounds like the problem is that there's too much stuff on the ground. [Pick up items] 5) Hmm... Yes, it seems this problem might be a result of having too many trees in some areas. [Remove trees in one or more acres] 6) Hmm... Maybe people are sending in these comments because there's not enough greenery in some areas. [Add trees (and/or flowers) in one or more acres] 7) Everyone's got to work together so we can make [town name] shine. Make sure to do your part. [Plant flowers in one or more acres] cool I feel like the luckiest pelican in the world to be able to work in a wonderful town like [town name]. [Keep rating to get Golden Can]  Phyllis: Phyllis:1) There must be a flower that smells terrible somewhere in town. Well, if that's the problem, maybe they should just stop planting them! (Come on, genius!) [Get rid of Rafflesia] 2) It must be because of the weed problem in town... (Talk about disgusting!) [Pick weeds] 3) It's because there's so much garbage cluttering up the town! (Ugh, how gross!) [Get rid of trash] 4) I guess there's just too much stuff lying around town. [Pick up items] 5) Maybe it's because of all the trees around town... (What am I, a scientist?) [Remove trees in one or more acres] 6) Problem is, some areas just don't have enough trees. TREES! I said TREES! (Try listening for once!) [Add trees (and/or flowers) in one or more acres] 7) I don't know about you, but I'd sure rather live in a nice place than a bad place. [Plant flowers in one or more acres] cool Well, isn't living here better than you expected? (...Or maybe not.) [Keep rating to get Golden Can] Mapping Your TownInstead of using patterns, you may want to try mapping out your town with graph paper or in a computer program. Not only does this give you a concrete look at your town, it saves you time in laying down and picking up patterns and allows you to create plans for your town in terms of tree placement. Instead of using patterns, existing trees/landmarks and shovel holes can be used to align everything correctly. (Note that shovel holes disappear when you save and quit, saving you time for cleanup.)
|
|
|
|
|
|
|
|
|
|
|
|
|
|
|
|
|
|
Posted: Fri Feb 06, 2009 6:23 am
Flowers are used to make your town look nicer and more colorful. There are a number of different species available, and many are available to buy from Tom Nook. Flowers must be watered occasionally, and a sign that they need watering is when they droop and lose color. Failure to water a flower will result in it dying after one or several days. Running over a flower multiple times will destroy it. Picking up a wilted/unhealthy flower will destroy it. Watering a flower will ensure that it is not withered the next day. Rain and Snow water all flowers in your town automatically. It is believed that if it is raining in the city when you visit it, it still counts as having watered your flowers for that day. Flowers can also be picked up and placed inside your house where they will appear to be growing in some sort of flower pot or trough. Whilst they are indoors, they will never wilt or require watering, so this is a useful way to keep rare hybrids if you know you won't be able to water them for a few days. Note:Flowers are the biggest part of your perfect town status. Flowers can be also be worn. Tulips, Cosmos, Pansies, and Jacob's Ladders are worn in your hair. Roses are carried in your mouth. Flowers that are not available through Nook include Dandelions, Jacob's Ladders, Carnations, and Hybrids of flowers that can be bought from Nook.  Dandelions Dandelions : appear randomly throughout most of the year. If left alone, they will eventually change into dandelion puffs, which may be equipped. Pressing A with a puff equipped will cause the seed to blow away, destroying the item in the process.  Jacob's Ladder Jacob's Ladder : is a Flower that will ONLY grow when your town has achieved 'Perfect' status. Everyday that your town is 'Perfect', a Jacob's Ladder might grow. 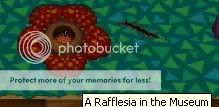 Rafflesia Rafflesia : appear when the town has been neglected for too long or Time Traveling has occurred. They have appeared in all Animal Crossing games to date. In City Folk, a Rafflesia appears in the Town Museum. Rafflesia can be rid of by weeding the town. Flies can be caught near them. Carnations : are received on special holidays. They come in red, white, and pink. On Mother's Day, your mother will send you a bag of pink carnations. On Father's Day, your dad will send you a bag of red carnations. White carnations are only obtained by cross-breeding pink and red carnations. Animal Crossing Hybrid Flower GuideHybrid events occur randomly Every day at 6:00am, roughly 3-5 new flowers spawn in your village. These flowers may be wild, or they may be the product of two parent flowers. Parent flowers may spawn the standard color flowers, or, if conditions are ideal, a second generation color (that is, a color other than red, white, or yellow). Flower seeds in standard colors can be bought from Tom Nook to set up hybrid plots. In order to get two flowers to cross You must have two flowers of the same type (ie, two pansies, two roses, etc.) adjacent to one another. If two flowers successfully produce offspring, their child will appear in any of the nine squares that surround either of the two parents. It is important to note that flowers will not reproduce if all of the nine squares surrounding both parents are blocked by obstacles such as trees, rocks, or patterns placed on the ground. As a clarification, it is perfectly okay for some of the spots to be blocked. In fact, to increase the probablity of successful hybridization, we encourage users to arrange flowers so that that each flower touches multiple potential breeding partners. Possible Crossbreeding outcomes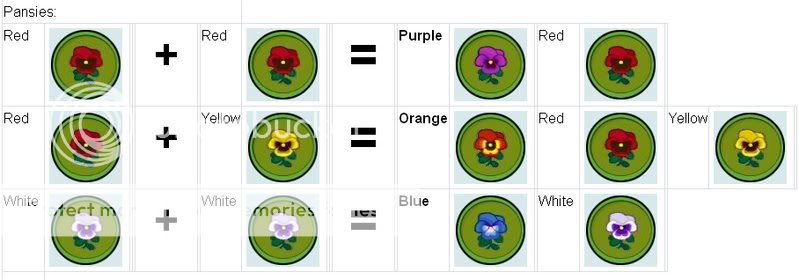 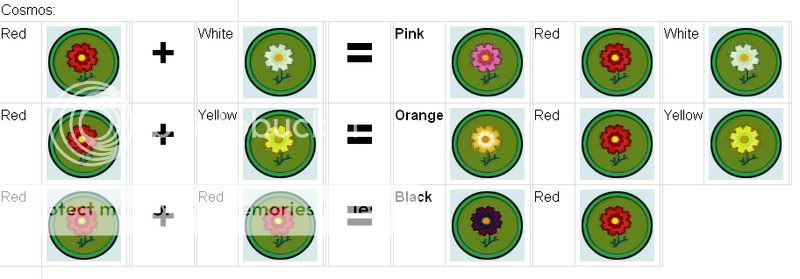   Nooks Selling PricesFlower Name : Price
|
|
|
|
|
|
|
|
|
|
|
|
|
|
|
Posted: Fri Feb 06, 2009 6:27 am
Bug Catching: Tips and TricksBugs in TreesSome bugs hang out inside trees, and you have to shake the tree to get at them. You can't tell if a tree is hiding a bug inside it,. so you'll just have to keep shaking trees and see what happens. Spiders and Bagworms will hang down from trees when you shake them. After a short while hanging they'll climb back up inside, but you can always shake again. When the bug is hanging from the tree, get your net out and catch it - use left/right on the d-pad to change quickly between tools to make catching it easier. From villagersDo a favor for a villager and he/she may give you a bug (even if it's not the season for the bug!) as a reward. BeesSometimes when you shake a tree a beehive will drop down, and bees will give chase and try to sting you! If you get stung you'll get a nasty sting on your face, and the animals will all comment on it when you talk to them. To get your face back to normal take some medicine, or just save and restart your game. When you see the beehive you have two options: catch them or hide. If you want to hide, just run away and get indoors as quickly as possible. If you want to catch them, the easiest way seems to be as follows: - as soon as you see the beehive, run away north - switch to your net (this causes you to face south, so you're facing the right way for the bees) - as soon as you see the bees appear on the screen, swing your net! Sometimes it won't be possible to run north. In these cases run directly east or west if possible, and after switching to your net you'll need to face the direction the bees will be coming from. Bees have a bit of a lag when chasing you. If you make a quick turn while running, they'll swing wide, allowing you time to switch the item you're holding or for you to take aim. You may find it easier to 'fake them out' and swing your net during their turn. Like in Animal Crossing: Population Growing opening your inventory causes the bees to freeze in midair. This tip can be used to easily switch to your net without worrying about being stung. Bugs in the AirBugs like butterflies can be found flying in the air. Birdwing butterflies fly with great heaping flaps. So big, that they fly pretty dang slowly. You also must realize that with these heaps they fly great distances so wait until you're right under them to swing. They seem to fly higher than other butterflies as well, so try to watch their shadow to ensure a capture. Agrias Butterflies are extremely quick - you'll need to run them down to properly catch them. You may get lucky and see one land on a flower. You can then walk slowly up to them and catch them unaware. Banded Dragonflies fly so quickly that your best bet to catch them is to chase them into a sign, wall, or other obstruction. They pause for a moment to change direction - that's your cue to swing! Bugs in RocksBugs like the Pill Bug and Centipede live in rocks - hit rocks with your Shovel to release them, then catch them with your net. Use left/right on the d-pad to change quickly between tools to make catching it easier. Bugs UndergroundThe Mole Cricket lives underground. If you're walking around and hear a cricket sound but can't see one, it's probably a Mole Cricket underground. To get the Mole Cricket you have to dig a hole to release it, then catch it with your net. It might take a number of holes in the area where the sound is before you find it. Use left/right on the d-pad to change quickly between tools to make catching it easier - or visit a friend on WiFi and cooperate to catch a Mole Cricket, one of you digging the other catching. Bugs on TreesSome bugs, like the various Stag beetles, can be found on tree trunks. If you disturb them, for example by moving too quickly near them, they will fly off. A good way to hunt these sorts of bugs it to start by the sea and walk upwards in your town - that way you can see the bug on the trees as you walk up and slow down if you see a bug. Walking from top to bottom is town is much harder and you'll probably disturb bugs before you see them. Some bugs are easier to scare than others, too. Usually the rarer the bug, the more careful you'll have to approach it. Lantern Flies and Oak Silk Moths are especially vulnerable to quick movements. You can tell a Lantern Fly sees you when it opens its wings - you'll have maybe 1 more step before it flies off. Bugs on Tree StumpsNew in AC:City, bugs like the Violin and Longhorn Beetles only appear on tree stumps. Bugs on TrashSome bugs appear on stuff you leave around time. For example if you want to get Ants, leave a rotten turnip outside and soon you'll see ants crawling all over it. Bugs on VillagersTo get a Flea you'll need to spot it on a villager first. Make sure you're not too close or you will talk to them. If you have trouble, you can swing the Wiimote while facing the villager instead of pressing the A Button. You might also invite a friend over, have them talk to the villager, and swing at them while they're distracted. Bugs on the GroundBugs like Grasshoppers, Crickets, and Leaf-Bugs can be found wandering around the ground. Try not to make them flee into bodies of water! Spiders and ScorpionsWatch out when you see one! These crazy critters will chase you if you take out your net, so while hunting them, be sure it's concealed. They will flee if you don't have it out, so use your time to create a good plan before you get bit or stung. Tarantulas can jump over pits, rocks, and other obstacles, so be extra careful around them. The easiest way to catch one might be to chase it due north until it's almost off-screen, take your net out. Time your swing as it approaches carefully. They run as fast as you do (if not faster). Scorpions are a little more docile and slower. A rumour said you can dig holes around them to keep them in one spot, but they can simply walk over them, so it's not true. Another possible capture method is to chase one off of the top tier. When you get your net out, the walls will stop it from stinging you, but it will still try to give chase. Work your way around the walls to a slope and catch it while it's stuck on ground with a tiny level difference (i.e. around where it flattens out) if you stay far enough away. It might just be easier to let it flee from you then take your net out, catching them as they scurry your direction. If you get bit or stung by one of these 'bugs', you'll awaken in front of your house and the 'bug' will be gone. COMPLETE BUG LISTName A-Z RareLocation Date (Time) Nooks Price 
|
|
|
|
|
|
|
|
|
|
|
|
|
|
|
|
|
|
Posted: Fri Feb 06, 2009 11:15 am
Fishing: Tips and TricksFast BitersMost fish are pretty easy to catch - once the fish takes the bait most people find it easy to hit the button (or gesture with the Wii Remote) in time to catch the fish. Not all fish are so easy to catch! The following fish only give you a very short time to react before they swim off: Coelacanth
Tuna
Stringfish
Arapaima
Angelfish
Gar
Hammerhead-Shark
Arowana
Napoleonfish
Dorado
Ocean Sunfish
Barred Knifejaw
Shark
If you want to catch these fish you'll need to get really fast at reacting to fish biting. Or you can try the Fifth Nibble Trick (see below). The Fifth Nibble TrickSometimes fish bite on the first approach to your lure, sometimes they nibble a few times at it before biting. However it seems that the fish never take more than five approaches before biting - so if a fish nibbles four times you know that next time it's gong to bite, and you can be ready with a super fast reaction to catch even the fastest fish! WaterfallIf you're fishing just upstream of the waterfall, be careful the fish on your line doesn't get too close to the waterfall or it will swim off. One way to avoid this happening is to to fish from far enough upstream so that your lure can't go too close to the waterfall. BridgesFish can swim under bridges, but your lure won't go under them. If a fish is already nibbling at your lure and it goes under a bridge, you can still catch the fish. Scaring FishThere are several actions that will scare fish away, which may be desirable in some situations: Running along the shoreline within a certain distance of the fish.
Releasing another fish nearby.
Pulling in the rod after a fish has begun biting.
Use another tool nearby (The net works well if you're trying to scare them). Silver RodSilver Rods have better lures than normal rods, making fishing a bit easier. You can buy them for 500 bells from Nook's shop once it's become a Nook 'n' Go (first upgrade), but they only appear rarely. Golden RodThe Golden Rod 'is a real fish magnet!' plus it makes the fish hold onto the bait for a little bit longer. Sensory DeprivationUsually, a player uses three senses while fishing: sight, feel (Wii-mote vibration), and sound. However, if a player tends to pull the rod out before the fish actually bites, it may be useful to stop using one of these senses. One technique is to close your eyes and rely only on the sound and vibration. It may be useful to keep your eyes open until the fish has taken one nibble, that way if the fish happens to bite right away, before taking any nibbles, you will be able to see this, but if it doesn't, you can use the first sound as a reference to distinguish between a nibble and a bite. Another technique is to mute the television and just closely watch the bobber. COMPLETE FISH LISTName A-Z RareLocation Date : Time Nooks Price 
|
|
|
|
|
|
|
|
|
|
|
|
|
|
|
Posted: Fri Feb 06, 2009 11:16 am
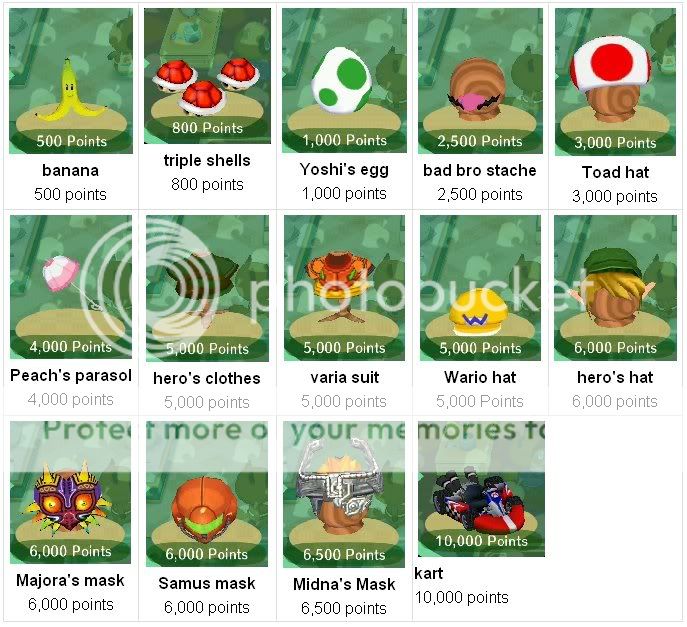
Animal Crossing : The Happy Room AcademyIt is mainly a bit of fun, to see how well you can decorate your house, but if you score a lot of points, there'll surely be a reward! The Happy Room Academy (HRA) is an in-game organization which inspects your house once a week and scores the style and placement of your furniture and other decorations.  Your Score: Your Score: Showcasing complete furniture sets and series and/or rare or expensive pieces of furniture will help boost your HRA score with special point bonuses. Following the rules of Animal Crossing Feng Shui will also boost your score. What seems to be the easiest and possibly cheapest way to collect HRA points is to acquire as many HRA Lucky Items as possible - 18 lucky items alone will get you well over 100,000 points. One significant difference between City Folk's HRA and previous versions' is that in City Folk your basement (once you have one) is also judged and included in your HRA score. HRA Headquaters: In the City you can visit the HRA headquarters, where you can view your friends' scores via Nintendo WiFi Connection. In the early morning when most of the stores are closed, you can go to the HRA but you can't see Lyle and the entrance to the model room will be blocked by the red rope and a note. Rumor says that Lyle sleeps on the bed in the model room (sometimes, there isn't a bed). Evaluation Letters: On Sunday the HRA sends you your evaluation results on academy paper. You can "opt in" or "opt out" of receiving these mailings by talking to Lyle at the HRA Headquarters. Point BonusesName : Points Details Complete Series : 20,000 all 10 pieces of furniture in a series. Complete Series + Wallpaper or Carpet : 25,000 all 10 pieces of furniture in a series and either matching wallpaper or carpet. Complete Series + Wallpaper and Carpet : 30,000 all 10 pieces of furniture in a series plus both the matching wallpaper and carpet. Furniture Theme Flooring or Wallpaper : 3,000 just a theme's flooring or wallpaper. Furniture Theme Flooring or Wallpaper + Theme Furniture : 3,000 time the number of pieces of furniture in the room which match the carpet or wallpaper. Complete furniture set : 1,000 for each piece in the set. RewardsPoints : Prize 70,000 : House Model 100,000 : Wide-house Model 150,000 : Two-story Model Animal Crossing : Feng ShuiFeng Shui is the belief that items and furniture can be arranged in your house to increase the flow of life energy. This is thought to bring good health and good luck. Animal Crossing has its own form of Feng Shui. In Animal Crossing you place Yellow furniture and items on the West (left) side, red items and furniture to the East (right) side and green items and furniture to the South (bottom). This is said to give higher scores when it comes to the Happy Room Academy (HRA).  Feng Shui Scoring Feng Shui ScoringA score is created from the placement of your items and their appropriate colors. Every item has some alignment to a color. Some have multiple color elements (ex. Watermelon Table is Red/Green) and some are double-colored (ex. Green Lava Lamp is Green/Green). As such, some items are worth more points naturally on specified colors - a Watermelon Bed in the southeast corner is worth more than if it was in just the south or east (see examples below). Items spanning multiple spaces have their points given for each space they sit in. A Green Table entirely in the south part of your house takes up 4 spaces (it's 2x2), so you get +2 for each spot, totalling +8 for just the table. Also note that any item placed on top of this table will also get counted towards your total score. An example of scoring placements:A Green Lava Lamp (Green/Green) on a green square gets +2, on a green/red or green/yellow gets +1, and anywhere else gets +0. A Sunflower (Green/Yellow) on a green or yellow square gets +1, on a green/yellow square gets +2, and anywhere else gets +0. Feng Shui BenefitsWhat color coordinating will do for you. Increase Yellow Feng Shui to:-Increase the amount of bells that villagers give you as a reward when you do stuff for them. -Increase your ability to obtain an 8th bag of money (worth 8,000 bells) from the money rock. A score of 73 "points" seems to be the minimum needed. -Increase the probability of success of Bell Trees. -Increase the probability that non-counterfeit paintings appear at Redd's. Increase Red Feng Shui to:-Increase the probability that Mario Items appear in floating balloon presents. -Also increase the probability of non-counterfeit paintings appearing at Redd's. -Increase the chance that "Crazy Redd exclusives" appear at Redd's. Increase Green Feng Shui to:-Increase the chance that spotlight items appear at Nook's. -Increase the chance of non-counterfeit paintings appearing at Redd's. -Increase the chance that "Crazy Redd exclusives" appear at Redd's. While it seems easy to test some of the yellow benefits (it's easy to observe an increase in villager bell rewards and the money rock bonus has been confirmed), most of the benefits of Feng Shui, including the chance of non-counterfeit paintings appearing at Redd's and such, seem rather difficult to test, as there is no hard numbers available for comparison. The only way to confirm or deny such a result is simply through repeated observation. Lucky ItemsThere are also a number of Lucky Items, which can be placed anywhere in the room. There are conflicting reports as to whether or not lucky items contribute to Feng Shui, other than those that have color, such as the Washer/Dryer (Green). They do add 7,777 points to your HRA score. Having more than one of each item in a room will still only give 7,777 points. Item Name : How to get Arwing : Spotlight Item at Tom Nook's Dracaena : Spotlight Item at Tom Nook's Garden Gnome : Spotlight Item at Tom Nook's Ivory Piano : Spotlight Item at Tom Nook's Jack-in-the-box : On Halloween, have Jack play three tricks on you Lefty Lucky Cat : Buy from Redd Lovely Phone : Gift from Katie and Kaitlin Lucky Black Cat : Buy from Redd Lucky Cat : Buy from Tom Nook Lucky Clover : Find randomly around town on clover patches Lucky Gold Cat : Spotlight Item at Tom Nook's Master Sword : Spotlight Item at Tom Nook's Music Box : Gift from Katie and Kaitlin Piggy Bank : Deposit 10,000,000 Bells into your ABD account Raccoon Figurine : Buy from Redd Samurai Suit : Spotlight Item at Tom Nook's Treasure Chest : Spotlight Item at Tom Nook's Triforce : Buy from Redd Washer/Dryer : Buy from Tom Nook Animal Crossing : Nooks Point SystemBuying items from Tom Nook earns the player Nook Points, which can be exchanged for Nintendo-themed prizes. Accumulating Nook points will also increase the player's membership rank, resulting in discounts and models of Nook's store. Nook Points can be tracked through the green "Nook's Point-Tracking System" machine in the shop. Every 100 Bells spent in Nook's store (including the catalog) earns the player 1 Nook Point. Additionally, selecting the "visitor points" option from the machine will earn 3 points, or 5 if it's done in someone else's town. Visitor points can only be awarded once per day. Occasionally, Nook will have a Point Special. During that day, the player earns 5 times the normal amount of points for purchases. Nook will announce Point Specials about three days in advance on the notice board outside the Town Hall. The character's "member" title will be upgraded automatically when they reach certain point totals. Each title improvement automatically sends that character a mail "From TNPS" announcing the promotion and including a model of one of the incarnations of Nook's shop, which can be placed as furniture. The Nook Point Tracking System: can tell a player how many points the current character needs in order to achieve the next Member level, though if they are already a Platinum Member it instead waxes lyrical about their shopping frequency. The Nook Points themselves can also be spent on exclusive Nintendo-themed rewards as shown below:
|
|
|
|
|
|
|
|
|
|
|
|
|
|
|
|
|
|
Posted: Fri Feb 06, 2009 11:16 am
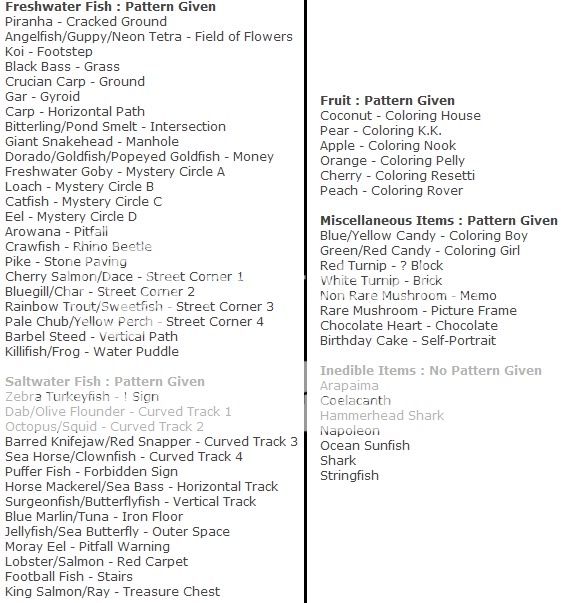
Animal Crossing : Special Characters in TownsK.K. SliderK.K. Slider will come to your town every Saturday from 8pm to Midnight. He is a musician who performs on stage at The Roost in the Museum. K.K. is a little bit of a hippie, but is real cool and loves to play with the cool cats in town. When he appears in the roost, you may go and speak to him. Then you can tell him your mood, or request for a song. He will then play a song. If you requested for a song, he will give you a CD, which you can place in your CD player at home. You can only get one song per night. BlancaBlanca is a cat with no face, who relies on you to draw it back on for her. She only appears if you have WiFi switched on. You do not receive any special gifts for having Blanca and drawing her face on, but she will not leave, thereby stopping any other special visitors from arriving, until you draw her new face. Faces she can ask for:Serious, Creepy, Happy, Adult, Crazy, Cute ChipChip is a beaver who hosts the fishing tourney in town. Participation in a tourney requires players to hand Chip a fish, which he then measures. The player or villager that hands him the longest fish during the tourney is the winner. The fishing tourney is held on either the second or third saturday of eight months (excluding June through September) and there are two types of fishing tourneys that coincide with their position in the month. Each of these tourneys has its own trophy which is mailed to the winner and (unless delayed by a mail backlog) arrives the morning of the day after the tourney. All fish handed to Chip are "eaten" by Chip after being measured, and not returned to the player. However if the fish, when donated, broke the previous record for longest fish during that tourney, the player will be handed a random piece of furniture. NatNat is the chameleon who runs the bug-catching contest. If you win the contest, you get a trophy, or if you break the previous record for the day, he will give you a normal furniture item that is not in Nook's Spotlight or in Redd shop. GulliverGulliver is a seagull who appears on a random day (Monday - Thursday) as a UFO flying in the sky, horizontally (can be either eastwards or westwards) at the top of either the second or third row of acres in a town. The UFO can be shot using a slingshot, though the speed at which it moves often makes this task difficult and occasionally impossible. The UFO can make more than one pass over a town on a day it is scheduled to appear, giving players multiple chances to shoot it down. If the UFO is shot, two events happen on the following day: A single spaceship part (whose item and coin appearance resembles a gear) can be found on the ground, and a crashed UFO will appear at a random location on the town's beach, alongside its unconscious pilot Gulliver. Gulliver needs to be spoken to multiple times before waking up, at which point he will request that the player find the spaceship part. Items received from Gulliver:Arc de Triomphe Chocolate compass Manneken Pis Matryoshka merlion mermaid statue Metroid moai statue Mouth of Truth pagoda plate armor Tower of Pisa tribal mask Katie & KaitlinKaitlinThe mother will wander around in your town. When you talk to her, she will tell she lost her kitten and that she's probably in some town. This will be one of the towns included in your friends list. You can't do anything else but wait until your friend brings Katie over. You do not get a gift when the two cats are reunited.KatieThe kitten will be crying somewhere in your town. Once you find her, she asks you to find her mother. She will tell you the name of the town where her mother can be found, which will be one of the towns included in your friends list. Agree and walk slowly to the town gate. Once you get to the town gate, and go on Wi-Fi, and into the other person's town with the mother, there will be a cut scene where the mother and daughter will re-unite together and thank you.The next day a thank you letter with a special item attached will appear in your mailbox. Items Received from Katie:Music box Apple TV Papa Bear Papa Panda Lovely Phone Lily-Pad Table Portrait PascalPascal is an otter who appears on a random weekday in town between 6am until after sometime after midnight. Talk to him and he will dispense some rather philosophic advice before jumping into the river and floating away. Once he floats away, any other players living in town will NOT be able to get an item from him. If you have a scallop in your inventory, he will ask for it. Give it to him and he will give you a piece of the exclusive Pirate Ship Theme. Make sure that you have a regular scallop because he will not ask for white scallops. Warning!: Do not talk to Pascal unless you have a scallop in your inventory and want a piece of the exclusive Pirate Ship Theme. He will swim off if you decline his advice and you will not get any furniture. Items Received from Pascal:Helm Barrel Keg Ship Cannon Anchor Ship Compass Sea View (wallpaper) Ship Deck (carpet) He always appears on a bridge.PetePete is a pelican and the mailman that delivers the mail in your town. He stops by in your town on a random weekday from 9 a.m. and 5 p.m. He is caught in a love triangle with the two pelicans, Pelly and Phyllis, the sisters that work at Town Hall. He won't give you any special items, but he loves to talk to anyone who won't yell at him for messing up a delivery. SaharaSaharah is a camel who occasionally visits your town on a random weekday from 6am to midnight. She asks you to bring her old rugs or wallpaper from the animals in your village. Based on what you bring her, there are several outcomes:If you bring her three or more old rugs/wallpapers from your townspeople, you'll receive a rare rug/wallpaper. Note that she will take ALL your rugs/wallpaper and give you only one Sahara rug/wallpaper in exchange. If you bring her less than three items, she will simply give you a common rug/wallpaper. Sometimes, the villagers won't give you enough items to get a rare piece. You may store these in your home in anticipation of Saharah's next visit. Items Received from Sahara:Western Vista : Western Desert Lunar Horizon : Lunar Surface Blue Tarp : Closed Road Ringside Seating : Boxing Ring Mat Classroom Wall : Classroom Floor Bathhouse Wall : Bath Tile Backgammon Wall : Chessboard Rug Shoji Screen : Tatami Floor Garden Wall : Mossy Carpet Mortar Wall : Sand Garden Basement Wall : Basement Floor Music-Room Wall : Music-Room FlooR Office Wall : Office Flooring Ancient Wall : Ancient Tile Industrial Wall : Concrete Floor Meadow Vista : Daisy Meadow Tropical Vista : Tropical Floor Desert Vista : Saharah's Desert Tree-Lined Wall : Sidewalk SerenaSerena is a self-proclaimed goddess who appears out of your town fountain (built after donating a total of 600,000 bells to your town - 200,000 for the bridge, then another 400,000 for the fountain after the bridge is built). She is summoned by throwing a basic axe into the fountain (once per character per day) at which point she will either say a few words and leave (not returning the axe), or start asking the player a series of questions. Answering her questions can reward the player a silver or golden axe.If the player's town contains Nookington's, they will often be able to purchase an axe, though the appearance of a timer or "silver" variant of tool can mean no axe appears on some days. Additionally axes can be purchased and kept in reserve by players before their town's fountain is built so that they have axes to throw on days when there is no axe to purchase. The player can still receive a golden or silver axe if the axe they throw into the fountain is nearly broken, though it is unknown if the condition of the original axe affects the odds of this.WendellWendell is a wallpaper selling walrus who will show up in your town on a random weekday between 6 AM and midnight. He is so hungry and if you give him fish, fruit, or a mushroom, he'll give you special patterns for free as a reward. Many of his patterns are designed to make your town look more city-like; for example, he will give you patterns that are designed to look like roads of different shapes, or patterns that look like signs to important buildings, like the Town Hall. You can display Wendell patterns at Able Sisters, credited to being designed by Wendell from Sumware. WispWisp is a special character whose species can only be described as "ghost". Wisp appears on a random day after 8pm, staying until after midnight (exact time needs confirmation). He is located at a random part of town and cannot be seen; if the player approaches Wisp's location he will greet them and ask them to come closer. As they approach, wisp will appear, asking the player to find an item called "empty lamp" somewhere in their town. The empty lamp itself appears in a town at the start of any day in which Wisp is visiting. Its appearance is extremely similar to Genie's lamp from Aladdin, pictured here. Since it appears before the evening, if the lamp is seen in a town (and the player can be sure it appeared that day), it means Wisp will be in the town somewhere that evening. The lamp primarily appears next to a house or other building. When spoken to a second time (with the lamp in possession), Wisp will instruct the player to go to the attic of their house. Once they do, they can select the empty lamp in their inventory and use the "Rub" option, at which point Wisp reappears. He then gives the player the choice of one wish. Animal Crossing : Special Characters in CitiesDr. Shrunk & Frillard Dr Shrunk performs at the Marquee in the city. Attending his performances allow the player to learn emotions. Frillard, a lizard, occasionally fills in for him when he's away. He can teach emotions which Dr Shrunk can't. The Marquee is where you can learn new emotions. You can find the Marquee on the left-hand side in the City. It's open from 10am to 11pm. A clerk at the window will charge you 800 bells to see a show, and you get to choose from four available shows - which show you choose decides which emotion you get (so if you choose Love you get the Love emotion). The four emotions available change every week usually on Sunday. The maximum number of emotions you can have is four, so if you already have four you have to choose (after paying and seeing the show) if you want to replace an emotion with the one you've just seen. 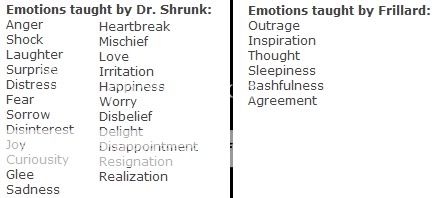 Lloyd Lloyd Lloyd is a gyroid that runs the Auction House. The Auction House is where you auction off items to other players over Nintendo Wi-Fi Connection. You can only see items being auctioned by people you are already 'friends' with. If someone wins, they take that item. The Auction House is open all day. There are display periods and bidding periods in the auction house. During display periods you put your items up, and you can view what will be in the auction. You can only put one item in your auction house at a time. During bidding periods you can place only one bid, you cannot see any other bids, and the money you bid is held by the Auction House until the end of the bidding period. Bells won and items won are given to you at the end of the bidding period. You can ask Lloyd when the next display period or bidding period is. You can also have Lloyd give you access to your Checkroom (the space within the cabinets of your home.) Kicks Kicks is a nice and kindly skunk that wears light gold overalls and a paper bor cap and sits on the steps of a boarded-up building between Harriet's shop and the Auction House. Kicks only is there when it is not raining or snowing in the City. He does a shoe shining service, where he will change the color of your shoes to match your hairstyle or hat color, or to match your shirt style, for 500 Bells. No Bells are charged if the shoes don't change. After a couple of shoe shines Kicks will ask you if you want your shoes to be Masculie or Feminine. This means that if you're a boy you can get different colour shoes that you could only get if you were a girl character before. And vise versa if you're a girl. You can talk to Kicks and get your shoes shined by either Color or Style. By Style: Shoes chosen by Style will be based on the styles of your clothing, accessories, and haircut. The style that most frequently appears in your outfit will determine what shoes you get. Shirt color will not affect shoe outcome. Here are the styles and their corresponding shoe type:((refer to the last post on this page to determine what clothes constitute which styles)) 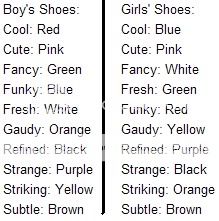 By Color: By Color: The highest color output of your outfit will determine your shoes. More importance seems to be placed on hats and hair color, although shirts and accessories are considered too. HarrietHarriet is a poodle who runs Shampoodle in the city. For 3000 Bells, she'll give you a new hairstyle and ask a few questions which, depending on your answer, determine which hairstyle you get. ((HAIR STYLE GUIDE COMING SOON)) Gracie Redd Kapp'n Resetti Katrina Lyle Phineas Animal Crossing : Special Characters During HolidaysFranklinFranklin is a turkey who appears at the Harvest Festival. Talk to Tortimer first, and he'll teach you a bit of history, and give you a knife and fork. Then hunt down Franklin in your town, and trade the knife and fork for a piece of furniture from the Harvest Series. If you are having trouble locating Franklin, you may give your knife and fork to a villager. They will tell you a 'suspicious character' was seen near a house or landmark. For a laugh if he is hiding behind a tree, you can chop it down making him sweat and nervous. Items Received from Franklin:Harvest Bed Harvest Dresser Harvest Bureau Harvest Chair Harvest Sofa Harvest Table Harvest Mirror Harvest TV Harvest Clock Harvest Lamp Harvest Wall Harvest Rug JackJack is a special character who only shows up on Halloween. Give him candy, and you'll get a piece of furniture from the Spooky Series. If you don't give him candy, he may just play a trick on you! Items Received from Jack:Spooky Bed Spooky Dresser Spooky Wardrobe Spooky Chair Spooky Sofa Spooky Table Spooky Vanity Spooky Bookcase Spooky Clock Spooky Lamp Spooky Wall Spooky Carpet He also gives items to those who don't give him candy, which are:Item : How you get itPumpkin Head : First no-candy trade Moldy Shirt :Second no-candy trade Patched Shirt : Second no-candy trade Jack-in-the-box : Third no-candy trade If you want another piece of his furniture? Just simply go into your house an go right back out. Or just go into any place which changes maps, and back out and he'll be there again. A little hint for Jack, when you go up to the other people they will run toward you, but only jack will stay where he is and not go toward you. Little trick to keep your candy! Jingle1-2 weeks before Christmas you might get a letter from someone named Jingle. Jingle is a reindeer wearing a Santa outfit who shows up at 8 PM on Christmas Eve (December 24th) and gives a present to players. He departs from the town at 12 AM, four hours later, though if he is nearby when the town bell rings he can still hand out a present until you move away. Jingle usually only gives out one present per character, but players can trick him by changing their accessory in order to reveive more. Changes that work include hats, glasses, masks, flowers, the Mii mask, the character's hairstyle, umbrellas, and designs (used on either a hat or an umbrella). Wear a hat with several different glasses works. Changing shirts does not have any effect. Additionally, Jingle does not have an infinite memory - it appears he can only remember back a certain number of accessories (which is unknown but less than 25) and any that were used beforehand can be re-used. He can either be found outside, or inside an unlit villager's house (the one time each year players can enter unattended villager houses). As the character does not hold an umbrella indoors, they do not work when he is inside. Jingle will usually, but not necessarily, change locations between handing out gifts and may be in the same location multiple times. Players must leave the current location between encounters in order to receive another gift. The Jingle Wall and Jingle Carpet can be requested. The remaining ten items are randomly selected. The gifts he gives out are furniture from the Jingle Series. These cannot be ordered from Tom Nook's catalogue, but they can be sold to him for 12,240 bells. This is a play on the date you receive them; they contain the digits "12" (December) and "24" (24th). So long as he does not recognise you from a previous encounter, Jingle asks the player two questions. The contents of the present he hands out are dependant on their answers. Items Received from Jingle:Jingle Bed Jingle Dresser Jingle Wardrobe Jingle Sofa Jingle Shelves Jingle Table Jingle Chair Jingle Piano Jingle Clock Jingle Lamp Jingle Wall Jingle Carpet Zipper T. BunnyZipper T. Bunny shows up on Bunny Day, which occurs once a year on Easter. Zipper has hidden a number (30) of special eggs around town. The hidden spots are marked with a star like the fossils and gyroids, which can be dug up. The eggs contain candy or bunny foil. If bunny foil is inside an egg, you can trade this with Zipper for a random piece of the Egg Series. Unlike Festivale, you won't get more than one per item in the set of the series once you find all the eggs. All twelve items in the egg series can be sold to Nook for 107,776 Bells total. If you go around to the back side of Zipper, he will turn around and you can see a large zipper on his back. Each "human" player will get their own 30 eggs to find. There are rummors as to who Zipper really is (he is not Tortimer because Tortimer is inside the postoffice sleeping). One of the town folk said something to the effect that "it was not Festivale and wondered why he (Pavé?) was here". Items Received from Zipper T. Bunny:Egg Bed Egg Dresser Egg Wardrobe Egg Chair Egg Bench Egg Table Egg Stereo Egg Toy Set Egg Clock Egg Lamp Egg Wall Egg Floor PavePavé is a peacock that shows up during Festivale, which occurs seven weeks before Easter Monday each year (that is, the same time as Carnival in Rio de Janiero). Give candy obtained from the villagers to Pavé in exchange for some exclusive furniture from the Pavé Series. Pavé will ask you to get three pieces of a certain color candy and he will give you one piece of furniture for every three pieces of candy. The furniture can be ones given prior. The way to get candy is to play games with your villagers. It can be football (soccer); flip the coin; ESP test (guess the shape and fruit); which hand; or rock, paper, scissors. When you play games with your villagers you need to have something to bet with. If you do not have candy, you need to have items, such as furniture or 500 bells or the villagers won't play with you, since you have nothing to bet with. If you don't want the day to get too expensive, empty your money from you pockets and carry around only sea shells or fruit! Also, if you are wearing a matching outfit when you first see a villager, they will give you a piece of candy and compliment your outfit. (The matching fruit outfits, shirt and hat, are known to work.) Tip: Keep your candy in letters or on the ground, since it may be harder to get candy than other items. If you leave your candy on the ground for too long, you will get ants (this will not affect the candy). Items Received from Pave:Pavé Bed Pavé Chair Pavé Sofa Pavé Closet Pavé Chest Pavé Table Pavé End Table Pavé Lamp Pavé Bookshelf Pavé Bureau Pavé Wall Pavé Floor
|
|
|
|
|
|
|
|
|
|
|
|
|
|
|
Posted: Wed Feb 11, 2009 1:57 pm
Gifts to Villagers
This post from me will have item and clothing lists for when neighbors want a certain something ...
and then start rejecting what you give 'em.
((edited by THeSLuSH))
ITEM REQUESTS

CLOTHING REQUESTS
|
|
|
|
|
|
|
|
|
|
|
|
|
|
|
|
|
|
|