Well as the subject says, i need help making a headdress, something like this:
or similiar it.
Posted: Wed Jun 18, 2008 11:28 pm
Try and find a solid, 100% cotton fabric if you can. It tends to have the least shine and is the easiest to work with for a beginner since it has no nap or pattern to worry about. Also, here's the tutorial:
Here are the instructions on how to follow the pictures. The stitching for each step in the photos is in BLUE to make it more visible as you work. You should pick a thread to match your lace and fabric, though. Follow the images from RIGHT TO LEFT and TOP TO BOTTOM:
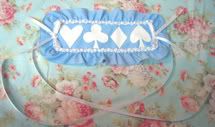
Image 1: Example of final product.
Image 2: Illustration showing what you need to cut out of your fabric [the original piece is 20x30cm, folded in half so that it's 30x10com].
Image 3: Your other materials.
Image 4: Measure out the lengths of ribbons that you'll need.
Image 5: Iron interfacing onto the backs of your material. Interfacing will make it have a sturdier shape. If you don't have any, don't worry about it at this point and just skip this step.
Image 6: Sew the ribbons for tying the headpiece in place facing inward.
Image 7: Fold and pin the ribbons out of the way on the inside of the headpiece.
Image 8: On the untouched piece of fabric, sew a piece of lace from one end to the next and sew in place along the edges with a straight stitch.
Image 9: Follow the diagram for pinning the lace in place, facing "inward". Sew the first layer in place with a straight stitch.
Image 10: Pin and sew the second layer of lace in place, facing "inward" again.
Image 11: Place the two pieces together so that the lace and ribbons are touching. Pin and sew. Leave a gap of about 10cm between the beginning and end of the stitching.
Image 12: Trim the edges of the lace and interfacing along the outside of the stitches so that they'll bend easier when inverted. Snipping little triangles out will also help it fold and lay flat.
Image 13 and 14: Turn the headdress inside-out. It will end up looking almost finished.
Image 15 [new row, detail shot] and 16 [upside-down shot]: Lightly whip-stitch or iron the gap you left closed. It'll be finished off more permanently in a moment.
Image 17, 18 [diagram] and 19: Place the ribbon in a lattice pattern and pin as you go. Follow the diagram and fold the beginning and end under. Then sew around the entire perimeter of the headdress to secure the ribbon and the trim for good.
Image 20 [new row] and 21: Tie a satin ribbon bow by wrapping it around your thumb and inserting the loop through that opening. Sew the bow in place.