shaolin
Warning: THIS IS AN OLD TUTORIAL! WILL UPDATE WHEN I HAVE TIME (and am not lazy)
I will use Adobe Photoshop for this tutorial, but I honestly believe any drawing program will do. If you use MS Paint and want to follow the tutorial, you may notice that a couple of the tools I mention here are not available. But I will try to keep the tutorial as general as possible.
For the other users, I will be using layers to make my costumes. I use layers to draw, but it isn't entirely necessary. It just makes things easier in my opnion. If you want to learn about Layers, there should be help files in the programs you use.
Notes:
- This tutorial will assume you can save your own pictures and avatars, and open them on your drawing program. Uploading your pictures to the internet or putting them on your signature is beyond the scope of this tutorial.
- I will draw this costume pretty much according to the reference picture, in terms of how the clothing is shaded and the way the clothes are positioned. I highly encourage you to be creative, however =)
- I am not a professional artist. I do not have an art degree. I just draw for fun, and I like to help as much as I can, so I cannot guaruntee this is the best way to draw an edit. It's just MY way blaugh
- I'm Canadian, so I will say 'colour' and not 'color' =P
Are we cool, then? Let's get started!
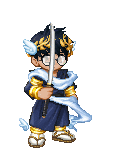
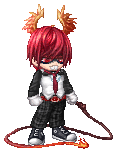
Today we are going to draw Ky Kiske from Guilty Gear

You want to start by positioning your reference picture beside your avatar so you can easily refer to it. Normally I like to point my avatar facing the same direction as the reference, so it is easier to match body parts.
To begin, look at your reference picture and see which pieces of clothing are on the bottom layer and which are on the top. We first want to do a rough outline of all of the clothes, and then do all the shading in the end, so it might look ugly at first. We want to work from the most-inner layer first. In this case, it is the shirt and pants.
Now you can get the exact colour of the pants by using the 'eyedropper' tool (a quick way to do that with Photoshop is to hold alt, which saves a lot of time clicking on the tool and clicking back to the brush). Create a new layer and draw roughly the shirt and pants. I chose the darkest shade on the pants for my inner layer because it's just easier for me to distinguish it as the inner layer. One thing to keep in mind when drawing is to not draw over the left hand (it would be the right hand if the avatar is facing the other way, because it is in front of everything else. Other than that, you can be quite messy here, because there will be things covering most places later 3nodding
For the perfectionist: If you want that hand to be 100% uncovered, you can cut the hand and put it on a higher layer.
Pretty ugly so far, right? Don't worry about the shorts sticking out. It will be gone soon. Now I create a new layer and draw the jacket using a dark shade of the jacket. Do not worry about the black lines outlining the jacket for the moment. That is considered a detail and will be handled later on.
Still not much, eh? Don't worry wink
I will then draw the shoulder pieces and the blue cross in the middle. Note that the shoulder piece and jacket have the same colour, so I'm going to use a slightly different shade so I can tell the pieces apart. Not really a necessity, but I'm a neat freak. Again, I will add the black lines around the cross and other details later.
Beware: Gaia avatars have no neck, so drawing costumes that have a huge collar will be difficult. The best way to take care of it is to either make the collar overlap the avatar's face, or to get rid of the collar altogether.
Is is starting to look like anything yet?...trust me trust me xp
Now, I personally hate drawing shoes. I don't know why, but I can never get them to look nice. But anyway I will not draw his shoes and gloves
Note: The shoes are under the jacket, so I put the shoes layer below. I should have drawn the shoes first, but as I said earlier, I dont like drawing them and I was avoiding them =(
Boy, it's missing a lot of blue and yellow and black, isn't it? Now I can start adding some of the detail in. I usually use a separate layer for each colour (in this case, black, yellow, blue). Oh yeah, and that white patch that's on the cross.
Finally taking shape, isn't it?
Now you can finally be artistic! I will show you how I shade as best as I can. There is by no means just ONE way to do this (I always change the way I do it too).
I will start with the jacket, since it's the biggest piece of clothing. Notice on the reference picture, you can easily see 4 different shades of white used for the jacket, right? I used the second darkest colour for drawing my jacket, and now I will use the darkest colour to outline the 'flow' of the cloth.
next I will use the lightest colour and shade in the brightest parts.
And finally, the 2nd lightest colour, just to make it looks more blended in.
And voila! Simple, no? Looks pretty good to me. Most of the time, the characters will have at least 3 different shades for each piece of clothing. If not, it's not that hard to choose one colour, and adjust the shade to darker or lighter.I usually think 3 different shades are enough already, as you see the 2nd and 3rd picture did not have a huge difference, but the more colours you use, the more colourful it will be, right? =)
Just play around with different shades until you're satisfied with how the shading looks.
For perfectionists: To make it look very blended in using very little colours, you can use the 'smudge' tool to smudge the colours together. I usually do that, because I'm used to it.
After playing around with shading a bit.
Well for almost all of the other clothing, the principle is the same. So let's skip a few steps, shall we? (you have no choice ^_^)
Ta-da!
It looks good enough, right? You shaded in everything.
Wrong, there is always room for improvement. If you didn't notice, I did not shade everything yet. The three layers I have made earlier for the more detailed pieces (blue, black and yellow) aren't shaded yet. They are quite small, but it still makes a difference. If you look at the reference picture, you can see those lines have different shades too, right? Anyway, this isn't much different from colouring the other pieces of clothing. The general rule is to shade the lines matching the shade of the clothing. I will use the black lines on the jacket for example. Along the bottom, use a lighter black when the white cloth above is lighter, and darker black when the cloth is darker. There's no trick to it. If the lines are too thick, you can always thin them out later.
Here I've added the shades on the black line of the jacket. Can you see the difference? Maybe not very much, but I will do the rest of the black, and work on the blue and yellow now. After that you will definitely notice a difference =)
Okay, this is after doing the rest of the shading a making a few minor tweaks along the way. What do you think? I'd say we're pretty much done here. ^_^
I will use Adobe Photoshop for this tutorial, but I honestly believe any drawing program will do. If you use MS Paint and want to follow the tutorial, you may notice that a couple of the tools I mention here are not available. But I will try to keep the tutorial as general as possible.
For the other users, I will be using layers to make my costumes. I use layers to draw, but it isn't entirely necessary. It just makes things easier in my opnion. If you want to learn about Layers, there should be help files in the programs you use.
Notes:
- This tutorial will assume you can save your own pictures and avatars, and open them on your drawing program. Uploading your pictures to the internet or putting them on your signature is beyond the scope of this tutorial.
- I will draw this costume pretty much according to the reference picture, in terms of how the clothing is shaded and the way the clothes are positioned. I highly encourage you to be creative, however =)
- I am not a professional artist. I do not have an art degree. I just draw for fun, and I like to help as much as I can, so I cannot guaruntee this is the best way to draw an edit. It's just MY way blaugh
- I'm Canadian, so I will say 'colour' and not 'color' =P
Are we cool, then? Let's get started!
Today we are going to draw Ky Kiske from Guilty Gear
You want to start by positioning your reference picture beside your avatar so you can easily refer to it. Normally I like to point my avatar facing the same direction as the reference, so it is easier to match body parts.
To begin, look at your reference picture and see which pieces of clothing are on the bottom layer and which are on the top. We first want to do a rough outline of all of the clothes, and then do all the shading in the end, so it might look ugly at first. We want to work from the most-inner layer first. In this case, it is the shirt and pants.
Now you can get the exact colour of the pants by using the 'eyedropper' tool (a quick way to do that with Photoshop is to hold alt, which saves a lot of time clicking on the tool and clicking back to the brush). Create a new layer and draw roughly the shirt and pants. I chose the darkest shade on the pants for my inner layer because it's just easier for me to distinguish it as the inner layer. One thing to keep in mind when drawing is to not draw over the left hand (it would be the right hand if the avatar is facing the other way, because it is in front of everything else. Other than that, you can be quite messy here, because there will be things covering most places later 3nodding
For the perfectionist: If you want that hand to be 100% uncovered, you can cut the hand and put it on a higher layer.
Pretty ugly so far, right? Don't worry about the shorts sticking out. It will be gone soon. Now I create a new layer and draw the jacket using a dark shade of the jacket. Do not worry about the black lines outlining the jacket for the moment. That is considered a detail and will be handled later on.
Still not much, eh? Don't worry wink
I will then draw the shoulder pieces and the blue cross in the middle. Note that the shoulder piece and jacket have the same colour, so I'm going to use a slightly different shade so I can tell the pieces apart. Not really a necessity, but I'm a neat freak. Again, I will add the black lines around the cross and other details later.
Beware: Gaia avatars have no neck, so drawing costumes that have a huge collar will be difficult. The best way to take care of it is to either make the collar overlap the avatar's face, or to get rid of the collar altogether.
Is is starting to look like anything yet?...trust me trust me xp
Now, I personally hate drawing shoes. I don't know why, but I can never get them to look nice. But anyway I will not draw his shoes and gloves
Note: The shoes are under the jacket, so I put the shoes layer below. I should have drawn the shoes first, but as I said earlier, I dont like drawing them and I was avoiding them =(
Boy, it's missing a lot of blue and yellow and black, isn't it? Now I can start adding some of the detail in. I usually use a separate layer for each colour (in this case, black, yellow, blue). Oh yeah, and that white patch that's on the cross.
Finally taking shape, isn't it?
Now you can finally be artistic! I will show you how I shade as best as I can. There is by no means just ONE way to do this (I always change the way I do it too).
I will start with the jacket, since it's the biggest piece of clothing. Notice on the reference picture, you can easily see 4 different shades of white used for the jacket, right? I used the second darkest colour for drawing my jacket, and now I will use the darkest colour to outline the 'flow' of the cloth.
next I will use the lightest colour and shade in the brightest parts.
And finally, the 2nd lightest colour, just to make it looks more blended in.
And voila! Simple, no? Looks pretty good to me. Most of the time, the characters will have at least 3 different shades for each piece of clothing. If not, it's not that hard to choose one colour, and adjust the shade to darker or lighter.I usually think 3 different shades are enough already, as you see the 2nd and 3rd picture did not have a huge difference, but the more colours you use, the more colourful it will be, right? =)
Just play around with different shades until you're satisfied with how the shading looks.
For perfectionists: To make it look very blended in using very little colours, you can use the 'smudge' tool to smudge the colours together. I usually do that, because I'm used to it.
After playing around with shading a bit.
Well for almost all of the other clothing, the principle is the same. So let's skip a few steps, shall we? (you have no choice ^_^)
Ta-da!
It looks good enough, right? You shaded in everything.
Wrong, there is always room for improvement. If you didn't notice, I did not shade everything yet. The three layers I have made earlier for the more detailed pieces (blue, black and yellow) aren't shaded yet. They are quite small, but it still makes a difference. If you look at the reference picture, you can see those lines have different shades too, right? Anyway, this isn't much different from colouring the other pieces of clothing. The general rule is to shade the lines matching the shade of the clothing. I will use the black lines on the jacket for example. Along the bottom, use a lighter black when the white cloth above is lighter, and darker black when the cloth is darker. There's no trick to it. If the lines are too thick, you can always thin them out later.
Here I've added the shades on the black line of the jacket. Can you see the difference? Maybe not very much, but I will do the rest of the black, and work on the blue and yellow now. After that you will definitely notice a difference =)
Okay, this is after doing the rest of the shading a making a few minor tweaks along the way. What do you think? I'd say we're pretty much done here. ^_^