Miku-Marmalade
(?)Community Member

Offline
- Posted: Sun, 06 Jun 2010 05:50:00 +0000

Welcome to my marvelous thread for making custom cursors!
I see people asking this all the time so I thought I'd show you wonderful Gaians show to do this! biggrin
Before we go through this, if you want an easy cursor url you can go to Tektek.org>Dream avatar> And when you get to the page where the list of items are, right-click something "cursor-like" such as a wand. That works REALLY well. It's as easy as right-click, copy image url/copy image location> paste it into your profile options page with this code:
html, body, a{cursor: url('*TEKTEK IMAGE URL*'), auto;}
Pic references. biggrin
Firefox:

When you right click the image of the desired cursor, you'll see a list of options. Choose, "Copy Image LOCATION"(Not "copy image" alone, "copy image LOCATION" wink
Google Chrome:

Same as above: Right click the desired cursor image and choose "copy image URL", not just "copy image". They're different.
NOTE: SO EVERYONE KNOWS, I AM USING PHOTOBUCKET.COM FOR THE IMAGES. I DON'T KNOW ABOUT PHOTOSHOP, GIMP, OR ANYTHING ELSE. There is also a chance of the cursor not working if you use Firefox, it does NOT work with IE8, as for Opera?, and I am positive it works with Google Chrome.
Ask questions in the thread. Please do NOT pm me.
There's several steps but I used a LOT of pix to help you along. That's why the page is so long.
It's quite a process, but you CAN do it!
.
YOU MUST USE THIS PROCESS OR YOUR CURSOR WILL HAVE A WHITE BACKGROUND! THIS PROCESS GETS RID OF THE BACKGROUND BUT KEEPS THE WAND!

I am using an example of making a magic wand to make a cursor. You can use anything you want though!
First off.
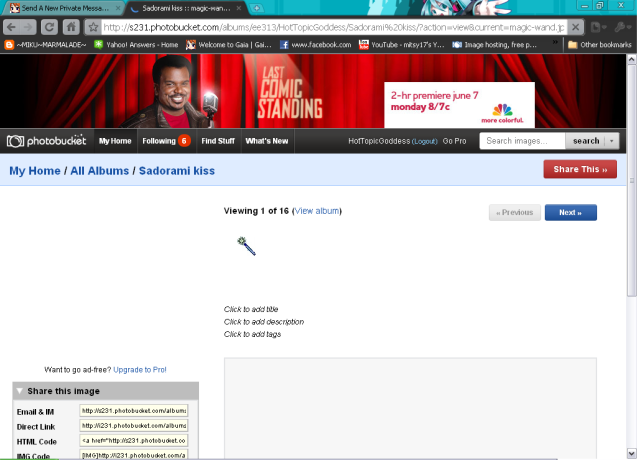
Go to Photobucket.com. If you don't already have an account you need to make one.
Search for "magic wand".
When you go to that page they'll be over 700 results. I am using the one of the first page:

Save it to your album. When you get to your album click "edit" (shown below)

After that, you should end up on a page like this, this is where all the images of whatever album you placed the wand image in. (image below)

Click "edit". I have put a red bubble over "edit" click there.
Click "geek"(image below) I have put a red bubble around the area you're supposed to click here too.

When you click "geek" you'll see a "smart cut out" Click that. I have put a red bubble around this one too.
The next one I put in several steps so there would not be as much pictures.
The finished wand will look like this before you are done editing it completely.

Also it's what the green and red area is supposed to look like. In order to create this look follow the following directions.
Zoom the wand. To zoom the picture if the wand, drag the circle thing in the upper right corner to 300%. It's easier to see what you're doing so your picture will have as much accuracy as possible.
Main reference:

You'll notice that there's a black circle. That's the brush. You can change the size by dragging the little black and grey bubble(as in the image). To make the brush smaller, drag it to the left, to make it larger drag it to the right.
Use the "keep" feature. The "keep" feature is green and it will keep the green highlighted area, which in this case is the wand. Color the entire wand(don't do the blue sparkles around it)
Then use the "delete" feature. The "delete" feature is red and it will delete the unwanted area. In this case it's the background. Color the background in red. Avoid the green area as much as possible. Don't worry, they have a little feature that will predict unknown areas( the tiny pixels you weren't able to get.) Look at main reference what the green and red area is supposed to look like after you've colored everything.
Okay, now you should be done editing the the wand. To save the hard work you just did click the bottom corner as shown below.

After that your screen should look similar to this:

Now the moment you've been waiting for---it's done!
Your cursor will look the same as before. Thing is it's edited where the background is gone. To get the right code...Oh yeah, the CSS code of THIS cursor is below.
html, body, a{cursor: url('http://i231.photobucket.com/albums/ee313/HotTopicGoddess/Sadorami kiss/magic-wand.jpg'), auto;}
This is what the wand cursor will be if you placed it in your "profile options" page.

That'll give you the wand as a cursor. I hope that I helped you sorry this is so long...
Feel free to ask questions. I REALLY want you to get this!
KEEP IN MIND THAT THIS IS INSTRUCTIONS FOR THE WAND. YOU CAN USE WHATEVER IMAGE YOUR HEART DESIRES- biggrin
A Gaian showed me a problem that you might have. It's when you do the process right but the picture still comes of funky, meaning it still has that darn white background.
What you do is save the image you want as your cursor to your computer. I used MP. It's the best because it's on any Microsoft computer on accessories.
This is what you should have when you save it.
Please, you MUST use PNG to get the results I got.
Then go to Photobucket and follow the same directions as above.
First you have to duplicate your original copy when edited it on Photoflexer.
You can duplicate it by going under "layouts" or simply right clicking and choosing the option, "duplicate image(s)"
Then delete the second picture/the one you just duplicated.
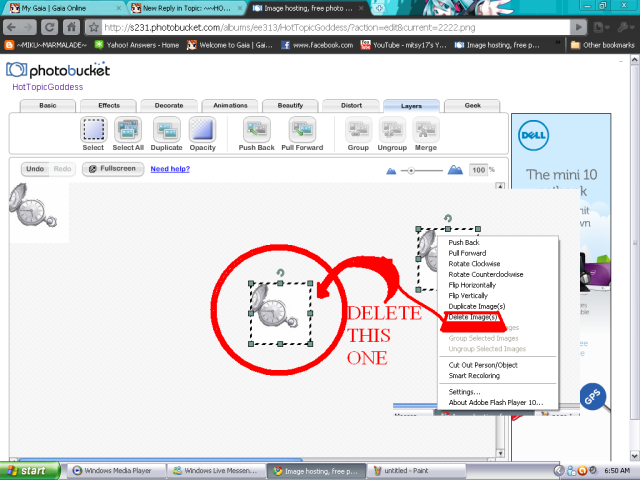
After that go do the same process as above.
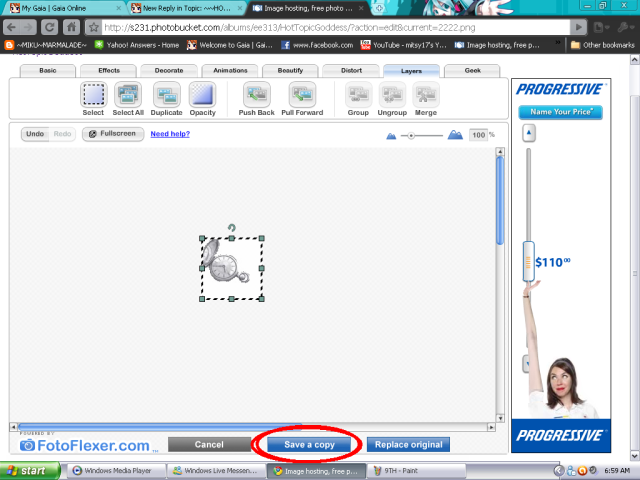
When you save it, make sure you save it as a copy, not an original.
Note: That one image was one I did fast. It's sloppy but the background is accurate- wink
What you do is save the image you want as your cursor to your computer. I used MP. It's the best because it's on any Microsoft computer on accessories.
This is what you should have when you save it.
Please, you MUST use PNG to get the results I got.
Then go to Photobucket and follow the same directions as above.
First you have to duplicate your original copy when edited it on Photoflexer.
You can duplicate it by going under "layouts" or simply right clicking and choosing the option, "duplicate image(s)"
Then delete the second picture/the one you just duplicated.
After that go do the same process as above.
When you save it, make sure you save it as a copy, not an original.
Note: That one image was one I did fast. It's sloppy but the background is accurate- wink