
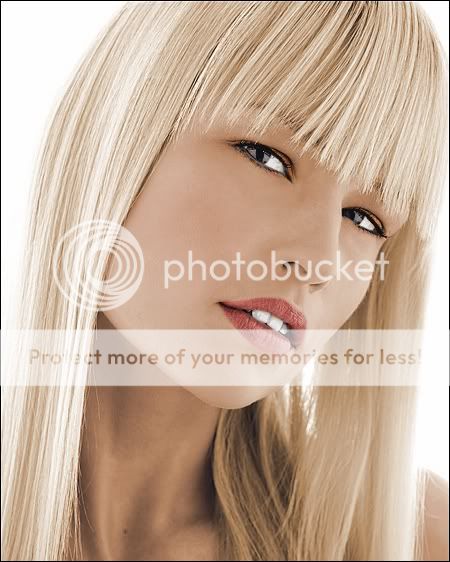
Desaturate Picture / Greyscale it
(Absolutely do not go to the colorize tool and colorize it with no saturation! It ruins the lighting of the picture)

Duplicate bkgd
Colorize (with the Colorize tool, Colors>Colorize, Adjust>Hue & Saturation>Colorize)
Hue - 18 , Saturation - 71
Erase from Everywhere but the Face. Make sure to remove it from the Eyes and Teeth
Duplicate bkgd
Colorize
Hue - 24 , Saturation - 71
Duplicate bkgd
Set to Screen at 75%
Duplicate the Screened Layer
Erase from Eyes and Bring the Opacity up to 100%
Click on the Skin Layer and Duplicate it
Go to Curves (Colors>Adjust>Curves, Sorry dont remember for Versions 8/9)
Red:
Input: 123
Output: 132
Green:
Input: 122
Output: 129
Set this layer to Screen @ 22%
Add an Adjustment Layer (Color Balance)
Midtones: 5,0,6
Highlights: 0,0,-2
Shadows: 0.-2,0
Click the bkgd lyaer
Using the Selection tool, Select the Lips (in a box/rectange or whatever, you will erase it later anyways)
Copy, Paste Into Selection, Promote to Layer
Bring this layer to the top (Make sure you get rid of the marching ants now)
Erase what isn't the Lips
Colorize
Hue: 225 , Saturation: 71
Set Opacity to 47%
Duplicate, Set to Burn @ 17%
Duplicate, Set to Hue @ 100%
Add a New Layer
Using the Airbrush Tool
Size: 96 Color: #C00000
Click Once where the Click is facing you
Lower the Brush Size to 46
And Click the Other Cheek
Click Gaussian Blur and Set Radius to 45
Then Lower the Layer Opacity to 30%
Click the bkgd Layer
Set the Eyes with the Selection tool
Copy, Paste into Selection, Promote to layer
Bring Layer to Top (Make sure the dancing ants are gone)
Erase from Everywhere but the Eyelids
Colorize
Hue: 27 , Saturation: 71
Curves
Red:
Input: 126
Output: 139
Green:
Input: 126
Output: 120
Color Balance
Midtones: 0,0,-7
Duplicate Layer and Set to Softlight @ 100%
Copy Merged (Edit>Copy Merged)
Paste as a New Layer on top
Click Auto (Automatic) Color Balance
Strength - 50
Temperature - 5220
Make sure Remove Color Cast Isn't Clicked
Add a New Layer and Add a 1 Pixel Black Border.
Your done.
You can do some slight editing such as
Copy Merged then Paste on top, Desaturate and Set to Softlight,
Copy Merged then Paste on top, Set to Screen @ 35%,
Copy Merged then Paste on top, Set to Mulitpy @ 20%, or
Something else like add effects or other Colorings you want different.


Remember Tutorials are always up for interperation so if you want a different Lip Color or something then go for it. This is just a guide. Just like If you actually want to colorize the eyes in the picture then go for it because I just didn't because they eyes are kinda black in the original picture. You would do it the same way you did the eyeshadow or lips. smile
Here's the PSP File with all the open layers: Download Full.psp
If you are using Photoshop and want all the layers then post in this topic (Or PM me because I might not see it, also I'll soon be gone for 2 months so If I don't write back, That's why) and I'll upload a PSD for you. biggrin