|
|
|
|
|
|
|
|
|
 Posted: Wed Oct 28, 2009 12:05 am Posted: Wed Oct 28, 2009 12:05 am
For these first few areas of zOMG you'll pretty much be following a specific path, though you can always choose to just explore or kill the Animated. Do note that the Training Sequence Sewers and the Sewers for Barton Quests are very different!
THE TRAIN
You find yourself on a train. You should see another person near you. He's the first NPC you'll meet in zOMG.
Click on Frank to start the conversation.
Follow the directions that Frank gives you. Early in the conversation he'll ask you to move closer.
Click or move with your keyboard to the area where the green circle appears
Continue chatting with Frank. Pay attention to what Frank has to say. He'll help you get started. Frank will give you your first ring. It's called Solar Rays. It is a decent ranged ring. Frank will teach you how to use it. To do so, you'll need to learn how to target your enemies. When Frank tells you to, click on the trash can or use the '~' or 'Q' key.
Now Frank will tell you how to use your ring. Just press 1 or use your mouse to click on the Solar Rays ring on your Ring Bar. It should take about two hits to take out the Trash Can. Remember, when you start getting more rings, when using your keyboard you'll want to click 1-8 depending on which ring slot the ring you want is in.
Frank will now show you how to use Rage. Hold down the 1 key or hold down your mouse button on the Solar Rays Icon until you see the red meter light up past some of the rage markers.
Finish reading what Frank tells you. Once you see "The doors unlock as the train slides to a stop" flash across the screen, move your mouse over the doors of the train. You should see some gears. Click the doors and you'll exit the train.
OLD TRAIN STATION
Something isn't quit right when you exit the train. The lights are off and you are under attack!! Use the skills Frank taught you to wipe out the two Peelungers that come at you. Once they are dead, the lights will come back on.
You should now be able to see another NPC. Talk with Barry. He'll give you some more hints and tips about how to play zOMG so pay close attention! Barry is going to send you to go find Dani so that you can continue on your journey.
SEWERS
Once you first enter the Sewers you should get a box that pops up. Make sure you read it! Head to the next screen down and you should find Dani. Talk to Dani to get your first real task!
Note: If you aren't at 100 health and 100 stamina, take a moment and kneel till both are at 100.
The Mumbler
Step 1: Dani says that the "mumbling gramster" she heard ran off into the room to the east. Head toward the flag shown on your PDA Map feature.
Step 2: You should see some Peelungers, use your Solar Rays ring to Take them out. After they are all gone, some gramsters should start spawning. Make sure you take them out. When the Mumbler appears, don't be afraid to hit him with high powered rage attack to kill him faster.
Step 3: Open the chest, Dani's passcard is hiding inside. You should also receive a second ring, which will be completely random, some orbs and some loot drops.
Step 4: Now that you've found the passcard, return to Dani and give it to her.
Rewards: One Null Fragment, one orb, and 10 gold.
After you talk to Dani for a bit more she sends you off on your second quest.
Finding Elizabeth
Step 1: Head up one of the ladders in the sewers and look far a guard named Elizabeth (She should be standing just north of the Guild House in the Southwest area of Barton. She will also give you a quest, The Null Chamber (for more information on the quest check the post on Barton)
Rewards: One orb, and 5 gold.
Chests, Crates and Baskets: There is only one chest in the new Training Sequence. This chest is something that you won't miss and need to open to get out of the sewers.
--------------------------------------------------------------------------------------
BARTON SEWERS
Description: Unlike the area of the sewers you visited in the Training Sequence, this area of the sewers is much bigger and there are a lot more animated here. Three Barton NPCs will give you a passcard so that you can come down here and do some work for them. After those three quests are over you can't come back.
BADGES
(You can view your Badges by looking in your completed Quest log in the game or under My Gaia. You can display your badges for all to see if you are using the current profile system, just add the content box for Badges.)
 
Peelunger Pounder: Kill 25.
Gramster Gladiator: Kill 25. (Possibly Broken)
|
 |
|
|
|
|
|
|
|
|
|
|
|
|
|
Posted: Wed Oct 28, 2009 12:06 am
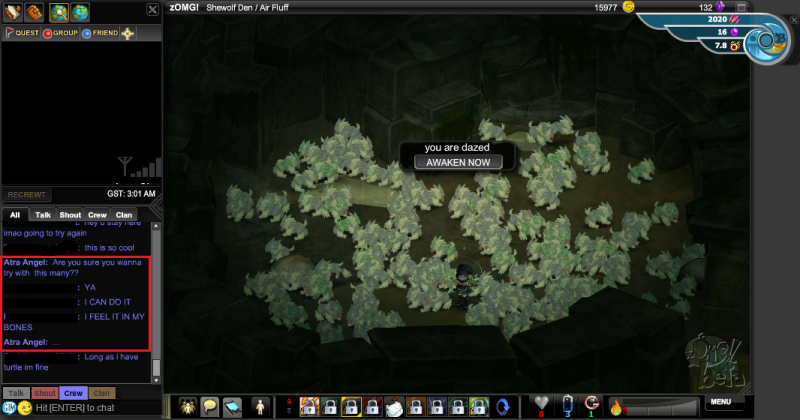
For starters, allow me to point out a feature of your game screen you may not have noticed before:
It's a Menu!!! This is a button that many people have missed in their game play, it kind of likes to hide down there, but it shouldn't because it has all sorts of goodies hidden away in it.
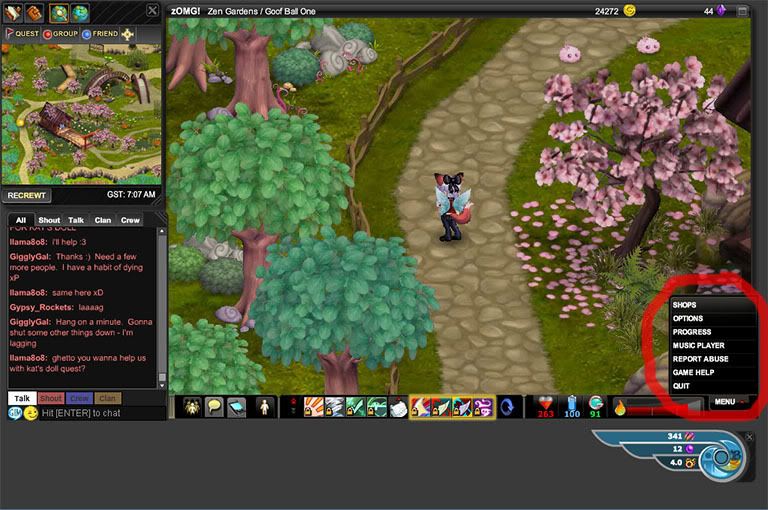
The first thing I would like to point out is the choice labeled "GAME HELP", let's see where that takes us:
For the most part, this little menu is self explanatory (click on the selection you want and it will show you the info, but there is one option I want to point out. Let's choose "COMBAT, ADVANCED" Shall we?:
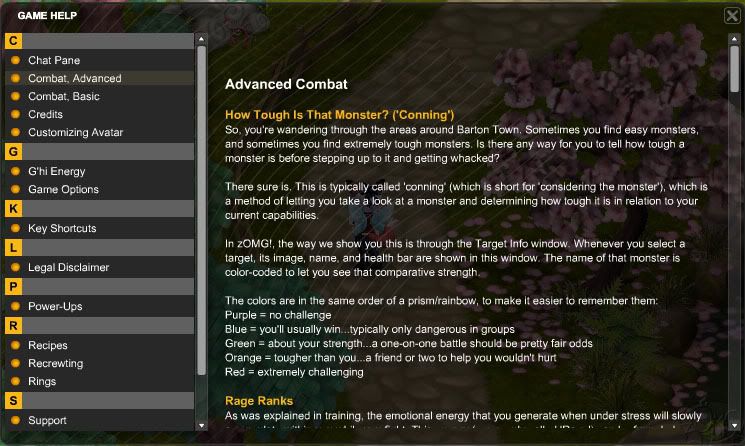
This is a great rule of thumb to remember, as the colors also relate to how you measure up to your fellow players. This is very important to know when setting up a crew, especially for orb farming. How you measure up against other people in your crew and against the monsters you're fighting has a big impact on the drop rate of orbs, gold, and other items. (Yes, when you join a crew, assuming you are all on the same screen, you get an opportunity for an item drop each time some one in your crew kills a monster while you are in same screen area).
The general goal is to have a crew of people who are all green to each other (roughly the same cl lvl, whether actual or suppressed) fighting monsters that are also green (roughly the same strength as you. So it does you ABSOLUTELY NO GOOD to jump ahead in areas to stronger monsters; you'll actually wind up getting fewer items and taking longer to lvl up your cl than if you stayed in an area with monsters near your strength. It also does you ABSOLUTELY NO GOOD to crew with someone that is either red or purple to you, the huge gap in strength will only decrease your chances of getting drops.
Most of these are MINIMUMcl reqs, primarily because monsters like to swarm users, except for fluffs (with the exception being carrion fluffls... if you can ever find any... stare ) But because of the group attacks, either wait til you are a higher lvl or go with a crew.
As a general rule of thumb, if you notice that you're dieing every 30 seconds or so, or close to it, you need to change your strategy by doing one of several things: either go back to the last area and level up some more, get a crew together, or try some different rings when battling the tough monsters.
Generally it is recommend that all cls <2.0 stay in Village Greens (try talking to Leon, he has a great quest chain that will both get you orbs to level up and give you 2 new rings, as well as send you on to Bill's Ranch when you're ready)
cls < 3.0 should stay in Bill's Ranch (There is another quest chain here that will also earn you another ring [most quest chains will lead into the next area])
any cl < 3.7 should stay in Zen Gardens, (make sure you talk to the guard near the entrance to Barton before you talk to Katsumi for the 1st time, it will give you an extra bonus for talking to her as well as the opportunity to do a repeatable quest for killing ghost lanterns (great for orb farming w/ or without the quest, as long as your cl is between 3 & 4)
to be added to...
Moving on, here is another feature that Rings offer that a lot of people don't know about
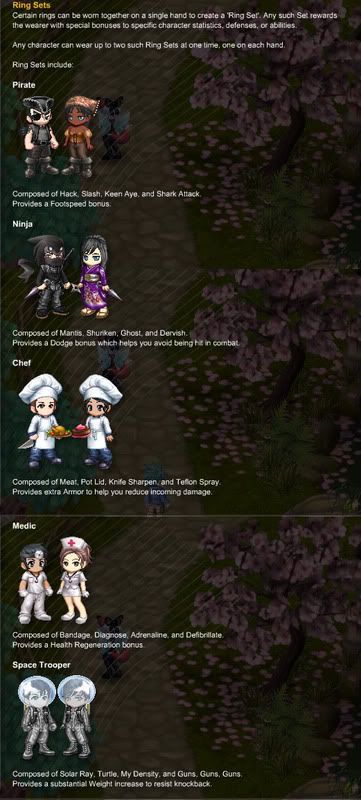 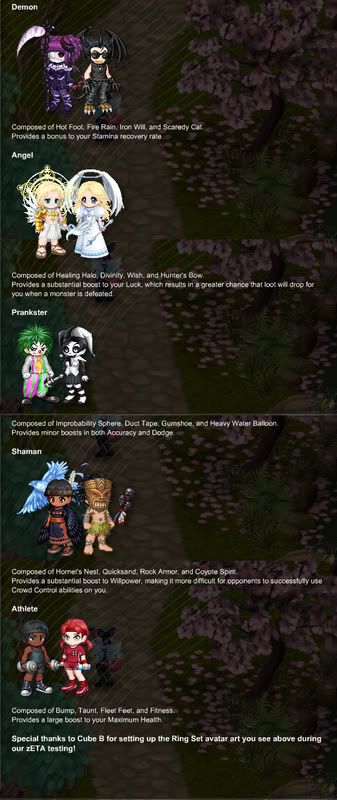
These Ring Sets, depending on your current tasks/goals and personal preferences can be very handy.
Most find that some ring essentials are:
*at least one long range ring
*a way to heal yourself (either batteries, another crew member with healing rings, or your own healing ring(s)
*having dervish, slash, and hack is a major advantage in any battle, especially with keen aye (it raises your accuracy level) and Shark Attack (strong mid-range attack with knock-back benefits) (and together they make up the Pirate set, giving you a footspeed boost that, if nothing else, helps you run away faster) and here's why:
-Dervish is an awesome ring because you don't have to have a target to use it, just click it and it attacks and repels all nearby monsters (great to have if you get swamped)
-slash, while it requires a nearby target, also attacks several monsters, if they are standing close together
-Hack, while it has a slightly shorter range than slash and only attacks one target, does more damage to the target
|
|
|
|
|
|
|
|
|
|
|
|
|
|
|
|
|
|
Posted: Wed Oct 28, 2009 12:07 am
A past update introduced the concept of "soulbinding" rings to their owners to cut down on ring deflation in the marketplace and to keep people from buying their way to higher levels.
Any rings obtained in the game from now on are "locked" to your account and cannot be traded, gifted, or sold. The exclusions to this rule are any rings found BEFORE this update. These rings can be traded, sold or gifted away without restrictions, but become soulbound when equipped in the Null Chamber.
This change is permanent and will not be taken back.
CLOSE COMBAT
 Bump: Bounce your target back on its keester with a big powerful bump of the hip. This ring deals moderate damage and even knocks the enemy back, giving you more room to use ranged attacks. Also useful in keeping enemies from attacking your friends.....sorta (lol). Bump: Bounce your target back on its keester with a big powerful bump of the hip. This ring deals moderate damage and even knocks the enemy back, giving you more room to use ranged attacks. Also useful in keeping enemies from attacking your friends.....sorta (lol).
 Dervish: Whirling at an incredible speed, the user of this ring deals damage to all opponents within close range at the same time. An AoE attack which gives you a little breathing room by pushing back every enemy it hits along with dealing "moderate" damage. Dervish: Whirling at an incredible speed, the user of this ring deals damage to all opponents within close range at the same time. An AoE attack which gives you a little breathing room by pushing back every enemy it hits along with dealing "moderate" damage.
 Hack: A powerful, close-combat abiilty that does raw damage to an opponent. A slow, but powerful swipe of a sword. Has a slow recharge rate and uses the most stamina of any 1v1 attack. Hack: A powerful, close-combat abiilty that does raw damage to an opponent. A slow, but powerful swipe of a sword. Has a slow recharge rate and uses the most stamina of any 1v1 attack.
 Mantis: Project a light sword to swifly cleave through the air at your target. Summons a katana to quickly strike your foe. This ring sports a fast cooldown, low stamina cost and strong damage output. Mantis: Project a light sword to swifly cleave through the air at your target. Summons a katana to quickly strike your foe. This ring sports a fast cooldown, low stamina cost and strong damage output.
 Slash: The blow dealt by this close-combat attack hits all nearby targets in the front arc of the attacker. More powerful than the Mantis attack, but slower. A ring which summons a sword to strike your foes. While slower than the mantis ring, it's considerabily more powerful. Not to mention it hits all enemies within slashing-distance. Slash: The blow dealt by this close-combat attack hits all nearby targets in the front arc of the attacker. More powerful than the Mantis attack, but slower. A ring which summons a sword to strike your foes. While slower than the mantis ring, it's considerabily more powerful. Not to mention it hits all enemies within slashing-distance.
RANGED COMBAT
 Fire Rain: Summon burning rain from the sky to fall in a small area around yourself. All your enemies will suffer from the effects, but your friends will not. An aoe attack which summons fire to rain down on any foes in a large radius, with you as the center of the attack. Hits exactly 3 times. Fire Rain: Summon burning rain from the sky to fall in a small area around yourself. All your enemies will suffer from the effects, but your friends will not. An aoe attack which summons fire to rain down on any foes in a large radius, with you as the center of the attack. Hits exactly 3 times.
 Guns,Guns,Guns: When all else fails, haul out the artillery and drown your target in lead! Summons various firearms to attack the enemy. Said to deal moderate damage and also has a nice knockback effect while sporting a short cooldown timer by sacrificing attack range. Guns,Guns,Guns: When all else fails, haul out the artillery and drown your target in lead! Summons various firearms to attack the enemy. Said to deal moderate damage and also has a nice knockback effect while sporting a short cooldown timer by sacrificing attack range.
 Heavy Water Balloon: Balloons filled with some sort of foul concoction are tossed, creating powerful explosions around your chosen target. Launches a water balloon to deal AoE damage to an extremly wide-radius of enemies while debuffing each target's accuracy and dodge rate. Has a very low attack power and moderate cooldown though. Heavy Water Balloon: Balloons filled with some sort of foul concoction are tossed, creating powerful explosions around your chosen target. Launches a water balloon to deal AoE damage to an extremly wide-radius of enemies while debuffing each target's accuracy and dodge rate. Has a very low attack power and moderate cooldown though.
 Hornets Nest: Hurl a nest of hornets at the ground, creating a swarm that attack any enemies in that area. An AoE attack in which you thow a hive of hornets into a group of enemies. This ring hits three times and does damage similar to Fire Rain while having a small chance to inflict fear on each target (similar to Scaredy Cat). (Note: You *actually* get to choose where you throw the hive on the screen, as your cursor changes into a greet target) Hornets Nest: Hurl a nest of hornets at the ground, creating a swarm that attack any enemies in that area. An AoE attack in which you thow a hive of hornets into a group of enemies. This ring hits three times and does damage similar to Fire Rain while having a small chance to inflict fear on each target (similar to Scaredy Cat). (Note: You *actually* get to choose where you throw the hive on the screen, as your cursor changes into a greet target)
 Hot Foot: Set your target's feet on fire, causing it pain for several seconds after the attack occurs. Creates an area of hot steam under a monster and does damage slowly over time while debuffing the target's dodge rate. This ring can be use from mid-range. Hot Foot: Set your target's feet on fire, causing it pain for several seconds after the attack occurs. Creates an area of hot steam under a monster and does damage slowly over time while debuffing the target's dodge rate. This ring can be use from mid-range.
 Hunter's Bow: These arrows may not hit particularly hard, but your target won't be able to run as well with the arrows stuck in it. Summons a bow to attack the enemy for a weak attack. Enemies hit by the attack will become slowed, which also stacks with gumshoe, making enemies run at a snail's pace. Hunter's Bow: These arrows may not hit particularly hard, but your target won't be able to run as well with the arrows stuck in it. Summons a bow to attack the enemy for a weak attack. Enemies hit by the attack will become slowed, which also stacks with gumshoe, making enemies run at a snail's pace.
 Shark Attack: Land sharks move through the ground, attacking the target of your choice and usually knocking it back away from you while also doing significant damage. Summons a shark to swim towards your opponent and deal damage while moderately knocking your enemy back. This ring can be used from medium-range. Shark Attack: Land sharks move through the ground, attacking the target of your choice and usually knocking it back away from you while also doing significant damage. Summons a shark to swim towards your opponent and deal damage while moderately knocking your enemy back. This ring can be used from medium-range.
 Shuriken: Hurl sharp spiny objects of pain at your foes, damaging them slightly while also disrupting your opponent and making it hard for them to be accurate with their attacks. Throws a barrage of ninja stars to deal damage to your target. It's said to have low attack rate, but also debuffs your target's accuracy. That's right, throw your sharp metal at their face. Maybe some of it will stick? Shuriken: Hurl sharp spiny objects of pain at your foes, damaging them slightly while also disrupting your opponent and making it hard for them to be accurate with their attacks. Throws a barrage of ninja stars to deal damage to your target. It's said to have low attack rate, but also debuffs your target's accuracy. That's right, throw your sharp metal at their face. Maybe some of it will stick?
 Solar Rays: Focus the power of the sun into a beam that can reach out and touch your target, giving it a powerfully nasty sun burn. This ring is ranged, but also sports a moderate cooldown and stamina cost. Also has the second-longest range of any ring. Solar Rays: Focus the power of the sun into a beam that can reach out and touch your target, giving it a powerfully nasty sun burn. This ring is ranged, but also sports a moderate cooldown and stamina cost. Also has the second-longest range of any ring.
|
|
|
|
|
|
|
|
|
|
|
|
|
|
|
Posted: Wed Oct 28, 2009 12:08 am
What others have noted about the game..........
1. Defib can be used on a dazed person more than once. Each successive use unlocks more ring slots and generally helps them to recover faster. Also, if you use Rage to charge defib when using it, it will unlock even more ring slots for the poor victim. So don't be afraid to defib the heck out of your comrades.
2. Rage Charge can be used on Buffer Rings (although I have yet to confirm whether this actually affects the strength or lifespan of the buffs, but it makes logic sense, right?)
3. Notice how some monsters tend to spawn only once a screen is completely emptied of all other monsters, while other spawn places will continue to pump out mobs the minute you kill them?
Use this to your advantage!
If you're fairly set on your farming line-up (Dervish is always nice, but other rings work almost as well), you might want to camp in one of the places that has continuous spawns (up to the set limit of monsters). Fluffs in Village Greens spawn fairly quickly, as opposed to some of the Gnome places, or the Flamingos.
If you're just starting out, or you want to test the viability of a different line-up, or if you're more set towards a supporting role but find yourself farming alone for a change, a slower spawning ground might make more sense. Try the Fluff Rush, or farm Skeeters just above the DMP gateway.
4. Have you ever wondered why you can only collect empty air from some crates and boxes? That's because camping them isn't nice, and there's an enforced 1-2hr interval until you can loot those same boxes again.
5. Use instances to your advantage. DMP is an instance. You can enter it, kill everything in it, exit and go right in again. Everything will have respawned. The Hive and the Shallow Seas are other examples. Note that people have to be in your crew if you want to play in the same instance as them.
6. There is virtually no set way of speed leveling. Some people prefer one mob over another, sometimes it'll feel like hours have passed since your last Ring drop. Switching servers doesn't seem to help, and your crew is beginning to get on your nerves.
The solution? Take a break.
7. You can build-up your rage using one ring, and then transfer it to another. By doing this you are able to build up rage for a ring that is still recharging. For example, you can use hack, build up the rage on shark attack while hack is recharging, and then use the fully raged hack. This makes it so that you maximize your DPS.
If you have noticed similar nuisances in the game you would like to share, please, make a new topic and post them so that the rest of us can use them too.
|
|
|
|
|
|
|
|
|
|
|
|
|
|
|
|
|
|
Posted: Wed Oct 28, 2009 12:09 am
The Wish Tree Vision: Locations are on the maps Bass'ken Lake, Gold Beach, and Old Aqueduct. An easy way to get them without dying too much if you're low level is to get the Windmill one first, then go north (or north through the western part of the map if you can live through saw attacks) and all west past Boardwalk (avoiding anchor bugs, stick to the southern most of the map) and through most of the Beach, then go north as far as you can for the Lighthouse. Then take the same path down the beach to the southern exit to Old Aqueduct. From there you can find the last vision on the map without getting killed (unless someone dragged Tiny Terrors in there). Good luck!
Mark's Ring: is located all around the Bass'ken Lake shore as indicated on the map. You'll have to walk around as close to the water as you can, clicking to inch forward each little step. The docks don't count. The location is random for everyone.
Village Greens: There's a guard east of Leon, I'm not sure of her name -- she's not part of any quests now, but she might be in the future. Also, you can get into Towns by the gate she guards. Between the two green mushrooms where the courier comes out, is a gate -- touch it and you get a badge. You might also want to put in the Goof Ball tees in order?
Bill's Ranch: Below and to the left of the DMP gate is the Skeeter Hive for the Klocken quest. Going into the Barn gets you another badge.
Zen Gardens: You do have Trip and Burton there, but the Durem Blockade also gives a badge.
Bass'ken Lake: More badges! One for walking on the piers of the lake, one for walking on the rocks of either side of the waterfall.
Gold Beach: Ike appears by the bonfire at night - he gives the Spouts quest. Duneslam appears in the sandy circle below the Null Crystal.
|
|
|
|
|
|
|
|
|
|
|
|
|
|
|
Posted: Wed Oct 28, 2009 12:10 am
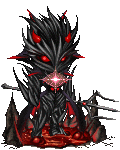
Atra Angel I'm sure you've heard of the recent adjustment to the Kokeshi quest- defeating it has become A LOT easier for single players and the difficulty (and reward) level increases the larger crew you have with you. Me, being the unlucky loser that I am, had played to Kokeshi game after Beta, but I was forced to redo it again while they were fixing Katsumi's talking privileges. So, I lowered my CL and meandered to kill the doll, only to get pwned. Angered and annoyed, I wondered whether I could raise my CL once inside the boss area and kill these saps with ease. I had no problems whatsoever- I think that the game only registered me as a single player and hence kept the gameplay at that of a single player. But, of course, I hadn't been the only one to discover this cheat. I had been randomly killing things in Bassken Lake, minding my own business, when I was recruited to shewolf hunt. I didn't mind and actually planned to raise my CL once inside the cave to make things easy. So I skipped away to the Null to lower my CL to the proper 5.1 During that time, my fellow crewmembers entered. One was of like mind and raised his/her CL to 10.0, and when I hurried in and raised mine, I killed them and was hunky dory. But then...the wolves kept spawning. And spawning and spawning and spawning and coming and coming and coming until.... Yes, it actually happened. It was terrible. First there were only a few, and then MORE AND MORE AND MORE AND MORE AND THEY JUST KEPT COMING!!!It was terrible, traumatic, and hilarious. Okay, let's get to the point- Why did this happen? I can't say for sure, but I have a pretty good theory about it (in my eyes, at least). I believe that the Kokeshi quest was not the only boss area outfitted with that update, and because me and my partner were of high CL, the game naturally responded with a high difficulty. Okay, maybe not naturally- more like homicidally. More research will be done on this (I wanna see many Gnomes and OMGs!!!), so I'll be back with more pics, but enjoy the hilarity and BE WARNED!!! xD EDIT: Okay, apparently, if you raise your CL in the Duneslam island, you won't be able to complete it, even if you kill him. Just to let you know ^^
|
|
|
|
|
|
|
|
|
|
|
|
|
|
|
|
|
|
Posted: Wed Oct 28, 2009 12:11 am
partystar15 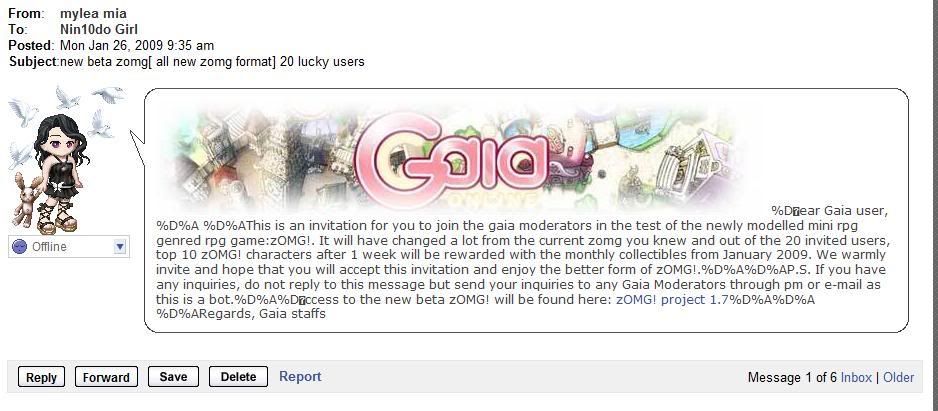 NOTE: If you get this pm - This is a scam do not do anything it ask you to do. Report it and delete it. NOTE: If you get this pm - This is a scam do not do anything it ask you to do. Report it and delete it.
|
|
|
|
|
|
|
|
|
|
|
|
|
|
|
Posted: Wed Oct 28, 2009 12:13 am
Spacer9247 Having a slow and frustrating time of wadeing through the lag? I found this topic on the forums. To save you some time I'm going to copy and past most of what is on the link to that topic, but for more info you can refer back to it at the link below. I have used this program, and it is safe, though if you are on other areas of gaia (games) or other sites with certain flash it may block them, so just enable and disable as needed. Adblock improving zOMG: http://www.gaiaonline.com/forum/zomg-gaia-s-mmo/adblock-makes-zomg-less-laggy-dev-post-quesiton-pg-31/t.44888529/ adblock:http://adblockplus.org/en/ NOTE: There is also another way way to improve performance. http://www.gaiaonline.com/forum/zomg-gaia-s-mmo/zomg-at-its-best-optimization-performance-enhancment/t.46599091_1/ I am currently just starting on using this way though, so no promises on it, but they have worked with eachother and has some good reviews on it, ill let you guys know.I use to adblock tons of times for zOMG. Though its not very pretty but at least i don't freeze up anymore when lots of people are on screen or while in a crew. How do add filtersyou enter the filters by clicking the drop-down next to the icon on your firefox browser as shown and click preferences: http://i36.tinypic.com/k12eko.jpg This screen should come out http://i38.tinypic.com/mbhgfd.jpg and then copy and paste the filter. Don't forget to hit Okay or Apply! (Pay no attention to my other filters since they are for towns and for general gaia browsing whee ) The Filters: animations (which gives me the biggest lag) *note: your avatar will turn invisible after zoning sometimes making it difficult to find yourself unless you target yourself by pressing spacebar* If you'd rather block specific animations see Mindset's quote further down.http://*.gaiaonline.com/images/Gaia_Flash/zomg/*/rings/*.swf avatars (everyone will have a see-through avatar frame) *note: does not block avatars on the forums! biggrin * (Provided by Saikatsu) http://*.gaiaonline.com/gaia/members/ava/*_strip.png* except for yourself (you'll still be prone to shadow on the ground avatar but if you want to see your own avatar this is how to do it.) to get your avatars image right click and select image or properties and copy & paste. @@_strip.png for example this is the exception so you can see my avatar in-game @@http://a2.cdn.gaiaonline.com/gaia/members/ava/39/c1/35524d9942c139_strip.png another example this is so you can see Qixter's avatar in-game @@http://a2.cdn.gaiaonline.com/gaia/members/ava/5e/7d/111ae64a6c7d5e_strip.png simple enough? if the url has a _flip.png with some other numbers remove that and just put in _strip.png instead. the @@ in front is what makes it an exception, with none or 1 it will just become a filter. intro movie (once you block it it goes straight to the server selection) http://m1.cdn.gaiaonline.com/movies/zomg/intro.flv annoying null chamber "music"http://*.gaiaonline.com/images/Gaia_Flash/zomg/*/sounds/nullchamber*_sounds.swf block all music (provided by Windmouse) *directsong.com There is more filters provided for drops and specific rings on the topic link provided at the top. But just blocking out a few of the basics makes a big difference for my computer where before it was unbearable to just move a few feet. Still get some lag with mobs, but otherwise it runs better. It takes a few tries and tests to see whats right for you.
|
|
|
|
|
|
|
|
|
|
|
|
|
|
|
|
|
|
|