

Today, boys and girls, we're going to learn how to do selective recoloring.
For purposes of demonstration, that would be:

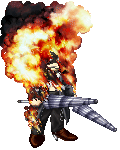
Something like this.
I know, most of you advanced users know how to do this, but I'm sure some people don't.
There's actually a few different ways to do this.
The simplest is to simply use the lasso to select the area you want to recolor, and then go Image>Adjust> Hue/Sat. This is simple enough.
Example
The other two ways to do it, which are more complex, are also more versatile, and better practice for other things.
The second way is to again highlight the segment you want to relcolor. Then, go to Layer> New Adjustment Layer > Hue/Sat. Now, adjustment layers are layers that affect the properties of ALL the layers beneath them in the Layer tree. With a hue/sat adjustment layer, you can completely change the hues of all the layers in the sig. In this case, though, you're only changing a segment. The reason I like this way is
1) If you get 100 or so steps in and decide the color doesn't fit, you can change the layer, or discard it, without having to recut the stock, or whatever
2) If you want to change one area, but it overlaps 3 or 4 layers, you can use this without having to do layers one at a time.
The third way involves copying the whole image, and then doing a hue/sat adjustment to the whole thing. (As discussed in the first option) Then, you go to Layer>Add Layer Mask > Hide All. This will show you the layer underneath. Then, you just use the eraser on the mask, to erase the parts you want to show. (For instance, if you were coloring the eyes, you'd erase over the eye. (Painting the mask in white will also work) To hide things, just paint on the mask with black paint.
There are a couple other way to do this, as well, which I've discovered since I first wrote this:
1) You can go to Image > Adjustments > Replace Color, and then select a color in the image with the eye dropper. You can add more colors to the selection with the +Dropper button. This is quicker, but doesn't work well if there are a lot of similar hues in the same place, such as the hair, in the above picture.
2) Go to Image > Adjustments > Selective Color and select a shade. This allows you to completely change a particular hue into something else. The problem here is that anywhere that color is, it will all be changed. Thus, if you're trying to change a blue shirt to red, you might change the sky to red, too.
Well, there you go. Hope this helps. And soon, you too can be making punk rocker Cloud's and Lee in an Orange jumpsuit, or whatever other ideas you desire...