Welcome to Gaia! ::

The Dragon Quest/Warrior Guild

Back to Guilds

A guild for all your Dragon Quest/Warrior needs! 

Tags: JRPG, Slimes, Roto, Alefgard, Zenithia 

Reply The Imperial Scrolls of Honour (LP Subforum)
LP! LoZ: Link's Awakening DX COMPLETE! Goto Page: [] [<] 1 2 3 ... 4 5 6

Quick Reply

Enter both words below, separated by a space:

Can't read the text? Click here

Submit

We're finally nearing the end of the game... thoughts?
  Brilliant. Simply brilliant.
View Results

gabriel sama

High-functioning Player

PostPosted: Wed Jun 22, 2011 4:27 pm


Chapter 23: Fire, Fire! Great Balls of Fire!

Hey guys, and welcome back to another exciting episode of LP! LoZ: LA DX! Today, we're gonna clear up the final dungeon, the Turtle's Rock. I for one have a strong dislike for this dungeon. Why? Well, besides the fact you have to fight previous mid-bosses from previous dungeons, this is one of those dungeons where if you use the wrong key on the wrong lock, you will be unable to finish the game.

YOU HAVE BEEN WARNED.

Right then. Now that my warning message has been given, let's get started.

User Image
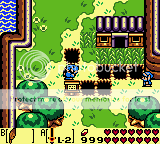
Behold, the entrance to the Turtle's Rock. Head up.

User Image
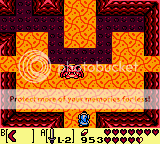
The two doors on either side are gonna lock when you step in, and you'll have to face this guy. Players of the other Zelda handhelds may recognize him as an enemy from... I wanna say Oracle of Seasons, but he may be in Ages too. He'll stay on the outer portion of the screen, shooting fireballs at you before either divebombing you or flying off-screen to attack from a different side. If you hit him twice, he'll split into a pair of bats, which will then fly into you. Not difficult of an enemy at all.

Once he's gone, head right.
User Image
Likewise, the doors will lock upon entering. There's a switch hidden under one of the pots, and you need to be careful with the Sparks to get to them.

User Image
Fortunately, the boomerang makes short work of them, and the switch is hidden under the pot nearest the lava near the closer Spark. Once you push it, head south.

User Image
There are two of the elephant enemies that mimic your movements, and two firepits that shoot fireballs at you.

User Image
Defeating both the enemies will spawn some stairs, and the fireballs will stop. Take the stairs.

User Image
Jump on the floating platform and take out the Spark with the boomerang before heading across.

User Image
Jump on the platform and ride it to the ladder, then climb up the second ladder to get out of the underground area.

User Image
There's gonna be a couple of the green blobs hiding here, and a Beamos. Move for that pot, and jump over the beams if needed.

User Image
Time it so that the Beamos just finished passing its gaze over the pot, then pick up the pot to find the switch. Press it and head for the door.

User Image
And it's our first deja vu battle! If you don't remember how to beat him, simply grab the metal ball after he throws it and throw it right back at him.
Link: It's like playing catch.
Only you're pegging them with a two-ton ball of steel.

User Image
Once he's been vanquished, grab the fairy he drops and head south.

User Image
Kill the snakes and head for the chest.

User Image
You'll find a stone beak. Head back through the doorway, and ignore the stairs.

User Image
Head left.

User Image
This is one of those interesting rooms you'll see in the dungeon. If you push that block with the bubble on it, you can take control of it. There's a key in this room, so the goal is to fill up the entire empty space with ground. Also, if you're using the block and you collide with either pre-made ground or a wall, it will disappear.

User Image
Once all the space is filled, you'll be rewarded with a key. Head left.

User Image
There's a chest here, but I wouldn't bother with it.

User Image
Green blob hiding in it. Once you beat it, head left.

User Image
And we're back here. Head left.

User Image
Defeat this guy again and head left.

User Image
Beat the snakes while evading the beams to unlock the door, then head north for your second deja vu battle.

User Image
Remember this sap? If you have full hearts, just beam sword him to death. He won't even be able to reach you.

User Image
He'll explode and drop a fairy, and head left once the door opens.

User Image
It's another one of those rooms, with that device. Fill up the empty space.

User Image
Doing so will give you a chest...

User Image
Filled with money we have little need of. Head south.

User Image
There's a chest here too. Inside of it has...

User Image
More money, which gives us the 999 limit. From here, head left.

User Image
Oh man, we haven't seen this guy in a long time. Just jump over the rolling barricade and slash at him to bring him down.

User Image
Grab the fairy once he's defeated, then head south.

User Image
Head down towards the vacuum, killing the enemies along the way, and then slash the black hole thing to kill it. Then go for the chest.

User Image
Our ever-faithful HRC joins us one last time. Head back north once it's in your pocket.

User Image
Keep heading north.

User Image
And this brat's back. I think you can get him in one shot using the boomerang, but I didn't check on it.

User Image
You'll get a key for your efforts. Backtrack to the room north of the entrance.

User Image
User Image
User Image
User Image
User Image
User Image
Head north from here.

User Image
To the right.

User Image
We're gonna use this room quite a bit.

User Image
Push the moveable block so that you can reach this area right here.

User Image
You can bomb the wall at the end of the path for a new route, and you can push the blocks to reach the chest.

User Image
Get that map.

User Image
The dungeon is shaped like a turtle. Interesting, huh? Head through the entrance you just made with the bomb.

User Image
Take the stairs.

User Image
Dodge the fireballs while jumping from pillar to pillar to the other side.

User Image
Take the ladder and climb across to the other side, dodging fireballs.

User Image
Congrats, you're back in the Stone Beak room. Kill the snakes to proceed to fight one of the old mid-bosses again.

Once he's vanquished, head left.
User Image
Now that we're back in this room, examine the north wall.

User Image
There's a spot you can bomb.

Once the bomb goes off, head through the new entrance.
User Image
You'll see a crystal here. Remember it for later. Go ahead and bomb that cracked wall though.

User Image
Don't bother taking the stairs. It's covered in ice and we don't have the item to get through. Also don't bother heading left, as there's a lava pit you can't cross either. Just take the path south.

User Image
And we're back here! Make your way back to the moveable block at the lava pit.

User Image
User Image
User Image
User Image
Now that we're back here, we need to head north. But there's several options, right?

User Image
This is the one we want. By the way, if you ever need to head quickly back to the entrance from anywhere in the dungeon, just play the warp song. It'll take you right back to the entrance. Pretty nifty, right?

User Image
Use your key on the block and head left.

User Image
Keep going left.

User Image
Oh look, dead end. Head two screens to the right.

User Image
Head right once more.

User Image
You can either take out the flying demon, or ignore him and open the door with your key.

User Image
Take the one-way door, and ignore the stairs.

User Image
There's a bunch of bombable blocks here. And the door locks too.

User Image
Defeating all the enemies will open the door. But if you bomb all the blocks, they'll reveal an arrow on the ground. There's a part on the wall you can bomb.

User Image
This part, in fact.

User Image
Careful here. If you use a key here without grabbing all the ones from further in, you can and will be trapped and unable to complete the game. So ignore this area for now and head back.

User Image
Head north.

User Image
There's gonna be a chime, and your goal is to kill the gibdos on the breakable floor.

User Image
Grab your key, then head left.

User Image
Just... just ignore this battle. Beating them will spawn a chest that you can't reach. Head left.

User Image
Take the stairs and head north.

User Image
Hookshot across to the chest.

User Image
Hey, a potion in case you don't have one. Jump down and collect all the goodies, then head north.

User Image
Take the stairs.

User Image
Get across as you see fit, and kill the goomba if you must.

User Image
Climb up the ladder, then hookshot across. Careful with the fireballs.

User Image
You're back here now. Head through the one-way door and make your way back to that door with the keyhole. Not the one that is directly left to the arrow room. The one that's past the mid-boss battle we ignored.

User Image
User Image
User Image
User Image
Use the key and go through.

User Image
There's the Nightmare's room. Ignore for now and head left.

User Image
Beat the enemies and head left.

User Image
Climb up the stairs.

User Image
Hookshot across to the chest.

User Image
Yay~ Money we don't need! Jump down and take the stairs.

User Image
Link: Ah... fresh air.
And look, there's a piece of heart!!

User Image
If you've been following my LP, this should be the last piece of heart you need. Once you got it, head right.

User Image
And there's a teleporter. Go ahead and activate it. Then come back and head right.

User Image
Take this entrance.

User Image
And now we're back inside the Turtle Rock. And look! We're up on the ledge where the chest will spawn! Lob bombs at those eaters and hope they get eaten! It'll take a few bombs to get the job done.

User Image
Once they're both out of the picture, the chest will appear. Go open it.

User Image
And add that small key to your collection. Head left after you get the key.

User Image
Jump down and head left.

User Image
Go left some more.

User Image
Head south.

User Image
There's a chime in this room. This puzzle is fairly interesting. You see that line on the ground? Go stand against the wall.

User Image
Shooting an arrow at the eye of the statue will drop the key. Grab it and head south.

User Image
Restock on items, then head back up.

User Image
Take a left.

User Image
Evade the beamos and make your way to the left of the chest and hide behind the block.

User Image
From here, push the block down, and the one in front of the chest to the right.

User Image
You'll get a small key. Head up the stairs and go around and south.

User Image
You can't clear this room, so just head back to the previous one.

User Image
With three keys, we need to head back to the arrow room. So go do that.

User Image
User Image
User Image
User Image
User Image
User Image
User Image
Head to the left.

User Image
Take out the sparks and jump across the pit and make your way over to the keyhole block.

User Image
If you have three keys, great. Use the first one on the block and head left.

User Image
Kill the snake and head left.

User Image
Head up the stairs and use the second key before heading right.

User Image
You'll need to hookshot onto one of the blocks on the other side.

User Image
Like so. Use the last key on the keyhole block and take the stairs.

User Image
Jump onto the platform and then onto the hanging block. Be careful of the fireballs.

User Image
Link: I'm hanging by a moment...
Jump onto the floating platform once it's safe and head right.

User Image
Jump across the floating platforms to the right, and take the ladder up.

User Image
This is the only reason why a crystal exists in this dungeon. To prevent us from reaching that chest. For now, head south.

User Image
And behold, the REAL mid-boss battle. Oracle of Seasons players will recognize this guy as Blaino, the dude that runs the boxing gym that you have to face to get Ricky's gloves back. Only difference is that they're blue. This guy is actually pretty challenging. His gloves will block most of your strikes, and he's fast on his feet too. His punches hurt quite a bit too. You need to wait until he does a flurry of punches to be able to go around his gloves and get a clean hit. He's also got one attack where he pulls back, as if he's winding up a punch, and then lunge forward to hit. If that hits you, you'll be sent flying back to the entrance of the dungeon. And we don't want that now, do we?

Once he's beat, grab the fairy and take the warp back to the entrance.
User Image
We need to head for the crystal room.

User Image
User Image
User Image
Take the top right route this time.

User Image
Jump off the ledge and head right. Grab hearts if needed.

User Image
Hit the crystal, then head back to the entrance.

User Image
User Image
User Image
User Image
User Image
Take the warp.

User Image
Head north, through the upper right entrance.

User Image
With the platforms down, we can get to the chest now.

User Image
It's a MAGIC ROD!

User Image
User Image
This is a fire-based weapon. So it's pretty sweet. Lights torches from a distance, burns foes, melts ice in an instant. Cool party tricks, yeah.

User Image
Link: The game is just as amazed as we are. XD

Head back to the entrance and go north.
User Image
With the magic rod, we can kill this guy in one shot.

User Image
Link: Gotta love the range on this baby. <3
Head left once he's down.

User Image
Kill snakes, go north.

User Image
Two hits with the magic rod will make short work of this guy. Head left once the door opens.

User Image
Push the block so you can head north.

User Image
Take out the snakes.

User Image
Then use the magic rod to light the torches.

User Image
A chest will appear.

User Image
You'll get a small key for your efforts.

User Image
I used the warp song to go back to the entrance.

User Image
Really nice for going there quickly.

User Image
Head for the lava pit room.

User Image
Make a path to the stairs.

User Image
The magic rod will get rid of all that ice, so use it to get across.

User Image
You need to take out the middle row of ice by jumping then swinging the magic rod in midair. This will give you a step to get up the ledge and reach the ladder.

User Image
Use the key on the door and go through.

User Image
You'd think we'd be done with repeat mid-bosses, but here's one more... hidden away from all the rest. I jumped over him and swung at his backside, since we can't really use the boots on lava. XD

User Image
After a couple of hits, he'll die and drop a fairy.

User Image
Take the north entrance.

User Image
This puzzle is pretty complex, as it does reward you with the boss key. Push the block up.

User Image
To get to here and then finish it... follow this pattern.
Legend: x = ground/lantern, | = wall, s = start
|xxxxxxxx|
|x>>v >>vx|
|x^ x>^x vx|
|x^v<<<|xsv>v>vx|
|xx>^>^>>|

User Image
Filling all the empty space will reward you with a chest.

User Image
Boss key, get~

Head back to the entrance.
User Image
Go to the lava pit.

User Image
Make a path to the right.

User Image
Like so.

User Image
Take the stairs.

User Image
More ice. Follow the route I will display below.

User Image
User Image
User Image
From here, take out the two ice columns that are above the goomba, drop down and try to take out the ice block that is in the way of making it to the left. If you miss, you can take out the ice to your right, drop down and climb back up.

User Image
Once you get across, head left.

User Image
Follow these steps.

User Image
User Image
User Image
And from there, jump. You could also ignore the first column and instead start with taking out the bottom row to save on time.

User Image
Once you're here, climb up the ice and head down the ladder.

User Image
You're now outside the boss room. Save, take a small break, then head inside.

User Image
User Image
User Image
Link: Sorry, but I'm playing those instruments. Cue battle music!

User Image
User Image
This guy is a laugh. All he does is jump around in the lava, and his main form of attack is the splash, from when he lands in the lava. The magic rod is your weapon of choice here, so spam it a lot. When he gets hit by it, he'll float around the room, bouncing off the walls. Dish out enough damage, and his outer shell breaks.

User Image
User Image
The concept remains the same, only he's small and thus harder to hit. Just keep using the magic rod until he's beaten. Also, I beat this guy without moving. Yeah. I just stood there and spammed the rod. That's all.

User Image
User Image
User Image
User Image
User Image
User Image
Link: I'll manage somehow. If I got into the dream, I can get out. I'm not like you Nightmares.
He'll burst into flames.

User Image
The last heart container will fall and land on Link.

User Image
Door will open now that we have the heart container, so head on over there and go north.

User Image
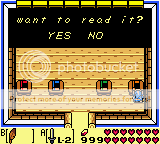
There it is. The last instrument.

User Image
You got the technicolor drum!

User Image
Thunder drum get!

User Image
User Image
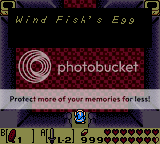
As usual, it'll play before you get engulfed in a flash of light.

User Image
User Image
And our destination is the Egg now~

User Image
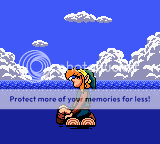
And with that, we are outside again.

Oh man, we are so close to the end. You have no idea.

Next time, I'll show you how to get the last picture, then we'll head over to the Wind Fish Egg and awaken him. So until then, see ya~
PostPosted: Thu Jun 23, 2011 9:04 pm


Chapter 24: STEALING IS WRONG, CHILDREN.

Hey everyone. Welcome back to another episode of LP! LoZ: LA DX! I'm not feeling my best today, so I'll keep it short. Fortunately, with 62 images, this is one of our shortest chapters yet!

This chapter is pretty straightforward. Get the final picture, then head off to the Wind Fish and wake him up. Let's get started.

User Image
We're done with the last dungeon, were we not? Good. Head right.

User Image
Jump from the cliff, and you should recognize where we are in the next screen.

User Image
Yep, we're west of the swamp and north of the forest. This dungeon is really close to town, huh? Speaking of town, that's our next destination, so get going.

User Image
User Image
User Image
User Image
User Image
User Image
User Image
User Image
User Image
User Image
User Image
We need to head to the shopkeeper's place, where we bought the shovel and bow.

User Image
User Image
User Image
Link: Marin! <3

User Image
User Image
User Image
User Image
User Image
She actually did tell us her wish, back at the date chapter. Also, she never does confess her feelings for Link.
Link: ._.
-patpat-

User Image
Here's the shop. Head inside.

User Image
We can buy the entire place several times over. Also, seeing as how the level 1 shield is still there, I'm guessing Like Likes can't eat your Mirror Shield. Since we're stealing today, just pick any random item from the shelf.

User Image
I went with hearts since it was straight in front of me.

User Image
To make this work, you need to have the shopkeeper looking away from the door. As you can see, he does keep his eyes on you.
Link: He's probably aware that people have stolen before...

User Image
You need to have him either facing up, or to the right by the time you reach the door.

User Image
Just so you know, I didn't steal anything. I'm not about to sacrifice Marin's single wish to the Wind Fish in exchange for a picture. I'll give you guys a link though to see what happens if you steal. Do you feel proud of yourselves? You realize that if you steal, you will never be called by your name again. You'll be called THIEF for the duration of the game.

User Image - Blocked by "Display Image" Settings. Click to show.
If you do steal, this image will automatically be added into the album. Oh, we need a title for this image, don't we?
"STEALING WILL ONLY GET YOURSELF KILLED."
Problem solved.

From the shop, head to the library.
User Image
Go inside.

User Image
One of the books in this room tells us how to navigate through the labyrinth inside the Egg.

User Image
User Image
Link: I think I can tell the difference between a chest and a bookshelf. stare

User Image
This is the book you want to read. And you can only read it if you completed the trading quest and acquired the Magnifying Lens.

User Image
User Image
User Image
Of course we want to read it.

User Image
User Image
I have confirmed that this route, along with two others, works.
Link: It's just going up 4 times.
That doesn't work, unfortunately.

User Image
Link: I know, right? It's like someone took a dump on the book or something.

User Image
Link: Oh. I wasn't aware secrets smelled like a**.

User Image
We need to head to the Wind Fish's egg, so head towards the teleporter outside of town.

User Image
Jump to the one near the 4th dungeon.

User Image
Start walking to the Wind Fish egg.

User Image
User Image
User Image
User Image
User Image
User Image
User Image
User Image
User Image
User Image
From here, you need to play Marin's song, the 'Ballad of the Wind Fish'

User Image
User Image
And awesome happened.

User Image
When you finish the song, the mountain will shake violently.

User Image
And then there's a human sized hole that bursts into the egg.
Link: Hurray! We woke up the Wind Fish!

User Image
Stalker Owl makes one more appearance.

User Image
User Image
User Image
So even though we played the Ballad of the Wind Fish, there is still some force keeping the Wind Fish asleep. I guess we'll have to fight that force.

User Image
The owl will also remain on the egg until you beat the game.

So that's all for now! Next time, we'll see the end of the game! Oh man oh man, I can't believe it!

See ya next time~

gabriel sama

High-functioning Player


gabriel sama

High-functioning Player

PostPosted: Fri Jun 24, 2011 11:13 pm


Final Chapter: Awaken the Beast

Hey guys, and welcome back to another... no... the LAST chapter of LP! LoZ: LA DX! Oh man, I can't believe we've finally made it to the end. It was a fun run, wasn't it? Four months of work, with about half of it being put off due to school and issues at home. But through it all, we have stuck to it. All things, great and small, must come to an end. And yes, that includes this classic. Let's... let's get started, shall we?

User Image
Last time, we found the last picture location and awakened the Wind Fish... or did we? If the Wind Fish is awakened, the island would cease to exist. And yet here we are, still on the island. So that must mean that there is still something preventing the Wind Fish from awakening. All in all, seems like we'd have to go inside.
Link: I'm so pumped! I know that this is goodbye to all the people in this dream, but still... can't you feel the tension building up? Let's do this and blow this joint!

User Image
Link: ... Apparently it's a lot bigger in the egg than it looks from the outside.
The so-called 'final dungeon': Inside the Wind Fish. We've made it at last.

User Image
Link: ... There's no way you can make that jump. D8
You're not supposed to. Jump into the pit and brace yourself.

User Image
And welcome to the Labyrinth! There are only a few routes that are known to escape from this eternal hell. Fortunately, if you've followed my instructions up until now, we can make this very painless. So stay focused!

User Image
Remember the order? First it's to the left.

User Image
Then up.

User Image
Link: Then to the right.

User Image
Up again.

User Image
Left again.

User Image
Up once more.

User Image
Right again.

User Image
If you go up one more time, you should hear a completion chime, and enter a room like this. Brace yourself... the final boss awaits.
Link: Just how far down does this egg go? It doesn't comply with the fabric of space!
You're saying that now?! None of the dungeons followed that law! They ignored what little space they were given!

Jump down to face...
User Image
... Yes, you are standing on the final boss himself. He has become your shadow.
Link: Just imagine how screwed I'd be if this was Dark Link forming under me...

User Image
User Image
User Image
User Image
User Image
User Image
User Image
User Image
User Image
Link: He sure spent a lot of time talking...
Probably wanted you to fall asleep during his speech.

The final boss, Nightmare, has several forms. And... believe it or not, if you've played Zelda before, especially ones from the NES/SNES generation, you'd recognize a few of them...

User Image
His first form is the Shadow Bot. If you guys remember the boss, or remember this music, great. If not... well, he's one of the mid-bosses you faced back in the 0th dungeon, the Color Dungeon. He'll hop around and attempt to bump into you, but he's not much of a threat. Oh, he'll also sink into the ground and reappear in a different part of the room. Wanna know how to beat him?

User Image
With crack. That's right. CRACK. So make sure you have plenty of it by the time you get here. Otherwise you may be in some deep s**t.

User Image
After taking a few doses of it, he'll burst apart. Stage one of the boss is done.

User Image
He'll then become Shadow Agahnim. For those of you not familiar with him, he's an evil sorcerer from a Link to the Past that gave you hell.
Link: He also plays one wicked game of Tennis. >_o

User Image
He'll start by charging up an orb of high-density energy. Pay attention to the next part, because this is important.

User Image
If the blast is spherical, you can use your sword (or shovel, if you still have it or got it back) to deflect the blast back at him and deal some damage.

User Image
He's also got the cross-shaped blast, which you cannot hit back at him and will hurt you.

User Image
Once it travels enough distance, the cross-shaped blasts will explode and fire off smaller blasts from the four corners. Simplest way to get around this is to jump out of the way and wait for the spherical blasts.

User Image
Once you deal enough damage, Shadow Agahnim will spin around before...

User Image
Reverting back to his normal form. And then he'll take on his third transformation...

User Image
Link: O_____________________________________o
Shadow Moldrom. Remember that very first boss we faced, way back in the Tail Cave? Yeah, he's BAAAAAAAAAAAAAAAAAACK~ Beating him hasn't changed. Just swipe at his tail. But there's a twist. Each time you hit his tail, he'll speed up. You have to keep hitting the tail and make him go faster. If he slows down and goes back to his original speed, all the damage you have done is nulled.
There's a painless method I've heard of... during the transformation bits as Nightmare shifts from one form to the next, if you start slashing him just as he starts to transform into Shadow Moldrom, you can stop him mid-transformation, and if you deal enough enough damage doing this, he'll shift right onto his next form.

User Image
Speaking of his next form, it's...

User Image
Link: I swear this guy took a look into my memory to see all the past enemies I've beaten...
It's Shadow Ganon. If you don't recognize one of the most famous Zelda villains, I'm afraid you cannot call yourself a Zelda gamer.

User Image
He'll summon a bunch of flaming goddamn bats at you, which are immune to your attacks so you'd have to evade them.

User Image
Once all the bats are gone, he'll throw his trident at you before it'll return to him like a boomerang. And another thing. This guy is immune to regular sword hits. You'd either have to thrash him with Spin Attacks, or use the Peggy Boots and impale him with your sword.

User Image
Once you dish out enough damage, he'll shift to his fifth form...

User Image
Shadow Lanmola. You've fought him before back in the desert, as well as in a Link to the Past. However, he won't be defeated normally, like before. He'll chase you all around the room too. There's several easy ways to kill him though. Either use a Spin attack, the hookshot, boomerang, bombs, Magic rod, or charge at him with the Pegasus boots and sword to defeat him. One hit will do the trick.

User Image
Link: Hah. You're not so tough for a final boss.

User Image
Link: What the...? This is...

User Image
The sixth and final (true) form of Nightmare, Dethl. He'll swing those arms of his around to try to hit you, in which you must dodge by jumping.

User Image
Occasionally, he will open that eye of his, in which you can fire an arrow into it to deal damage. I suppose you can also use the boomerang, as it is significantly faster than the bow. Which would you prefer? 16 arrows to kill the final boss, or one boomerang hit in the eye?

Once you deal the final blow...
User Image
User Image
User Image
User Image
Link: So close, and yet so far away... cool

User Image
And then he went super saiyan.
Link: O____________________________________________________O

User Image
... I'm kidding. You beat him.

User Image
User Image
User Image
And then some mysterious voice tells us to climb the stairs.
Link: What stairs?

User Image
Link: ... Oh.

User Image

User Image
User Image
Link: Are we in space? Or did we have some crack and induce some sort of high?

User Image
Link: ... If we're high, why is the Stalker Owl here?

User Image
Link: Wait a minute... the textbox is white...
Probably so the words can actually be read, since we're dealing with a black background...

User Image
User Image
User Image
User Image
User Image
User Image
User Image
User Image
User Image
User Image
User Image
User Image
User Image
User Image
User Image
Link: He sure loves to talk, doesn't he?

User Image
Long story short, Stalker Owl is actually the spirit of the Wind Fish to watch over the dream, and then he goes on about how the Nightmares first showed up, and then us, and how he's thankful that we saved this world. This is also the last time you see Stalker Owl, so throw any last minute words you'd like to say to him.
Link: I hate you Stalker Owl!

User Image
And then the Owl fades out of existence.
Link: ... I feel guilty now.

User Image
Link: Something's coming!

User Image
Link: Is that... the Wind Fish?
Huh... like that one Owl said long ago, the Wind Fish is neither Wind nor Fish. It's a Whale with a bunch of tattoos. And really tiny wings for the massive body.

User Image
Link: He seems to be sizing us up.
Or maybe he's half asleep.

User Image
Link: We figured.

User Image
User Image
User Image
User Image
User Image
User Image
User Image
User Image
User Image
User Image
User Image
User Image
User Image
User Image
User Image
User Image
Link: ... Spirit or physical form, the Wind Fish loves to talk, doesn't he?

User Image
And then he fades out of existence to go wake up.

User Image
User Image
Link: Again? Fine... you have no idea how hard it is to play all the instruments at once you know...

User Image
And thus, we played the Song of Awakening once more.

User Image
And we watch how everything fades out.

User Image
From Bow Wow and his little siblings...

User Image
To the two kids playing catch...
Link: I never did get a chance to join them, huh...?

User Image
To the Octoroks on the beach...

User Image
To-- Did he find ANOTHER MUSHROOM?
Link: Screw it, I'm not saving Tarin's a** again. He's about to be vaporized from existence anyway.

User Image
To... yes, even Marin.
Link: D8!

User Image
Up until the entire island...

User Image
User Image
User Image
... fades entirely out of existence.

User Image
Link: ... You know, if the island doesn't exist anymore, then how do we--

User Image
Link: Oh god!

User Image
Link: Waaaaaaaaaaaaaaaaaaaaaaaaaaaaaaaaaaaah! Make it stop! I feel like I'm gonna-- urp!

User Image
Link: Blurgh...
... Nasty. I can't believe you threw up.

When we finally come to...
User Image
We see the sun glaring down on us.
Link: Huh... we're outside...?

User Image
Still clinging to the mast, I see.

User Image
Link: ....

User Image
Link: Marin baby, come back...

User Image
Link: Huh... where am I...?

User Image
Link: Oh right... shipwrecked... so this is where I really am...

User Image
Link: Guess I can just wait to be rescued or something...

3 hours later...
User Image
Link: I wonder what Zelda and Ganon are up to... probably partying hard without me.

3 days later...
User Image
Link: The world of Termina would have been destroyed by now...

User Image
Link: ... huh? Did it get dark all of a sudden?

User Image
Link: Oh goddesses! The moon has come to get me!!!!!!! Dx

User Image
-scrolling up to the sky-

User Image
Link: Oh wait, that's just the Wind Fish...

User Image
Link: Would be nice if someone picked me up and took me back to Hyrule...

User Image
User Image
User Image
Link: That's it! I'll get the Wind Fish to take me home!

User Image
Link: Hey, Wind Fish! Give me a ride home! biggrin

And then we spend the next two minutes or so watching the staff credits...

User Image
Link: You stupid land whale! Stop swimming around in the air and get your a** down here! scream Seriously! It's not funny! stressed

User Image
Link: Whoa! Hey, don't try to land on me you b*****d! gonk

For you lucky folks who got the Perfect Ending like I did, this next piece is exclusive to you.
User Image
For some reason, the image of Marin in the sky was flickering on me, and I tried to get a good shot. But as you can see, no luck.

So I'm borrowing from the wiki page to give you what you're supposed to see...
User Image - Blocked by "Display Image" Settings. Click to show.

And then her image will fade out...
User Image
Into a seagull.

User Image
In the end, Marin got her wish... to become a seagull. If you did not get the Perfect Ending, congrats. You just denied Marin her one wish.

User Image
Thanks to the staff that made such an amazing game.

And as an added bonus, this image I am about to show you is what you would see instead if you got the perfect ending in the black-and-white version of Link's Awakening.
User Image - Blocked by "Display Image" Settings. Click to show.

...
Wooo~ We finally beat Link's Awakening DX! It's such a shame that from here on out, LP! LoZ: LA DX will no longer be releasing any new chapters. I would like to thank Nintendo for making such an amazing game, Link and Marin for their assistance in writing this, and to my readers, who enjoyed every minute of this.

This is gabriel sama signing out. See ya!
PostPosted: Mon Jun 27, 2011 1:33 pm


Ahahaha. There was one more thing.

I believe I mentioned this a good while back, but Tiki gave me an article about Link's Awakening, and it's some pretty deep stuff. Definitely worth a read.

You can find it here.

gabriel sama

High-functioning Player

Reply
The Imperial Scrolls of Honour (LP Subforum)

Goto Page: [] [<] 1 2 3 ... 4 5 6
 
Manage Your Items
Other Stuff
Get GCash
Offers
Get Items
More Items
Where Everyone Hangs Out
Other Community Areas
Virtual Spaces
Fun Stuff
Gaia's Games
Mini-Games
Play with GCash
Play with Platinum