(mild nudity warning)
The body is a very complicated thing, so it can't be summed up in a very short tutorial, but I tried to keep this one as easy to understand as possible, and make every sentence helpful! By the way, I am not a very technical person, and usually just sort of "wing it" so please excuse any inconsistencies and weird things in the example pictures, and try to stay with me, okay? whee ;;;
1. As you may or may not have already discovered, there are a LOT of different types of guidelines that people have come up with for drawing the human body. I used to never use guidelines at all because most of the ones out there are just too complicated, and my people always turned out weird when I used them because I paid more attention to all the abstract shapes and not enough attention to the whole form of the body. (This is why I don't like measuring height with "heads", either.) All guidelines really are is a way for you to get the proportions mostly correct, remember your pose better while you draw it, and make sure the person fits on the page the way you want them to, so which guidelines you use are really for you to decide. Whatever you find easiest to work with!
Here is a set of very straight-forward guidelines. I'd recommend starting out using this type in the beginning.

(By the way, you don't have to use the poses I'm using if you don't want to! This tutorial is designed to help you get better at constructing bodies all on your own, in any pose you want. ^-^ )
If you're feeling slightly more ambitious or artistically intuitive, you could take a more organic approach to guidelines. Try to think of the flow or the movement of the pose you want, and scribble down the first thing that comes to mind.

This type of guideline is fun because it can result in a more natural, graceful, and unique looking body when used well. It may not always be perfect, but in art (even anime art ^_~ ) it's important to remember that perfection isn't always the most essential thing to strive for.
A few notes about proportions:
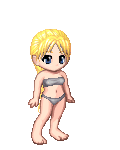
*On a real person, the top half of the body is the same length as the legs. In anime style, making the legs longer then this can also look good, but making them shorter doesn't work quite as well!
*The legs and arms bend right in the center. Check if the distance between elbow and shoulder is the same as the distance between elbow and wrist, etc.
*When the legs are folded up to the chest, the knees will be level with the place right above the breasts (if you're drawing a guy, just imagine it. ^^; ) and right below the shoulders.
*When hanging in the regular, relaxed position, the hands/wrists will be at the same level as the pelvis/crotch.
*The shoulders are about two heads wide. As in: if you measure how wide the head is, the shoulders will be twice as wide as that. 1 1/2 head shoulders works well for children and cute girls, and 2 1/2 head shoulders work well for manly/buff characters, but any smaller or larger then that and you might be pushing it. ^__~
*On girls, the hips are about the same width as the shoulders, and can even be wider. Boys' aren't quite as wide, but they're still there. Remember, there is space between the legs.
*The hands, with fingers spread, should be about the same size as the character's face. Bigger is better then smaller, so make sure they are AT LEAST this big! Even Michelangelo often made his hands larger than normal.
*The feet are as long as the forearms. Check for yourself if you don't believe me. ^__~
***Checking all these steps in relation to each other will usually help you get your character in the right proportions! As you draw more, you will memorize most of these checks and do them without even thinking, and you may even come up with your own that make the best sense to you. ^^ (These are just the ones I personally use most often, and find the most helpful.)
Remember, these lines are just simple guides that are only there to help you until you get the rough sketch of the body drawn, so make them light and easy to erase, and don't worry if they're messy. But also remember that this is one of the very most important steps in your drawing! All the biggest mistakes will happen here, so make sure the proportions and pose are how you want them before adding any detail, or you'll have to fix it later, which is a huge pain!
1 1/2. Another step you might want to take after drawing the base guidelines is to draw three cylinders: one for the head, one for the torso, and one for the hips. (Because these are the three main masses of the body. ^_^ )

The reason to use cylinders is because they are simple 3D objects, so you can clearly see how they are positioned, because of how much of the top or bottom ellipse is showing. (Ellipse: a circle viewed at an angle, like the top of a cup or jar)
Also, you can draw a line down the center of the body, through where the intersection of the collar bone, the belly button, the crotch, etc. are going to be, to make sure that everything will line up in a natural looking way.

It's really not too apparent in my example, (I should have chosen a more swively pose. ^^; ) but this is especially useful if the waist is twisted so that the torso and hips are pointing in different directions.
You don't have to go through these steps if you don't want to, but they are very helpful if you feel you need a little more structure. :3
2. The next part is to draw the actual shape of the body. You may want to make the shapes sort of simple at first, and just work out where the mass will go in relation to the guidelines. (This is sometimes known as "piping", but I think the method I'm using here is a little less abstract than traditional piping.) It's usually a good idea to try and keep the guidelines in the center of the masses you are drawing, (Mostly if you used the more mechanical, less organic guidelines.) unless you want to adjust your pose a bit, of course. (And you shouldn't be reluctant to! It's often hard to predict, in the guideline stage, exactly what the finished body will look like, so small adjustments will usually be a regular part of constructing the body.) Try to really think of it as a body, and not just lines, during this step. Ask yourself: "Is that really how that part of the body would look?" and if you're not sure, look in the mirror, or try a few different ways of drawing the area you're having trouble with. Also, this is a good time to make sure the arms and legs are all the same size/width/etc. It will be easier to see if everything matches in this stage, before you add detail to the anatomy. Since I have two sets of guidelines, I'll draw two different body types.


Wow, that's a lot of lines. sweatdrop Let's erase the guidelines and see if we like what we're left with, shall we?


Aaah, better. Hmm, there are some adjustments I could make so that these figures area more accurate. For example, the thin one's torso is a little short. (This is my check system from step 1 coming in handy. ^_~ I may not have seen anything wrong at first, but her wrist comes down below her pelvis a noticeable distance, so it made me wonder what was wrong and try to figure out how to fix it.) I'll try to adjust things in the next step to make her look better, though it would have been best for me to catch it in the guideline stage.
Note: (Since this is a problem for many people.) Remember, breasts are round! They work like water balloons. Try and keep the shape smooth, with no odd bulges or anything. (Except for the nipples, of course, but you can add those last.)
3. Now to give that abstract body some real shape! It's important to remember that there are bones and muscles under the skin, and your body will look more convincing and more interesting if you try to show that fact.
This is where it comes in very handy to look at and try to memorize some real anatomy. After all, you can't draw something if you don't know what it looks like, and anime style is pretty much just like realism, but with outlines, exaggerated features/proportions, and um... cool floaty hair and stuff. Probably most any artists' anatomy book will be helpful here, they pretty much all have the same content. I personally like Anatomy for the Artist by Sarah Simblet, (great illustrations, photos, transparent overlays showing bone and muscle, tons of info) and The Nude Figure A Visual Reference for the Artist by Mark Edward Smith (Not really an anatomy book, just hundreds of nice clear photos of different poses. Mostly female.) just to name a couple. Or you can search http://www.Google.com for "anatomy artist" or "human anatomy reference" or something. ^-^ (And of course another option open to you would be to just get naked in front of a big mirror. Very convenient for close examination, lighting experiments, and unusual poses. whee )
But all that anatomy can be sort of overwhelming, and this is a body tutorial, so of course I'll go over a lot of the basics and the more important bits. biggrin Where there are bones near the surface of the skin, with not much fat/muscle/etc. cushioning them, they will stick out and look angular. (like the knees, elbows, hip bones, knuckles, shoulder blades, and collar bone) When describing muscle, like in the arms and legs, you don't want to get too complicated or else things could get lumpy or wobbly looking. (DBZ type stuff... we won't get into that. Just regular non-muscular anime body types for now. ^-^ ) Simplicity is usually best, because it will portray an idea or pose strongly, without unneeded detail getting in the way. (Not to say that detail is bad, but it's most effective in small amounts. 3nodding ) You have to be especially careful when drawing lines on the body that aren't part of the actual outline, like lines on the stomach and neck. These lines are drawn to represent the way the skin is stretched firmly and smoothly over the anatomy underneath, so you should attempt to make them smooth and graceful, and not end abrubptly or be loose and wobbly.
*close up of neck lines*
You can also choose to represent a lot of these internal contours with shading, instead of line. :3
*UNDERCONSTRUCTION*
Pencil technique is important! Make sure you put purpose behind every line you draw. What I mean is, don't draw unsure, wobbly lines... have confidence! Make the shapes clear and defined, even if they aren't quite right. The best way to get good at this is to use long, quick strokes with your pencil instead of short, fuzzy/scratchy lines. Nonetheless, don't worry about getting it perfect with the first stroke, you can change it later, and clean it up when you ink. :3
4. etcetcetc *pic with tight T, jeans and shoes* *pic with no clothes, inked* etcetcetcccc
*under construction*
Alright, I am not nearly as confident about my boy drawing skizzles as I am about my girl drawing skizzles, but I'll try to pinpoint the features that I have found best help to describe the male body.
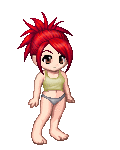
First of all, while a girl's body has a lot of curves and looks soft, a boy's body is usually best represented with more angles and straight lines. The shoulders are slightly wider*, and the hips are slightly smaller** than a female's. The trick to pulling this off without your boy just looking like a weirdly-proportioned girl, however, is the shape of the waist. It doesn't curve inwards in the same way a girl's does, but instead the line from armpit to hip is pretty straight***.
Also, a male's legs are more slender and less shapely**** than a female's, and his hands and feet are usually bigger.
*example pic with stars comparing boy and girl*
Lastly - and this doesn't really fit with the rest of the tutorial, but oh well, it's the least I can do for having such a tiny section for the male body - a lot of people claim to have trouble drawing boys' hair. The reason, usually, is that the hair is much shorter than a girl's, and that means that the head shape has to be more accurate, because there is nothing to hide it under. Remember, the human head is round, (though the face is slighly longer, but the back of the skull is, indeed, pretty much spherical) and the eyes are halfway down the face.
*example front and profile with guidelines*
Even though it may feel odd to draw it that way without any hair, you should try to do so anyway, because it will look much more natural in the end no matter what hairstyle you choose. ^__^
Thank you for reading my tutorial, I hope it was of at least some help. -^__^- Please don't quote the entire first post unless you must. :3 If I missed anything, or if you have any questions, feel free to post!
Credits:
Angel photo: http://www.xmenfilms.net/news.html
Angel photo: http://www.xmenfilms.net/news.html