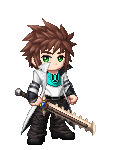
Welcome to Gaia! ::

Reply Editors Resources & Help Desk
how to make lightsabers in paint(my very first tutorial) Goto Page: 1 2 [>] [»|]

Quick Reply

Enter both words below, separated by a space:

Can't read the text? Click here

Submit

cheesey

PostPosted: Thu Mar 23, 2006 10:16 pm


since alot of people asked me to show them how to make lightsabers in paint, i thought id provide this tutorial for you. this is my third time making this because my computer is being a b***h and messes up every time i try to send it, so you better appreciate this stressed stressed

step 1:
step 1 is pretty obvious, get a pic of your avvie and paste it into paint.
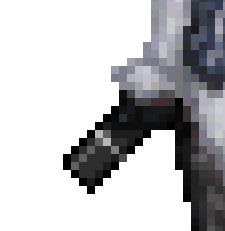
User Image

step 2:
on this step we begin to draw the handle of the lightsaber using the straight line tool. not too much of this should be showing, because most of the handle is covered up by your avatars hand or behind you.my handle is four pixels wide.
User Image

step 3:
this is the step where we add all the details and shading to the handle. i magnify the image 10x for this part(this is a secret feature on ms paint, which is accessable by clicking just below the 8x button). the majority of my handle is colord dark grey, with a darker shadow along the right side and just below the avatar's hand.i also added a highlight one pixel away from the left side of the handle. i also included a silver band around the handle for detail. you dont need to add too much detail to this part because its a very small portion of this edit.
User ImageUser Image

step 4:
on this step we're going to start on the blade of the lightsaber. using a light shade of the color you want your blade to be, we draw the outline of the blade with the straight line tool.
User ImageUser Image

step 5:
now we begin to add shading to the blade. using a slightly darker color, we draw around the original outline of the blade.
User ImageUser Image

step 6:
now, using a lighter shade, we draw around the inside of our original blade outline.
User Image

step 7:
using the same color as our original outline, we outline the outside of our lightsaber's blade.
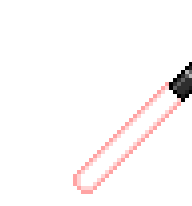
User ImageUser Image

step 8:
now, using the color we used for the inside of the blade, we outline around the outside of the line we just made. unlike the one pixel outlines we've been using before, this outline should be 2 pixels wide.on this step you should also go a little past the handle of the light saber.
User ImageUser Image

step 9(the very last step!):
using an even lighter color(almost white this time) we go around the outside again(one pixel outline, not two). it should extend past the handle even further.

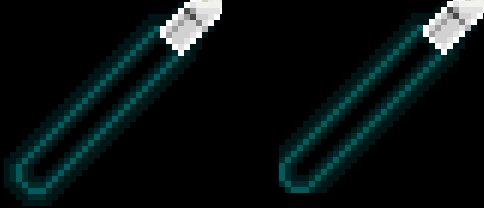
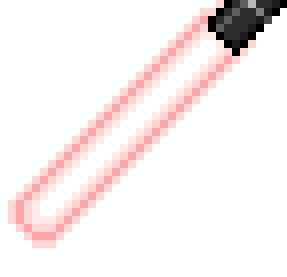
your final result should look something like this:User Image

good luck and happy editing! heart if theres anything you dont understand about my tutorial, feel free to ask me in this thread.
PostPosted: Fri Mar 24, 2006 9:12 am


Thank you so much Cheesey!

Invertedk


cheesey

PostPosted: Sun Mar 26, 2006 6:56 pm


InvertedKingdom
Thank you so much Cheesey!
youre welcome! heart
PostPosted: Tue Mar 28, 2006 8:32 pm


This tutorial is awesome! This is what I got:

User Image

mini_shinobi


Invertedk

PostPosted: Wed Mar 29, 2006 2:54 pm


This is what I got

User Image
PostPosted: Wed Mar 29, 2006 6:10 pm


everyone's lightsabers are looking really good! glad i could help!

cheesey


CianaTesdinic

PostPosted: Thu Mar 30, 2006 4:14 pm


Oh good!! a tutorial that doesnt require programs like painshop pro and such. ^.^''
PostPosted: Fri Mar 31, 2006 1:33 am


CianaTesdinic
Oh good!! a tutorial that doesnt require programs like painshop pro and such. ^.^''
im glad you appreciate it. i wish there were more paint tutorial out there, too.

cheesey


Invertedk

PostPosted: Fri Mar 31, 2006 6:29 am


Actually cheesey, I learned a way to make it look better since mine kept coming out a bit squared. Use a white/pencil tool and erase the two lines that are on the end of each side, making it look more curcular.
PostPosted: Sat Apr 01, 2006 9:25 pm


InvertedKingdom
Actually cheesey, I learned a way to make it look better since mine kept coming out a bit squared. Use a white/pencil tool and erase the two lines that are on the end of each side, making it look more curcular.
thanks, ill remember that! heart

cheesey


Invertedk

PostPosted: Sun Apr 02, 2006 7:04 pm


Look, just in case you dont know which lines these are the ones.

Look at the end of each, the first one is the unedited one and the second is the one which makes it look better.

User Image
PostPosted: Sun Apr 02, 2006 9:41 pm


InvertedKingdom
Look, just in case you dont know which lines these are the ones.

Look at the end of each, the first one is the unedited one and the second is the one which makes it look better.

User Image
yeah, i figured thats what you were talking about. thanks for the picture, though, for other people that may not have understood. its nice of you to help make my tutorial better for others. heart

cheesey


Invertedk

PostPosted: Sun Apr 02, 2006 11:16 pm


Hey, no prob! ^^
PostPosted: Sun Apr 02, 2006 11:25 pm


InvertedKingdom
Hey, no prob! ^^
its nice to have some help heart

cheesey

Reply
Editors Resources & Help Desk

Goto Page: 1 2 [>] [»|]
 
Manage Your Items
Other Stuff
Get GCash
Offers
Get Items
More Items
Where Everyone Hangs Out
Other Community Areas
Virtual Spaces
Fun Stuff
Gaia's Games
Mini-Games
Play with GCash
Play with Platinum