Welcome to Gaia! ::


Shameless Man-Lover

Hi there!

In this hidden thread I'm spilling all my secret tips and tricks on using Paint Tool Sai
It took me a long time to create this topic
and I hope I'll be able to help at least one person with it ^^

It may occur that some words are different in your version of Sai.
That's because it was originally a Japanese program, which got translated by different people.
If that's the case, don't worry... all the buttons and options will have the same effect in your version, despite their different names wink


Please don't post anything in this thread, though
I might want to add more things later on whee

Shameless Man-Lover

Tips and Tricks on using Paint tool Sai

1. Drawing clean lines
2. Fast ways to color (incl. magic wand tool)
3. Group clipping (usefull for shading)
4. Coloring lines

Shameless Man-Lover

1. Drawing clean lines

As you've probably already seen, there are different kind of drawing tools.
Every one of them is slightly or less slightly different from the others.

When selecting a tool, it's advanced settings will appear below the box containing all the tools.

          Size - I don't think I need to explain what this is?
          To select a size lower than 1 or bigger than 100, click the downward arrow next to the word "size" and select a different range.
          This way you can work very detailed (x0.1) or go for the big stuff right away (x5.0)
          Min size
          - When you draw with a tablet, the pressure you put on your pen will affect the thickness of your line.
          The min size indicates how thick your line will be when applying the least amount of pressure,
          expressed in % of the size above.
          Density
          - If you put this at a value lower than 100%, your line will be (partially) transparant


The following is a nice trick to get nice and clean lines
(I use it too and I love it heart )

In the top right/top center of your window, look for the word "Stabilizer"
User Image

Values 1 to 15
indicate how much Sai will "sharpen" the end of your stroke

User Image

Values S-1 to S-7 put a delay on your strokes.
This way you have more time to adjust your pen position on your tablet, to get smoother lines. Try it!

For sketching I set my stabilizer on a low value (0 - 5), for line-art I set it to S-7.

___________________________________________________

Another tip I have for your is: rotate and mirror your picture!
when you have to draw some lines in an uncomfortable angle, you can easily rotate the picture to create an angle you're more comfortable with, just like you would do with a piece of paper when drawing traditionally.

You can rotate and mirror with these buttons, found at the top of the screen:

User Image

The first drop down menu,
lets you pick a pre-set angle
The next two buttons
will angle the picture a bit in the direction of the arrow every time you click it.
The button with the square in it,
will set your picture back to it's original position.
The last button, with 2 arrows in it,
mirrors your picture.
When your picture is mirrored, the text next to this button will turn red and say "Inv."

The shortkeys for these actions are:
Delete -
rotate left
End -
rotate right
Insert -
original position
H -
mirror

Other shortkeys are:
Home -
angles the picture back to it's original position + zooms in/out to a fullpage view
Page up -
zoom in
Page down -
zoom out

___________________________________________________

When lining, make sure your picture is big enough. Don't be afraid to make it too big!
If your drawing is very large, you can easily add small details.
Plus resizing your drawing afterwards, will smoothen your lines even more!

Shameless Man-Lover

2. Fast ways to apply base colors (part 1: the magic wand)

Rule # 1: When coloring, always apply your colors on layers below your line-art layer!

_____________________________________________


Now on to some quick-painting tricks:

If your line-art is clean and doesn't contain gaps, you can paint it very fast using the magic wand + bucket.
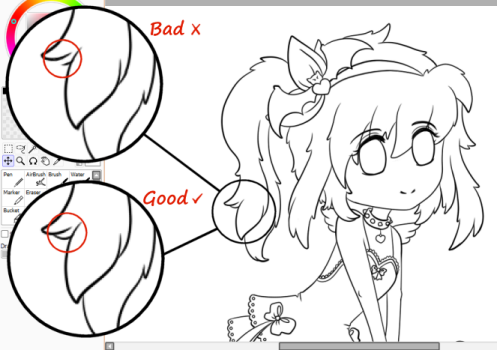
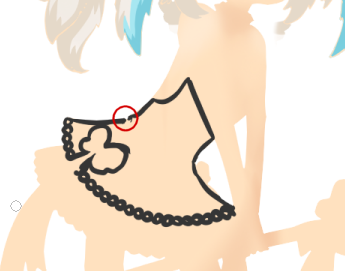
This is a screenshot (right) of what I mean by "gaps".

Now ofcourse that's a pretty big gap, they can also be a lot smaller! So keep a weather eye!
Gaps are always at the end of a stroke or at places where two or more lines come together.
Don't go erasing and redrawing them, just draw a second time over them! wink

User Image User Image


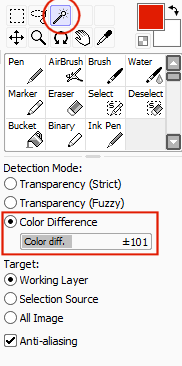
Now... select the magic wand tool and pick "color difference". (left)
In other programs "color difference" is often called tolerance, it literally means the tolerance towards differences in color values. In a line-art layer, it specifically means the tolerance between the white/transparant space and the black lines. So gaps are places where there isn't a distinct separation between line and whitespace.
To get a decent selection, put the color difference on a value of at least 100, preferably higher (120-130 = perfect)

If you go too high, it's practically impossible to fill all the gaps.

User Image

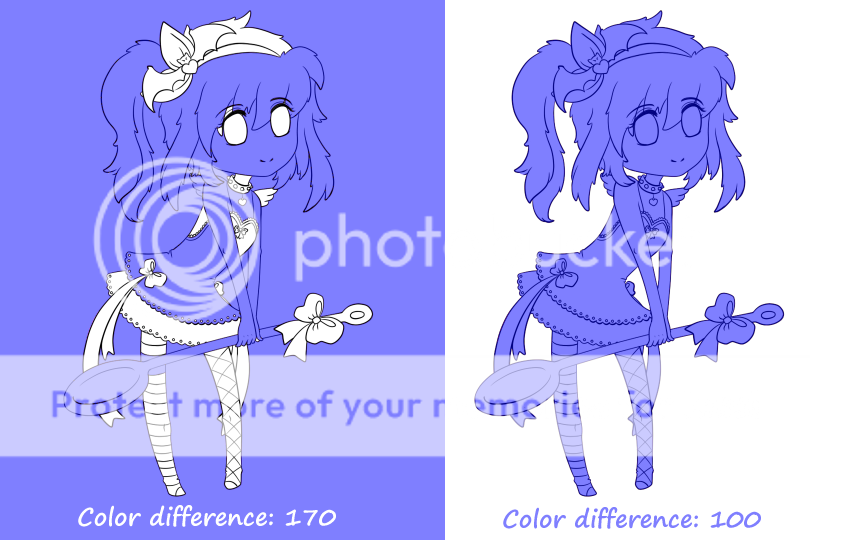
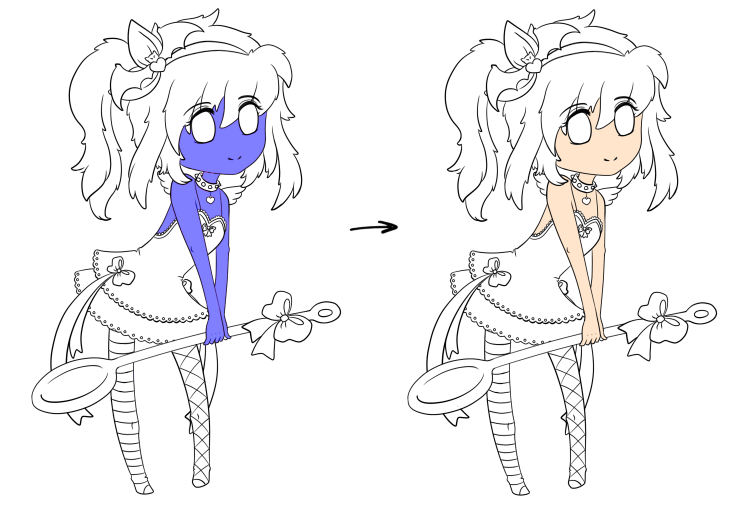
Whoa! It's blue! Don't worry, this is Sai's way of letting you know which area's are selected, when you're using a selection tool. (If you switch to the pen tool for example, the blue area will go away and you'll see the typical selection lines at the edge of the previously blue selection)

If you got too many gaps in your lines, your selection may look like the screenshot on the left.
(even on a lower color difference)
Deselect everything, re-trace the lines with gaps and try again. wink

_____________________________________________


When you finally finished your line-art and it's gap-free, we can almost start speed-coloring!

User Image


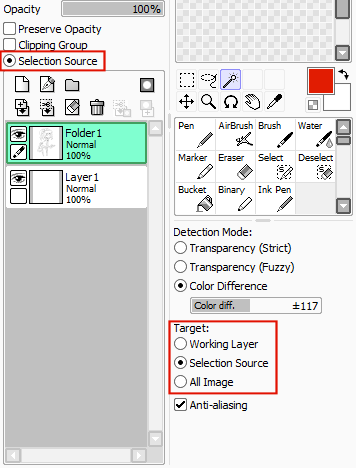
First I'll tell you about the selection source.
You can make one layer your selection source. Don't worry, it's not permanent, you can switch layers, but there can only be one at the time.


You do this by clicking the bullet button that says "selection layer" above your list of layers. The layer you currently have selected will become your selection layer. It will turn green in your list.


Now, what is a selection source layer actually?
When you move to a different/new layer and click anywhere with the magic wand, it will make its selection as if you were working in the selection source layer.
This way you can select and color in new layers without having to move back and forward to your line-art layer. This will save you a lot of time and frustration! wink

Shameless Man-Lover

2. Fast ways to apply base colors (part 2: finally coloring!)

When your lines are ready and your selection source is set,
we can go coloring!

(Remember to color on separate layers UNDER the line-art!)

Select the parts of your drawing that need to be painted in the same color.
You can fill them either with a drawing tool (like the pen-tool) with a very big size or with the bucket tool.
The bucket tool also has a "color difference". When you set it to maximum (255), it will color EVERY pixel within your selection.
When you set it to a lower value, you'll have to fill up every separate selection area individually.

User Image

_________________________________________

You may have noticed that the bucket too also has a "selection source" option with its targets, just like the magic wand. It even works the exact same way.
So when you select this option, you can skip the step where you select your areas with the magic wand
and immediatly fill up the areas with color.

________________________________________

Why do you need to pick a high "color difference" value?

I'll try to explain this with a screenshot...

The lines you draw, aren't just black on white. At the edge, they fade trough grey to white, which makes them look smooth.
A computer doesn't know where to stop it's selection, that's why it needs you to set a "tolerance".

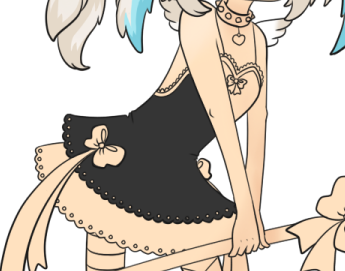
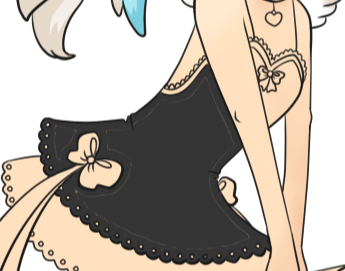
Let's zoom in on some lines and see what happens when we select with high and low tolerance:


User Image


User Image

I think it's pretty obvious the 2nd version looks much better, right? 3nodding

______________________________________

Oh, when you want to quit selecting things, you need to use the (rectangle) selection tool or the lasso tool
and click somewhere outside the selection area.

If you have your entire canvas selected (= the whole screen is blue),
you can deselect everything by pressing ctrl + D.


(Thank you GothManga for teaching me this trick whee )

Shameless Man-Lover

2. Fast ways to apply base colors (part 3: alternative methods)

If solid lines aren't exactly your cup of tea and therefore my first coloring technique is pretty worthless to you, I have an alternative for you:

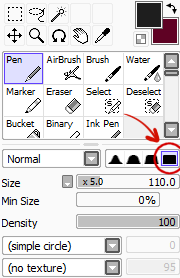
Take a drawing tool, the pen tool for example and set the edge shape to hardest.

User Image

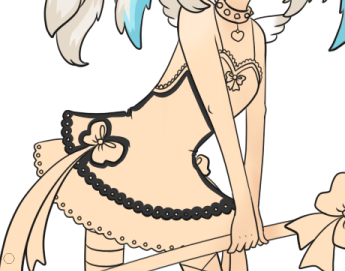
Create a new layer (under the layer with your lineart) and trace the outline of the area you want to color.

User Image

Toggle the visibility of your lineart layer, to check if you left any gaps in the outline.

User Image

When everything looks okay, fill up the interior with the bucket tool.

User Image

_____________________________________

If you forgot to set your brush edge to hard, you'll have the following effect:

User Image

It's not really a big problem, you can just go over those not-colored lines with the pen tool,
it just loses you a bit of valuable time.

Shameless Man-Lover

3. group clipping

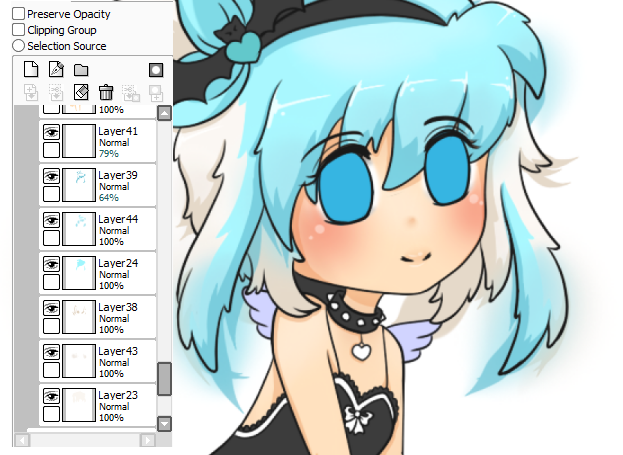
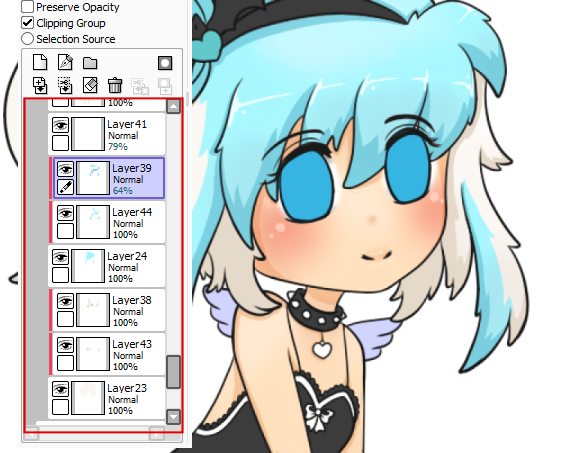
Group clipping or Layer clipping is usefull little trick to help you with shading.

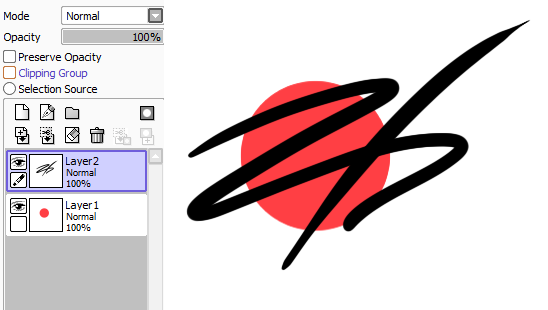
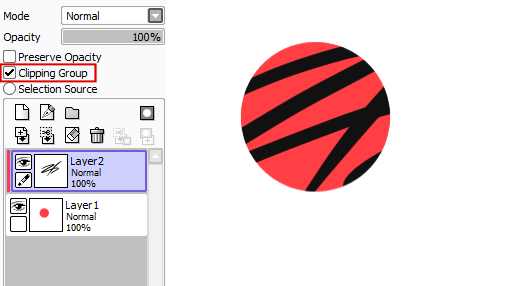
What is a clipped layer?
When a layer is clipped to the layer below it, it's as if you can't draw outside the lines of the bottom layer.
Everything that's transparant in the bottom layer, will become transparant or invisible in the top (clipped) layer.

This isn't easy to explain, so I'll try to show an example:

User Image

User Image

When a layer is clipped, it will get a red mark next to it.

You can't clip a layer on a layer that's already clipped.
You can, however, clip multiple layers on one base layer.

____________________________________________________________

Clipping layers is a very usefull tool for shading.
If you clip the layers on which you'll apply shading to your base color layers,
you don't have to worry about coloring out of the lines, because you simply can't.

This wins you a great deal of speed while shading and saves you a lot of time cleaning up afterwards!

Not clipped:

User Image


Clipped:

User Image

Shameless Man-Lover

4. Coloring Lines

Last, but not least... line coloring!

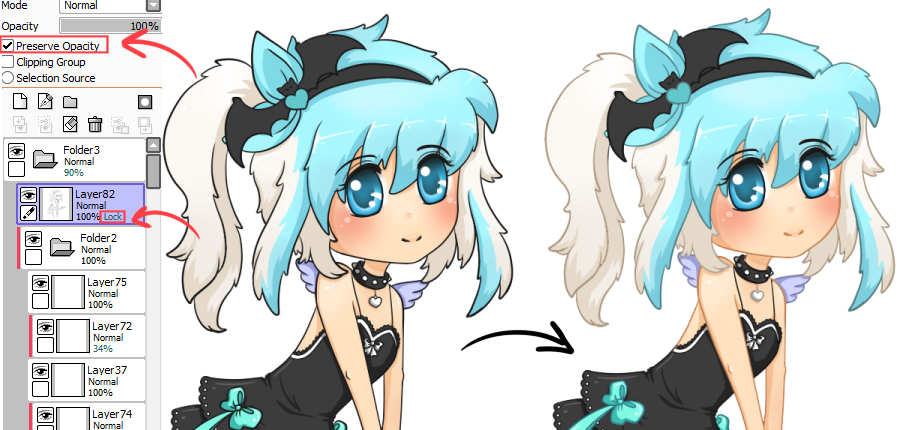
To color the lines of your drawing, you need to have your line-art on a separate layer!

When you got that prerequisite, we can proceed.

Select your line-art layer and check the box next to "preserve opacity".
(The word "Lock" will appear on your layer)
Now select the pen-tool, or whatever other drawing tool you want, and you can change the colors of the lines.

This kind of works like the layer clipping I've explained above, but all in one layer.

User Image


I don't recommend using "preserve opacity" for shading or anything else but line coloring actually.
If you use group clipping and spot a mistake in your shading at the very end,
you can easily delete or erase the wrong layer and redo it...

Shameless Man-Lover

Shameless Man-Lover

Shameless Man-Lover

Shameless Man-Lover

Shameless Man-Lover

Shameless Man-Lover

Shameless Man-Lover

Quick Reply

Submit
Manage Your Items
Other Stuff
Get GCash
Offers
Get Items
More Items
Where Everyone Hangs Out
Other Community Areas
Virtual Spaces
Fun Stuff
Gaia's Games
Mini-Games
Play with GCash
Play with Platinum