Codes
Remember, to find the right code more quickly, use
ctrl+f and search for the section you want codes for! Also, wherever you see
#000 or
#fff - those are colours, so you can put whatever colour you want there.
Background
#content { background: #000 url(image URL goes here) fixed no-repeat; border: none; color: #fff; }
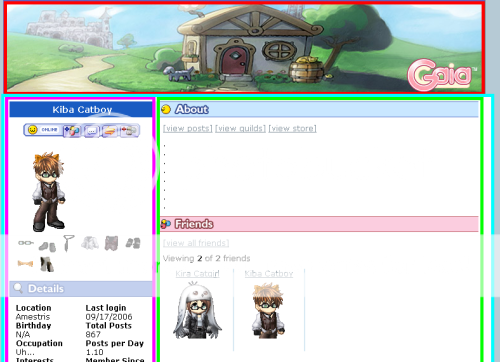
This changes the background for the Content block, and the Content block ONLY. Refer to the image in post #2 if you do not know what the Content block is.
body { background: #000 url( image URL goes here ) fixed left center no-repeat; color: #fff; }
This changes the background for the ENTIRE page, as well as the font colour.
If you don't want to have a background image, just remove
url( image URL goes here) from the code.
To change the alignment, replace any part of
fixed left center no-repeat with the type of alignment you want. Please see
post #2 under background for other alignments.
#profile, #details, #wishlist, #about, #journal, #friends, #comments, #signature { background: none; }
This makes the about, details, wishlist, profile, etc. boxes have transparent backgrounds.
If you do not want any particular one of those sections to have a transparent background, remove it from the code. If you later want to have it be transparent again, add it back to the code.
Borders
.section { border: 2px dotted #000; }
This puts a border around every one of the sections.
#content { border-left: 2px dotted #000; border-right: 2px dotted #000; border-bottom: 2px dotted #000; }
#extendedProfileBody #header { border-right: 2px dotted #000; border-left: 2px dotted #000; border-top: 2px dotted #000; }
This puts a border around the Content block. Refer to the image in post #2 if you do not know what the Content block is.
#site { borderpx solid #000; background: #FFF; }
This puts a border around the ENTIRE page.
Note: It's been pointed out that if you don't specify the background colour, it will look strange near the bottom of the page around the footer area.
Headers and Links
#extendedProfileBody #header h1 { background: #000 url( image URL goes here ) top center no-repeat; border: 0px; }
This lets you change the main header image.
If you don't want to have a background image, just replace
url( image URL goes here) with
url( )
To change the alignment, replace any part of
top center no-repeat with the type of alignment you want. Please see
post #2 under background for other alignments.
.section h2 { text-align: left; text-indent: 5px; color: #000; height: 30px; }
This sets properties for ALL of the block headers.
This means that if there is something that you want every one of your block headers to have (such as the same font colour), you can declare them all at once in here and not have to put it in the individual block header.
For the code to change the header for a specific block, please see the code section for that block further down this post.
#site a:link { color: #888; font-size: 10pt; text-decoration: none; }
#site a:visited { color: #ff0000; font-size: 10pt; text-decoration: none; }
#site a:active { color: #00ff00; font-size: 10pt; text-decoration: none; }
#site a:hover { color: #0000ff; font-size: 10pt; text-decoration: underline; }
This changes the link properties for all the links on the
entire page.
If you replace #site with a different section (like #about) it will change the properties for the links in ONLY that section.
a:link is the style the link will have by default.
a:visited is the style the link will have if the viewer has been to the page it links too.
a:active is the style the link has if it was just clicked on.
a:hover is the style the link has when the mouse is over it, but has not clicked.
Profile
#profile { background: #000 url( image URL goes here ) left center no-repeat; }
#profile h2 { background: #000 url( image URL goes here ) top left no-repeat; }
This is the basic code for the profile section. The background image under #profile (the first line) when used at the proper size and with that alignment, can be used as a fake avatar image if you make your avatar invisible. (See below)
If you don't want to have a background image, just remove
url( image URL goes here) from the code.
To change the alignment, replace any part of
left center no-repeat with the type of alignment you want. Please see
post #2 under background for other alignments.
If you want to specify text properties for the header specifically for the profile block, copy the code from the
Headers and Links section above in this post that is inside the { } and paste before the last } in this code.
#profile #bar { background: none; }
#profile #bar #onlineButton { background: url( image URL goes here ) no-repeat; }
#profile #bar #offlineButton { background: url( image URL goes here ) no-repeat; }
#profile #bar #hiddenButton { background: url( image URL goes here ) no-repeat; }
#profile #bar #addButton { background: url( image URL goes here ) no-repeat; }
#profile #bar #msgButton { background: url( image URL goes here ) no-repeat; }
#profile #bar #tradeButton { background: url( image URL goes here ) no-repeat; }
#profile #bar #ignoreButton { background: url( image URL goes here ) no-repeat; }
#profile #bar #addButton a { background: url( image URL goes here ) no-repeat; }
#profile #bar #msgButton a { background: url( image URL goes here ) no-repeat; }
#profile #bar #tradeButton a { background: url( image URL goes here ) no-repeat; }
#profile #bar #ignoreButton a { background: url( image URL goes here ) no-repeat; }
This changes the images for the status bar.
#profile .avatar { opacity: 0; filter: alpha(opacity=0) height: 150px; }
This causes your avatar to disappear.
#profile .caption { background: #000 url( image URL goes here ) border: 2px solid #555; color:#fff; }
#profile .caption:before { content: url( image URL goes here ) background: url( image URL goes here ) top right no-repeat; }
#profile .caption:after { content: url( image URL goes here ) background: url( image URL goes here ) bottom right no-repeat; }
#profile .caption .message { background: url( image URL goes here ) top left no-repeat; }
This allows you to modify your quote bubble. The background URL for
.caption:before and
.caption:after modify the rounded corners, and don't show up on IE.
.caption .message modifies the pointy part of the speech bubble that points to the speaker. If you don't want to have special corners at all, just remove
url( image URL goes here) from the code.
#profile ul.items { display: none; }
This causes the list of items that you're wearing to disappear.
#profile ul.items li img { background: #000 url( image URL goes here) top center no-repeat; }
#profile ul.items li { border: 1px solid #fff; }
This lets you put an image behind and a border around each of the items that you're currently wearing.
If you want to have a border but not a background image, just remove the first line.
If you want to have a background image but not a border, remove the second line.
Details
#details { background: #000 url( image URL goes here ) top center no-repeat; }
#details h2 { background: #000 url( image URL goes here ) top left no-repeat; }
This is the basic code for the details section.
If you don't want to have a background image, just remove
url( image URL goes here) from the code.
To change the alignment, replace any part of
top center no-repeat with the type of alignment you want. Please see
post #2 under background for other alignments.
If you want to specify text properties for the header specifically for the profile block, copy the code from the
Headers and Links section above in this post that is inside the { } and paste before the last } in this code.
#details #commonFriends { display: none; }
This makes that 'Shared Friends' bit go away.
#details #commonFriends li img { background: #000 url( image URL goes here ) top center no-repeat; }
#details #commonFriends li { border: 1px solid #fff; }
This allows you to change the border and the image behind each of the shared friends that show up.
If you want to have a border but not a background image, just remove the first line.
If you want to have a background image but not a border, remove the second line.
Wishlist
#wishlist { background: #000 url( image URL goes here ) top center no-repeat; }
#wishlist h2 { background: #000 url( image URL goes here ) top left no-repeat; }
This is the basic code for the wishlist section.
If you don't want to have a background image, just remove
url( image URL goes here) from the code.
To change the alignment, replace any part of
top center no-repeat with the type of alignment you want. Please see
post #2 under background for other alignments.
If you want to specify text properties for the header specifically for the profile block, copy the code from the
Headers and Links section above in this post that is inside the { } and paste before the last } in this code.
#wishlist ul.items li img { background: #000 url( image URL goes here) top center no-repeat; }
#wishlist ul.items li { border: 1px solid #fff; }
This lets you put an image behind and a border around each of the items in your wishlist.
If you want to have a border but not a background image, just remove the first line.
If you want to have a background image but not a border, remove the second line.
About
#about { background: #000 url( image URL goes here ) top center no-repeat; }
#about h2 { background: #000 url( image URL goes here ) top left no-repeat; }
This is the basic code for the about section.
If you don't want to have a background image, just remove
url( image URL goes here) from the code.
To change the alignment, replace any part of
top center no-repeat with the type of alignment you want. Please see
post #2 under background for other alignments.
If you want to specify text properties for the header specifically for the profile block, copy the code from the
Headers and Links section above in this post that is inside the { } and paste before the last } in this code.
Friends
#friends { background: #000 url( image URL goes here ) top center no-repeat; }
#friends h2 { background: #000 url( image URL goes here ) top left no-repeat; }
This is the basic code for the friends section.
If you don't want to have a background image, just remove
url( image URL goes here) from the code.
To change the alignment, replace any part of
top center no-repeat with the type of alignment you want. Please see
post #2 under background for other alignments.
If you want to specify text properties for the header specifically for the profile block, copy the code from the
Headers and Links section above in this post that is inside the { } and paste before the last } in this code.
#friends #friendGroup li { border-right: 0px; }
This removes that annoying line between your friends' images.
#friends #friendGroup li img { background: #000 url( image URL goes here ) bottom center no-repeat; } #friends #friendGroup li { border: 1px solid #fff; }
This lets you put an image behind and a border around each of the people on your friend's list.
If you want to have a border but not a background image, just remove the first line.
If you want to have a background image but not a border, remove the second line.
Journal
#journal { background: #000 url( image URL goes here ) top center no-repeat; }
#journal h2 { background: #000 url( image URL goes here ) top left no-repeat; }
This is the basic code for the journal section.
If you don't want to have a background image, just remove
url( image URL goes here) from the code.
To change the alignment, replace any part of
top center no-repeat with the type of alignment you want. Please see
post #2 under background for other alignments.
If you want to specify text properties for the header specifically for the profile block, copy the code from the
Headers and Links section above in this post that is inside the { } and paste before the last } in this code.
Comments
#comments { background: #000 url( image URL goes here ) top center no-repeat; }
#comments h2 { background: #000 url( image URL goes here ) top left no-repeat; }
This is the basic code for the comments section.
If you don't want to have a background image, just remove
url( image URL goes here) from the code.
To change the alignment, replace any part of
top center no-repeat with the type of alignment you want. Please see
post #2 under background for other alignments.
If you want to specify text properties for the header specifically for the profile block, copy the code from the
Headers and Links section above in this post that is inside the { } and paste before the last } in this code.
#comments dl dt.avatar img { background: url( image URL goes here ) left top no-repeat; }
#comments dl dt.avatar2 img { background: url( image URL goes here ) right top no-repeat; }
This puts an image behind your commentors.
The first line is for those on the left side, and the second line is for those on the right.
.caption { background: #000 url( image URL goes here ) border: 2px solid #555; color: #fff; }
.caption2 { background: #000 url( image URL goes here ) border: 2px solid #888; color: #fff; }
This changes the background of the commentors speech bubbles, and the border colours.
The first line is for the commentors on the left side, and the second line is for those on the right.
If you don't want to have a background image, just remove
url( image URL goes here) from the code.
.caption:before { content: url( image URL goes here ) background: url( image URL goes here ) top right no-repeat; }
.caption:after { content: url( image URL goes here ) background: url( image URL goes here ) bottom right no-repeat; }
.caption2:before { content: url( image URL goes here ) background: url( image URL goes here ) top right no-repeat; }
.caption2:after { content: url( image URL goes here ) background: url( image URL goes here ) bottom right no-repeat; }
This changes the corner images of the speech bubbles.
Read this whole explanation.
The
content url changes the
left-hand corners. The
background url changes the
right-hand corners. The
:before lines change the
top corners. The
:after lines change the
bottom corners. The first two lines are for the commentors on the left, and the second two lines are for the commentors on the right.
This means that the content url in .caption:before would be the upper left corner. If you do not understand, try reading this explanation a few more times.
If you use Internet Explorer: As far as I know, this does not work at all in IE. If you are changing the colours of your comment bubbles and do not want to make corner images, replace
url( image URL goes here ) with
url( ) in all four locations in this code.
.caption .message { background: url( image URL goes here ) top left no-repeat; }
.caption2 .message { background: url( image URL goes here ) top left no-repeat; }
This allows you to replace the part of the speech bubble that points to the avatar who posted. The first line is for those on the left side, and the second line is for those on the right.
If you are changing the colours of your comment bubbles and do not want to make corner images, replace
url( image URL goes here ) with
url( ) in both locations in this code.
Signature
#signature { background: #000 url( image URL goes here ) top center no-repeat; }
#signature h2 { background: #000 url( image URL goes here ) top left no-repeat; }
This is the basic code for the signature section.
If you don't want to have a background image, just remove
url( image URL goes here) from the code.
To change the alignment, replace any part of
top center no-repeat with the type of alignment you want. Please see
post #2 under background for other alignments.
If you want to specify text properties for the header specifically for the profile block, copy the code from the
Headers and Links section above in this post that is inside the { } and paste before the last } in this code.
Cursor
See
post #2 for the list of non-custom cursors available for use.
body { cursor: url( place cursor URL here ) }
This adds a custom cursor to the whole page. You can replace
body with another section (for example, #about) if you want just that section to use a different cursor.
#site a:link, #site a:hover, #site a:active, #site a:visited { cursor: url( place cursor URL here ), default; }
This adds a cursor for all of the links on the page. You can replace
#site with another section (for example, #about) if you want just that section's links to use the different cursor.
Obsolete Codes
These codes are no longer useful, due to the layout changes that Gaia has made to the profile pages.
#gaiaLogo { border: 0px; color: #fff; font-size: 11px; }
This removes the border around the bar with the logout/login button, and allows you to change the font colour/size of the Welcome Soandso message.
#footer { display: none; }
This removes the blue bar with the Gaia Copyright label.
#footer { background: #000 url( image URL goes here ) right no-repeat;color: #fff; }
This (theoretically) changes the image and the font colour for the Copyright bar at the bottom.
#corp { color: #fff; font-size: 10pt; text-decoration: none; }
This changes the line of Gaia links on the bottom of the page.