Welcome to Gaia! ::

Does this whole thing even make sense?

yes! 0.59124087591241 59.1% [ 81 ]
no wtf is this? 0.40875912408759 40.9% [ 56 ]
Total Votes:[ 137 ]
1 2 3 4 5 6 7 8 9 10 >

A Vague Explanation of Hover Sections

THIS CAN BE USED ON BOTH OLD SCHOOL AND V2. IT WORKS THE SAME, JUST WITH DIFFERENT SELECTORS.

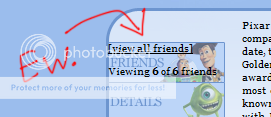
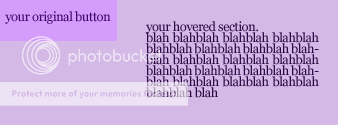
Hey there, cutes. ;] So I heard you were interested in learning how to work with "hover sections," as I guess they're widely referred to as here in the PD. You may be wondering what the heck I'm talking about. Well, hover sections are these fancy little things, where you have a button or something along those lines, and when you hover your little mouse over it, it changes into a full section of your profile! Here is a beautiful, Pixar-themed example. Holy poop! It's amazing, I know. I am quite amazed myself. And here's one of my older profiles that show's an example of click sections, and uses the V2 system.

A lot of people have shown interest in learning how to do this, and a lot of you have already figured it out on your own! But, I decided to make a little guide...ish type thing explaining how to make them...or at least how I do.

Before you get all into this, you should know that THESE ARE NOT ALWAYS FULLY COMPATIBLE IN INTERNET EXPLORER. And definitely make sure you read the whole thing before you actually start making your profile. C:

So okay, to start off, we're going to make sure you know the basics.


DO YOU know how to code a profile? I would hope so, if you're looking into learning this! If you don't, take a little step back and check out one of these wonderful guides:
User Image
User Image - Blocked by "Display Image" Settings. Click to show.


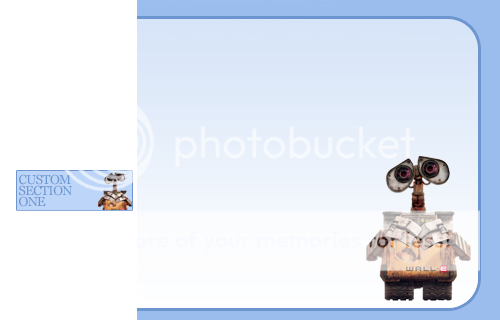
DO YOU know how to make custom sections? (If you plan on working in old school and using custom sections) It's quite easy if you're working in the V2/Current profile system, but if you plan on working in Old School, you best know how to make some custom sections if you're gonna want to use them in your hover-tastic profile. I recommend you get your butt over to freaxy's guide right here, and learn how to make MULTIPLE SCROLLING SECTIONS, as they are the best to use when working with hovers.
User Image - Blocked by "Display Image" Settings. Click to show.


And last but not least, DO YOU understand how to write and format CSS for the Gaia profile system? This guide requires an understanding of what you're doing. I will NOT be putting any code examples here for you to copy and paste because when you put something to copy and paste, people aren't going to read what I write about it and just try to use it, then complain when it doesn't magically work. It's also because I'm a jerk.


If you're confident with those three things, then head on down to post two and prepare to read one of the least-planned out guides ever! It's really just a very long explanation broken up into multiple posts.
Height/Width + Padding

The first thing you're going to do to start making your hover section is to set it to have a hidden overflow, and to set the size and placement of your "button," which is really just your section itself with it's default/un-hovered attributes. You'll notice that when you make your section the correct size for your button, gross things like this happen:


User Image

Totally not what we're trying to do, right? There are a couple ways to fix this. One is making a ridiculously huge, negative text-indent, but I don't like to do it this way. I think one time I tried it with something and there was something that it didn't work on and it was just annoying.

Another way to fix it is to use padding. Padding defines the space between the element border and the element content. If any of you are dorky like me and have checked out how Gaia makes their image links in profiles, you'll have noticed they do something similar to this. What you do is set either the height of your section to 0px and then use padding to set the size of the section. This way, the content will be pushed out of your section while also setting a height to it. So instead of having something like height:40px; it will be padding-top:40px;

And tada! You have a nice little button for the viewer to hover over to get your section to show...which I guess means we have to figure out how to get the section to show, huh?
The :hover Psuedoclass

Even if you've only made the simplest of profiles, I'm sure you've noticed this psuedoclass before, even if you've only used it to change the colors of your links when you hover over them. The awesome thing about it is that it can be applied to any element, and can change any attribute of it. Just slap it on the end of any selector (#about:hover, #id_comments:hover, #about ol li+li:hover) and set your properties! And obviously it's what you're gonna do to change the appearance of your hover section. Basically, this is where you're just going to make all the "normal" settings of your section: how you want it to appear when the viewer has hovered over it. If you have to, negate the padding from before with padding:0px;
Alignment

You can align your :hover section to any place on the page you want, of course, but you want to make sure that wherever you put it, some part of it is overlapping the area where your original button was.

User Image


If your section is set to appear in a different place, the viewer will hover over it, and once it moves, it will technically no longer be where the user's mouse is, and no longer hovered. This will cause the section to go back to it's default settings, and the user will once again be hovering over it...creating a never-ending loop of spaziness like so:

User Image


Making sure your section overlaps the original hover area could become an issue if you plan on making your content somewhere further away from where your button was. But! Don't worry too much. Remember, we just learning about padding! You can use this to help push your content where you want it to be, or you can also use selectors of elements INSIDE your section to position it (elements such as #friendGroup, #comments dl, #details #stats and #details #info, etc.)
Backgrounds + Transparencies

You always want your hovered section to have it's own background, whether it's an image or just a solid color by CSS. If you don't have a background, then it's just going to show through to the content underneath your section.

User Image


This is my background for one of my hover sections. For the parts of the profile I didn't want to get covered up, I just cut them out and left it transparent. It doesn't necessarily have to be transparent (it could just replicate what is underneath the hover section), but it can be an advantage with certain things, especially if your content is very far from where your button is.

User Image
Z-Index

By default on a Gaia profile, a section will overlap the one before it. So if you try to make your About Me section hover over your Friends section, it's not going to work; the Friends section will layer on top be default. This is where Z-Index comes in! Z-Index works like layers in Photoshop, or to put it in an even simpler way, like pieces of paper in a stack. You put the first piece of paper down, and then the second piece you put down will cover it, and the third one will cover that, and so on. There is no limit on the amount of "layers" you can make, and you can also use a z-index of 0 or even go into the negative integers if you need to. Keep in mind that z-index will only work when you have the element positioned, so make sure your section is set to be either absolute, relative, or fixed.

So if you want your About section to layer over your Friends section, you set a z-index of "1" to your Friends section, and a z-index of "2" to your About section. Which, in CSS would look like this:

    #friends{z-index:1;}
    #about{z-index:2;}


And, in all the effort to make sure your section overlaps it's original button, you may notice that some other buttons, links, or other important things get covered by the section. To deactivate the hover section, you have to hover out of the area, and back over to the thing you want to hover/click, which can get annoying. This is also where z-index helps!

If you have a cluster of buttons in the same area that get overlapped, like I have in the sample, it's pretty simple to fix. You can't give each section a different z-index, because then it still wouldn't help, depending on which section you're hovering over. What you have to do is change the z-index on hover. The sections as buttons would have a higher z-index than the sections as actual sections. This way the section that is hovered will be layered under the other buttons. You want to make sure all the buttons have the same z-index, and all their hovered counterparts all have the same, lower z-index.

Example:
    #id_about{z-index:2;}
    #id_about:hover{z-index:1;}

    #comments{z-index:2;}
    #comments:hover{z-index:1;}


And say, after all of this, you still have some content you want to layer above all of this at all times. Maybe a non-hover section that gets stuck underneath because it's between your button and your hovered content. Just give it a higher z-index than all of the other stuff and it will always stay on top!

Example:
    #details{z-index:3;}
Hover Sections with Multimedia

You may notice that embedded multimedia layers over everything else in a profile, even if you use a z-index of five million on it, and cannot be hidden with the combination of a hidden overflow and padding. This could definitely be an issue if you want to put multimedia inside a hover section. THIS is where the ridiculously huge, negative text-indent comes in handy. Just set your multimedia to have something like text-indent:-5000px; on it. But don't forget to set the text-indent back to 0 for when it's hovered! AND, this doesn't interrupt the playback of your media. : )
Clickable Sections (not compatible in Internet Explorer)

So now that you know about hover sections, you might be curious about clickable sections. If you want to use these, you must understand how to make hover sections first. There are four important things to building a clickable section: Knowing how to make a custom section, understanding how to make a hover section, z-index, and the :active psuedoclass. You may be wondering why you can't just use the :active psuedoclass alone to create a clickable section. You could, but the :active psuedoclass sets the properties for an element only while it is being clicked. Once the button is released, it will return to default properties. But really, now what we all understand hover sections, this is the easy part!

You're going to start off by doing all that stuff up there, earlier in the guide. Create the section just as you want it to be your clickable section. Get everything functioning as a hover section.

Next! You're going to create an entirely different custom section, and you're going to place it over your hover section's button. Make sure it is the exact same size, and positioned perfectly over the hover button. Set this section to have a z-index of at least ONE more than the hover button.

Now you're going to set the :active psuedoclass for the custom section. All you really need to change here is the z-index. Make sure it is at least one less than the hover button.


Example:
    #comments{properties: values; z-index:2;}
    #comments:hover{properties: values; z-index:1;}

    #about ol{properties:values; z-index:3;}
    #about ol:active{properties:values; z-index:1;}


If you haven't figured out by now, this is what is happening: we are using a combination of two sections to create something that appears to be a section that opens on click. The section is really just a hover section, but the custom section is blocking the section, making the viewer unable to activate the hover. Instead, they hover over the custom section. Once the custom section is clicked, the z-index changes, and the custom section is pushed underneath the hover section, activating the :hover properties of the section. The section will remain active until the viewer removes their mouse from the area.

So, tada! You now have a section that is only opened when clicked on!

Quick Reply

Submit
Manage Your Items
Other Stuff
Get GCash
Offers
Get Items
More Items
Where Everyone Hangs Out
Other Community Areas
Virtual Spaces
Fun Stuff
Gaia's Games
Mini-Games
Play with GCash
Play with Platinum