Egotistically
Egotistically
(?)Community Member
- Report Post
- Posted: Fri, 25 May 2012 06:32:52 +0000
Table of Contents
Mandah's Blurb
Simple Rules
GIMP: What is it?
The Basics
Toolbox
Quick Checklist
Making a Basic GFX
Added Effects
Tech. Assistance
Extra Help
Random Helpers
Chatty Munchkins
Credit
Egotistically
(?)Community Member
- Report Post
- Posted: Fri, 25 May 2012 06:33:06 +0000
Hello, my name is Amanda and I decided to attempt a "help guide" for my friend, but am
offering it for you all to use as well. I am not looking for credit in all of your works, or to tell you
how to do anything if you already know how to; this is just me explaining how I get my own
graphics created. Of course, there are hundreds of different ways to do it, but this is mine. If
you have anything you would like to add to this, I would be happy to add it and give you credit
for it, but I'm really not looking for any critique or harassment. I just want to help a few of you
get out there and use this free program while we can. After a while, when you begin to get in the
habit of doing things, it just becomes routine and it can even get fun, so enjoy it!
This guide may be helpful for creating post layouts -- but, I will just add that I am not going
through a lesson on coding, I'm honestly not the best at that and I tend to add my lyrics into the
image as you will see in the end, or if you stop by the samples -- and things such as banners
or buttons. It could, evidently, help with profile images, but I honestly am not experienced in that
field. So, if you want to learn how to make some 'interesting' or 'cool' graphics, I would
recommend having a peek through this thread. I'm not the best out there, and all of you may
surpass me in days, but I can guarantee you'll start getting the hang of it if you stick to it! It
takes a while to learn on your own, so hopefully this will speed up the learning process.
I will try to keep this as simple yet helpful as possible, but I am just covering one thing: the
basic image. I will, by no means, be using every single option there is, but you really do not
need to. Anyways; come, enjoy, and ask questions if you need help or if something isn't
working so well for you! Hey, you can also boast those images you create and are proud of;
you'll see improvements in no time. Oh, and please note that this guide is made in regards to
GIMP 2.6 [as I and many others find that GIMP 2.8 pales in comparison] so it may be a little
harder if you are on a different version of it, but many things should correlate.
Egotistically
(?)Community Member
- Report Post
- Posted: Fri, 25 May 2012 06:33:43 +0000
Obey the Terms of Service.
Do not steal or take credit for other peoples' work -- that includes my own work and anyone else
who had decided to share their creations. We are looking to learn, share, and improve ourselves,
not lurk around the thread until you see something you like. Un-uh. If you ask me to, I may attempt
to make you a graphic, but I will not stand stealing of any kind. Big no-no.
If you do not like it, stop reading. You are not obligated to read it from start to finish. This is here
to help you, not bore you to tears and make you want to shoot someone.
Be respectful of those around you and do not give unwanted critique. If they ask for it, fine by
me, but otherwise it's unwarranted harassment. Advice is nice, just don't forget that we are all
learning as we go.
If you would like to share your work in the thread, go ahead~! And if you want to proclaim it
under the 'samples' section as an "I made this using this GIMP guide~!" Simply follow the link
and post it yourself -- you could even write a little note/blurb like a 'guest log' sort of deal.
Anything you choose~! But, it is not required; it's only if you would like to.
Other then that, use your best judgement. I shouldn't have to tell you not to down talk other
people's work or the like. We're big kids.
Egotistically
(?)Community Member
- Report Post
- Posted: Fri, 25 May 2012 06:33:59 +0000
GIMP is a versatile graphics manipulation package, much like Photoshop, CS5, and the like. You
can alter, enhance, crop, and layer images to your hearts content and it's all very much free.
You are free to either search it up on google if you do not possess it, but I will also offer you a link
to the download page on the GIMP website. If you do not have GIMP and/or never intend to get it,
you will more than likely be able to use photoshop and still follow the guide in a fairly similar way --
there will be things in different locations, but a great portion should remain similar since most of
these things are transferable between the two programs. So, just to repeat it, many things are
similar between the two programs, but some things may be located in a different position. But, this
little guide is written for those who are strictly using GIMP, so I apologize for any inconveniences; I
just hope it helps!
Egotistically
(?)Community Member
- Report Post
- Posted: Fri, 25 May 2012 06:35:08 +0000
When you download GIMP you start off with the basic things, and that includes brushes and
patterns. To get more brushes and patterns you will have to download them from select
websites -- it may take a bit of hunting at first, and the process is very boring. You'll basically
need to find a website through google ( it's easier to search "Download GIMP Brushes Free" )
such as but it may take a few tries until you get a website suitable for yourself. On that
website, you can search through brushes and when you find some you like, simply download it.
Once it's downloaded you'll need to go into your GIMP folder and move everything to the
proper places. For example, if you download a brush you'll need to open both the download
folder and brush folder inside the GIMP folder; when you have them open, drag over all of the
proper icons in your download folder into the GIMP brushes folder. Here is an example of what
it looks like.
Just like with brushes and patterns, if you want a more averse selection of fonts, you'll need to
download them before hand from proper websites, such as urbanfonts.com. But, unlike when you
download the brushes and patterns, once you have a font downloaded, you'll need to open up the
downloaded folder, click on the font (you will know it's the one since it'll show you what different
sizes of the font look like) and it should have an 'install' button at the top. Click it, install it, and
close it. Your font will now be available on Microsoft Word, GIMP, Paint, Photoshop, and a few
other programs.
All your layers will be located on the right side of the screen on your second pop-up screen.
When doing more complex graphics, you'll use this more frequently, but the upside is that you
can merge layers together and move them around as a whole, even if it's just to clear up some
clutter.
Egotistically
(?)Community Member
- Report Post
- Posted: Fri, 25 May 2012 06:35:31 +0000
A-1 > Rectangle Select Tool; Select a rectangular region
A-2 > Ellipse Select Tool; Select an elliptical (circular) region
A-3 > Free Select Tool; Select a hand-drawn region with free and polygonal segments
A-4 > Fuzzy Select Tool; Select a contiguous region on the basis of colour
A-5 > Select by Colour Tool; Select regions with similar colour
B-1 > Scissor Select Tool; Select shapes using intelligent edge-fitting
B-2 > Foreground Select Tool; Select a region containing foreground objects
B-3 > Paths Tool; Create and edit paths
B-4 > Colour Picker Tool; Set colours from image pixels
B-5 > Zoom Tool; Adjust the zoom level
C-1 > Measure Tool; Measure distances and angles
C-2 > Move Tool; Move layers, selections, and other objects
C-3 > Alignment Tool; Align or arrange layers and other objects
C-4 > Crop Tool; Remove edge areas from image or layer
C-5 > Rotate Tool; Rotate the layer, selection or path
D-1 > Scale Tool; Scale the layer, selection or path
D-2 > Shear Tool; Shear the layer, selection, or path
D-3 > Perspective Tool; Change the perspective of the layer, selection, or path
D-4 > Flip Tool; Reverse the layer, selection or path horizontally or vertically
D-5 > Text Tool; Create or edit text layers
E-1 > Bucket Fill Tool; Fill selected areas with a colour or pattern
E-2 > Blend Tool; Fill selected areas with a colour gradient
E-3 > Pencil Tool; Hard edge painting using a brush
E-4 > Paintbrush tool; Paint smooth strokes using a brush
E-5 > Eraser Tool; Erase to background or transparency using a brush
F-1 > Airbrush Tool; Paint using a brush, with variable pressure
F-2 > Ink Tool; Calligraphy-style painting
F-3 > Clone Tool; Selectively copy from an image or pattern, using a brush
F-4 > Healing Tool: Heal image irregularities
F-5 > Perspective Clone Tool; Clone from an image source after applying a perspective transformation
G-1 > Blur / Sharpen Tool; Selective blurring or unblurring using a brush
G-2 > Smudge Tool; Smudge selectively using a brush
G-3 > Dodge / Burn Tool; Selectively lighten or darken using a brush
You will not have to know what all of these mean when you're creating basic graphics, but it
helps to understand the basics, especially if you want to know how to do more complicated
things. This just makes an easy reference to most of the buttons when I am describing how to
do a certain procedure.
Egotistically
(?)Community Member
- Report Post
- Posted: Fri, 25 May 2012 06:36:17 +0000
Do you have a variety of brushes and/or you would like to use and/or specifically for the graphic
you are intending to create? If you are in the middle of creating graphics and you realize that
none of the brushes you have really 'go with' what you are trying to create, you would either
have to suck it up and deal with it, or find new brushes and restart your graphic. If you download
new brushes with the GIMP program still running, they will not load and you will be unable to
use them until you restart the program.
Do you have the fonts you wish to use installed? Just like with brushes, you will need to restart
the whole program in order to access new fonts, so make sure you get some before beginning
your work. But, the good thing about fonts is that you normally use them after your graphic is
made and can simply add it on top of what you already have -- although, it's best to be safe.
Have you found a picture you wish to use? This one should be obvious, but you do need something
to work with! Luckily, you will still be able to access newly saved images without restarting the
GIMP program, so if you're still unsure, it's okay!
Egotistically
(?)Community Member
- Report Post
- Posted: Fri, 25 May 2012 06:36:39 +0000
I made a youtube video which basically covers the followings steps here. The image is of a
near-kiss between two anime guys, but it was because I was doing something in regards to it.
If you would rather look at a different image (although this one really isn't that horrible), then
I will get another one up of a more heterosexual (if anything) nature. Just request it in the
thread. The more it's requested, the quicker I'll get to it.
Make sure you have everything you need before starting the program, such as brushes, patterns,
and fonts.
Start GIMP -- It may take a minute to load.
Open the image you wish to modify by pressing CTRL+O or by going to Files > Open.
Keep an eye on your zoom level and make sure your image isn't too big (I would approximate
having anything over 1000px by 1000px to be 'too' big. This can be easily avoided by checking
the 'zoom' level; if it's at 22%, your image is way too big! If it's at 66.7% or 100%, it should be
alright. If a ton of the image is excess stuff and the area you are focusing on is small, it should
be fine. You are also able to pre-crop it to a more suitable size if you have way too much excess
space (simply select the crop tool and drag the mouse to create a box) or by resizing the image
by going to Image > Scale Image. But, please make sure you have extra space so your brushes
don't get cut off; it affects the outcome you more than likely desire by making it look a bit boxy.
When you believe your image is suitable in size, we can start the fun stuff!
If you're a little lost, your screen should look somewhat like this
Activate the image mask. There should be a button in your bottom left hand corner that looks
like this
The mask should now be activated and your image should have a red layer over it, like this.
If your screen appears differently, it may be because you have something selected. If you do,
deselect it.
Now it's time to start playing with brushes. But, if your screen is red like this, you will need to
use the eraser option (E-5) instead of the actual brush option (E-4). When you use the eraser,
you should start seeing the original colours of your image peek out, like this. If you prefer the
other way, you can instead select the whole image and then press the mask button, but your
screen will appear normal. You will know you're in the mask if you use your brush and it makes
your image turn red, like this. But, to cause less confusion, I advise using the former route.
Press your brush icon to get to your list of brushes and go wild! You don't need to use just one
brush; use as many as you like, but just remember that if you overlap them so much you'll only
be able to see the outside design.
Keep playing with images -- overlap them to create new designs; example.
If you finish your design and you have red marks over the centre of your'main' image, take the
plain small circular eraser-brush and wipe them away so it goes from something like this to this.
When you feel you're done, we're ready for the next step.
Press the masking button to unmask it. It should now look like this.
If you press the 'delete' button, the image you wanted would of been deleted and would appear
like this. If you did press it, press CTRL+Z it to undo it, or go to Edit > Undo Clear.
We want the opposite of that, so with our image still selected as it should be, we're going to
press CTRL+I, or go to Select > Inverse for it to select the opposite of what it was currently
selecting.
With the image inversed, press delete or go to Edit > Clear. Your image should now appear like
the image you designed in the mask; reference
With your graphic now created, you are now able to properly crop away all that white space, or
look towards the added effects to give it some possible 'oomphf'.
Egotistically
(?)Community Member
- Report Post
- Posted: Fri, 25 May 2012 06:37:33 +0000
With your image still selected -- if you accidentally unselected it, simply press CTRL+Z or Edit >
Undo to bring the selection back up. With the image selected, go to Filter > Shadow and Light >
Drop Shadow.. and click. You should get a pop-up which may appear on your task bar instead of
just 'popping up' (if it does, simply click it).
Change the 'Offset X' to something of your preference -- I use two.
Change the 'Offset Y' to something of your preference -- I use two.
Change the 'Blur Radius' to something of your preference -- I use four.
In fact, you can change everything to your liking, but unless my picture is a little too see-
through, I tend to leave the Opacity at 80 -- sometimes I change it to 30.
Experiment as you wish, though your picture should look somewhat like this at the end.
Create the line of text you wish to use using the Text Tool.
Select the 'Path From Text' button on the lower half of the toolbox -- you will need to scroll down
to find the button.
Press SHIFT+V or go to Select > From Path in order for your text to become selected.
Optional Step -- create a text outline or two before continuing (scroll down to learn how).
With the font and/or text outline still selected, go to Filters > Light and Shadows > Drop Shadow
and select the preference you wish to use.
Click 'OK'. Your font should now have a drop shadow to your liking.
Open GIMP
Press CTRL+N or go File > New to get the pop-up for a new document.
Use these settings.
Zoom into 3200%; image reference.
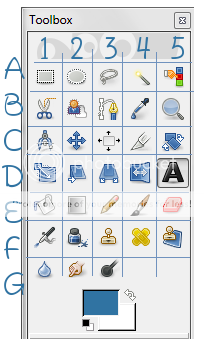
Go to the pencil tool (E-3) and select the smallest circle possible which is called Circle (01).
*Important Note from Sweetie Appleberry: In GIMP 2.8 the brush you used for the lines tutorial
isn't called Circle brush, its called Pixel. They're both brushes you automatically have with GIMP.
Leave the opacity at 100%, the scale at 1.00 and the colour black (#000000).
Starting from the top left hand corner, you will make one square. From there, you will skip three
(leave them blank, transparent, and untouched) and mark one. Your first row should look like
this.
Make a new square to the bottom left of each dot -- your second row should look like this and your
third row should look like this. If you want to speed up the process, just continue with one line at
a time; reference.
When you're finished (which should really take you a minute tops) your finished product should
appear like this (zoomed out to 2300%) And, just a
note -- Do not short cut this process, simply moving it to 10px by 10px will distort the image and
it will not come out as lines, trust me.
With the image as is, save it by pressing CTRL+S or going into File > Save but instead of leaving
it as a .jpg, .png, or .xcf, you will be saving it as a ".pat" file. For example: "Lines-1.pat"
Another window will pop up and whichever name you choose for it here
will be what it's titled in your patterns section. If you do not save it to your patterns folder and
instead save it into your pictures, you will need to do the following extra step.
*Important Note from Hello Honey Lemon: If you have GIMP 2.8 you won't be able to save it as a
.pat file and will instead need to export the file since it won't allow you to save a .pat file.
Open the folder you save your lines pattern in as well as the folder for your GIMP patterns. Drag
it over from your pictures to your patterns.
If you would like to also have the option of your lines going in the opposite direction without
redoing all of this work, go into Images > Transform > Flip Horizontally and then press the
CTRL+Shift+S buttons or go to File > Save as.. and repeat stepts 15-18
Press the refresh button on your right-hand window and/or open an image
document to test it out on.
Your final product? Slanted lines!
Follow the above guide to get the 'slanted line pattern'.
Repeat Steps o1 to o7 from the below section/guide on how to make a text outline.
Make a new layer and leave it above the font layer, like this.
Select the slanted line pattern.
Press CTRL+; or right click the screen and go Edit > Fill with Pattern or go Edit > Fill with Pattern.
Deselect and save, or try to do something a little more by combining the above (simply 'grow' the
selection, make a new layer below the font layer, and fill it with a new FG colour.)
Be creative! Either way, the final product gives you slanted line text!
Open GIMP
Open a new image, use the graphic you made, or open a blank page with a white background.
Choose the Text Tool (D-5)
ick a font, size, and/or colour that you like, then create a text box and write what you wish to write; reference.
Click on the text with the text tool so it's selected; if the "GIMP Text Editor" pop up appears, just
click 'cancel' or press the 'esc' button.
Scroll down on the bottom toolbox section and click 'Path From Text'; one click is all it takes.
Now press Shift+V or Select > From Path -- your font should now be selected.
There is no shortcut for the next step; go Select > Grow.. and choose how many px's you want
to increase the size by (AKA: do you want a bigger highlight (higher number) or a smaller one
(lower number)? If unsure, start with/try two.) and press 'OK'. Check this for a reference.
Create a new layer by pressing the new layer button, pressing Shift+CTRL+N, or
going Layer > New Layer.
Name the new layer and/or press "OK"
Move the layer down by selecting the new layer and pressing the down arrow.
Change your foreground colour to something different. I recommend using a darker shade, but you
may use whatever colour you like!
Now, make sure you are in your new layer (that should be located below your font layer). Check
for a reference.
Press CTRL+, or right click anywhere on the screen and go to Edit > Fill with FG Colour. Here's
a reference image.
Repeat steps o9 to 17 for additional highlights, but have each new colour on a new layer located
below the last one.
Press CTRL+A or Select > Deselect -- your font should now be highlighted.
100 is a completely solid image and 0 is an invisible image. Adjust to your liking.
Have your banner/selection in the middle of some 'white space' so it can be expanded upon.
If you are selecting a pre-cut banner, make sure you evenly select it by zooming up close.
Select > Grow > 3 px (You can change it if you like, this is just my recommendation)
Click OK
Right click > Edit > Stroke Selection -- you should get a new window.
Adjust the line width (I recommend using 1 or 2 px) and choose whether you will use a pattern or
your foreground colour for the colour of the lines.
Click on the 'Line Style'
Click the drop box of the 'Dash preset'
Use the preset you like or create your down by clicking the little lines on the 'Dash Pattern' box.
Press 'Stroke'
Egotistically
(?)Community Member
- Report Post
- Posted: Fri, 25 May 2012 06:38:12 +0000
If GIMP is glitching for you, or you think you may of messed up the downloading / installation
process, you can uninstall it and start from scratch, attempting these guidelines.
Go to the GIMP website and download it. I haven't actually done this process in over a year or two,
but follow all the instructions; wait for it to download and then follow-up with the installation process.
If you would like to have the GIMP user manual at hand, scroll down a bit and download
it in your respective/wanted language. They are included separately because the download size
is very large. It should not take long for this to download and it will not hurt anybody -- I have one
installed in English, though I don't necessarily use it all too much.
Now, everything should be downloaded and located in their respective places -- do not move
things around from their folders.
You can search "GIMP on your computer and if it comes out as the program, either pin it to your task bar
or start menu by right clicking it and selecting "Pin to task bar" or "Pin to start menu." If you do
not have those options, you are always able to drag them over, but only move the program and/or
create a shortcut of the program. If that doesn't work, you can choose the long way (See steps o5 to 1o).
Open your start menu and go into "My Computer".
Go into Local Disk (C:).
Enter your program files. I you have two options like I do,
you may need to check both. My GIMP is located in my "Program Files (x86)"
All my folders / files are found alphabetically (if yours aren't, just click on the "name" word/button
and it should sort them from A-Z. Select your GIMP file; the numbers following may vary.
Click the folder labelled 'bin'.
Your GIMP program will be found here.
Do not separate or move around your GIMP files because it may or may not mess up any future
processes you may be required to do.
Find and downloaded all of the free and/or bought brushes you desire, but the brushes will need
to be made and designed for GIMP although some photoshop / CS5 ones might work. They will
normally be labelled "GIMP Brushes" or "GIMP and/or Photoshop brushes" so sometimes it may
be hit or miss, so don't worry if one or two won't work. Also, when you download new brushes
you will need to restart GIMP before they register / load, so go brush hunting before you try to
create new images unless you are satisfied with the brushes you have.
Satisfied? Open up the folder in which you downloaded them into (ie: the download folder) and
open up the brushes folder through the search bar or by going through the step-by-step process in
this similar order. I recommend using the former (by search).
Have your two folders open and drag them from the download folder (or wherever you have them
stored) and into the brushes folder.
Open GIMP.
All of your new brushes should be available and seen by clicking the image icon on the brush
and/or eraser tool in the lower section of the toolbox.
Open your home directory.
Press CTRL+H to show hidden files.
Look for ".gimp-2.6" or ".gimp-2.8"
Find "Scripts" inside there.
Put your .scm files there.
Don't forget to do: Filters -> Script-Fu -> Refresh Scripts
Answered by psychic stalker.
Egotistically
(?)Community Member
- Report Post
- Posted: Fri, 25 May 2012 06:38:56 +0000
Egotistically
(?)Community Member
- Report Post
- Posted: Fri, 25 May 2012 06:39:39 +0000
Elizabeth Amriel
x e I I i x
The Soulless Puppet
Final Fantasy Bandit
Hello Honey Lemon
psychic stalker
Egotistically
(?)Community Member
- Report Post
- Posted: Fri, 25 May 2012 06:40:27 +0000
Elizabeth Amriel
x e I I i x
The Soulless Puppet
Yuri Takakuwa
Sweet AppIe Blossoms
Final Fantasy Bandit
Hello Honey Lemon
svnoyi inali
Spreader of Despair
Hitokiri Hitaru
l N ii n j a l
PolarBears In Your Pants
foxycake
psychic stalker
Funkalicious Cookie
Doover
Lady Psychopath
Marffiie
Totenglaut
Sitwon
The Chaos Is Controlled
nough said
BloodyLovely
Ruined Rose
Daintea Cupcakes
Cataclysmic Catharsis
Suicide Salvation
Purpleinator
Medikament
xDaishox
Luna Rousse
dragonrider47
Noryoku Kiyama
Pistol Annie
Nyxie_Night
MissButtercupBliss
Shameless Punk
Kimiko Doll
lawl f e l i n e
Orgasim dreams
shiroi_karasumuse
sexy vampire mojo
Usaki Tsukino
lawlfactory
Egotistically
(?)Community Member
- Report Post
- Posted: Fri, 25 May 2012 06:41:07 +0000
Made by Egotistically
Graphics by Egotistically
Coding by Egotistically
Last Updated January 12, 2013
GIMP 2.6
GIMP 2.8
Deviantart.com
Zerochan.net
Safebooru.org
Various Pattern / Brush Websites
This guide was first made for Mooshiball but shared for everyone to get help.